This no baked raspberry cheesecake is the kind of dessert that looks impressive but secretly asks very little from you. Instead of dealing with a water bath, cracked tops, or an oven heating up the whole kitchen in July, you get a cool, creamy cheesecake with a buttery crust and bright raspberry flavor.
Even better, it keeps things simple while still tasting like something you’d order at a little bakery café on a weekend getaway. The texture is smooth and creamy, the flavor is lightly tangy, and every bite has that fresh raspberry sweetness. Plus, you can make it ahead, stash it in the fridge, and pull it out when life gets hectic—which, honestly, is most weekdays.
So, if you’re craving a dessert that feels special without turning your kitchen upside down, this one’s for you.
Why This Cheesecake Works So Well for Busy Home Cooks
There’s something comforting about a dessert that doesn’t demand perfection. This cheesecake isn’t fussy. It doesn’t punish you for opening the oven door too early because, well, there’s no oven involved.
The filling comes together with cream cheese, whipped cream, raspberries, and a handful of pantry staples. The crust takes maybe five minutes. Most of the “work” is simply letting the fridge do its thing.
And the flavor? That’s where this recipe quietly steals the show.
The raspberries cut through the richness so the cheesecake tastes fresh instead of heavy. You get creamy filling, buttery crust, tart berry notes, and that cold, silky texture that somehow feels extra satisfying on warm afternoons.
A few reasons people keep making it again and again:
- No baking required
- Great make-ahead dessert
- Minimal cleanup
- Uses simple grocery store ingredients
- Easy enough for beginners
- Fancy enough for birthdays or holidays
Honestly, it’s the kind of dessert that makes people think you tried harder than you actually did.
Ingredients You’ll Need
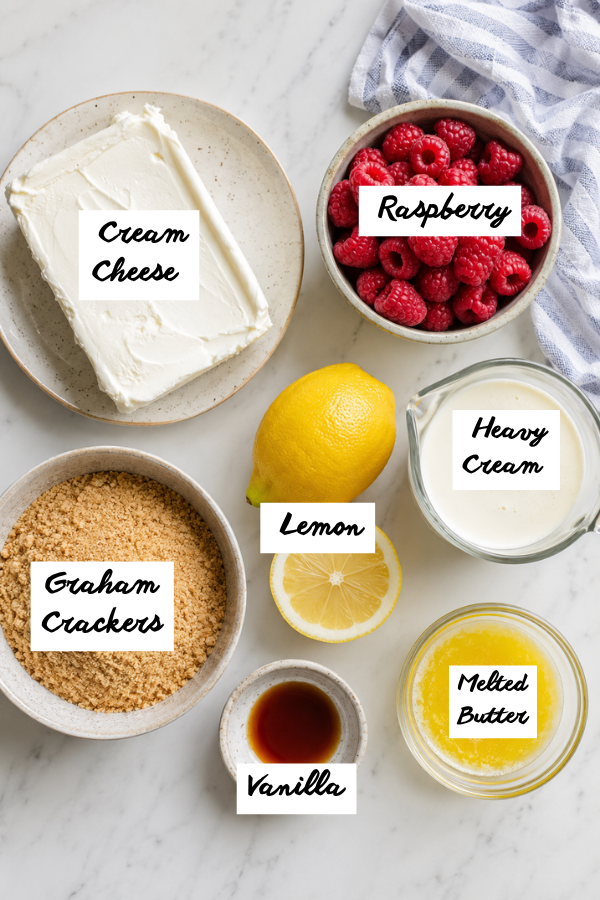
For the Graham Cracker Crust
- 2 cups graham cracker crumbs
- 6 tablespoons melted butter
- 2 tablespoons sugar
- Pinch of salt
That pinch of salt matters more than you’d think. It keeps the crust from tasting flat.
For the Raspberry Cheesecake Filling
- 16 oz full-fat cream cheese, softened
- 1 cup powdered sugar
- 1 teaspoon vanilla extract
- 1 tablespoon lemon juice
- 1 ½ cups heavy whipping cream
- 1 ½ cups raspberries (fresh or frozen)
Frozen raspberries work beautifully here. Actually, they’re often more flavorful outside peak berry season.
Optional Toppings
- Fresh raspberries
- Raspberry sauce
- Whipped cream
- Lemon zest
- White chocolate shavings
You don’t need all of them. But a few fresh berries on top instantly make it look bakery-worthy.
Step-by-Step Instructions
Step 1 – Crush and Mix
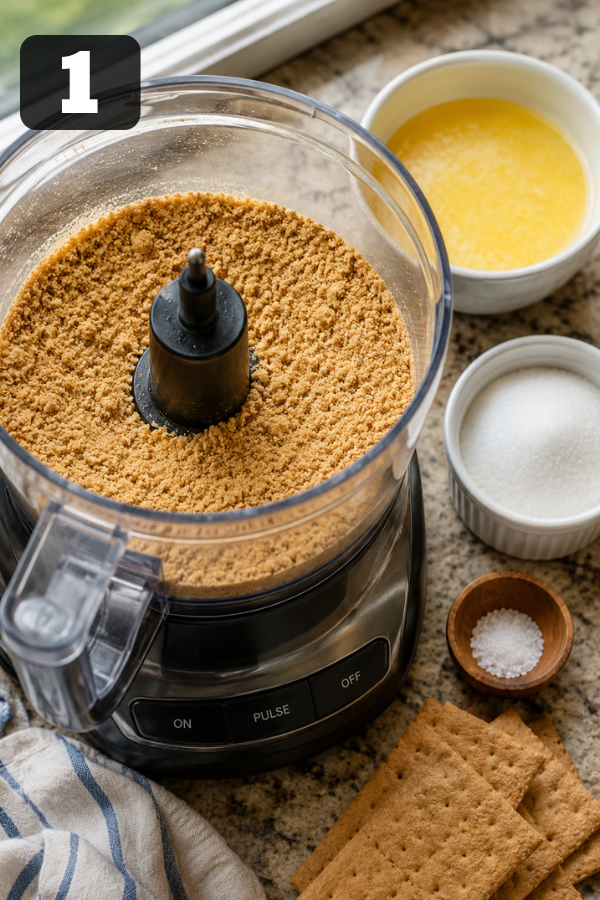
Add graham crackers to a food processor and pulse until sandy. Mix with melted butter, sugar, and salt.
The texture should resemble damp beach sand. If it looks dry and crumbly, add another spoonful of butter.
Step 2 – Press Into the Pan
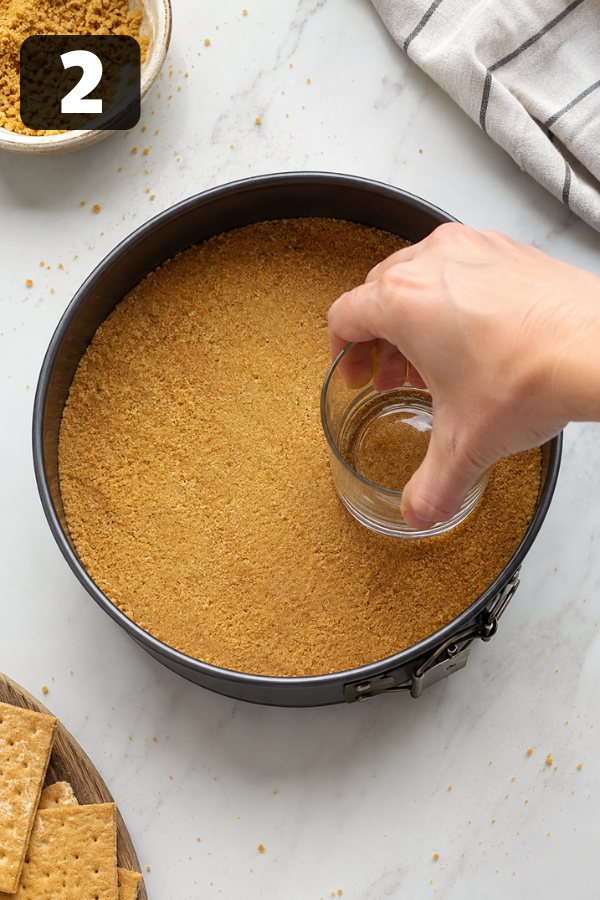
Press the mixture firmly into the bottom of a springform pan.
Use the bottom of a measuring cup to flatten everything evenly. That little trick helps the crust stay together when sliced.
Step 3 – Chill While You Make the Filling
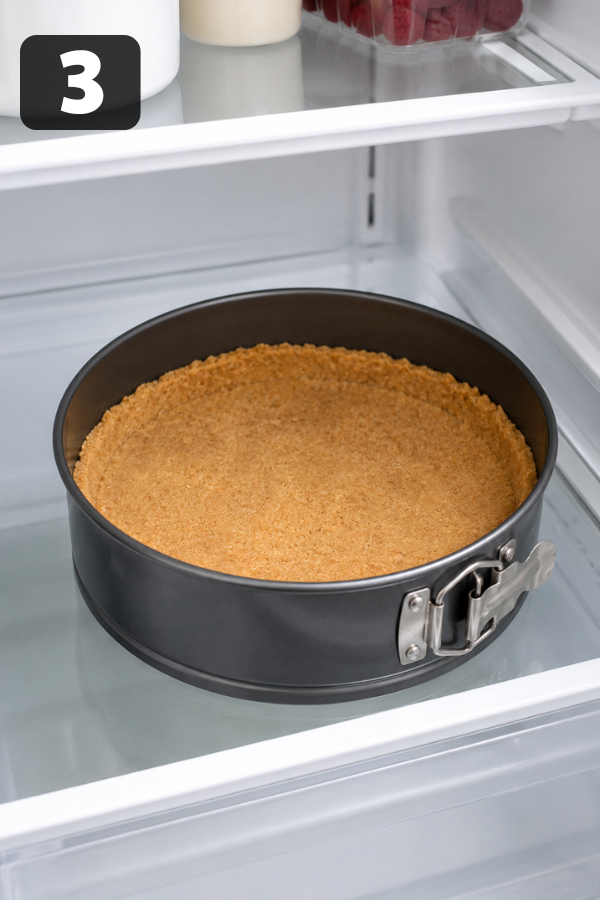
Place the crust in the refrigerator for about 20 minutes.
Cold crust = cleaner layers later. Small detail, big difference.
Step 4 – Make the Raspberry Mixture
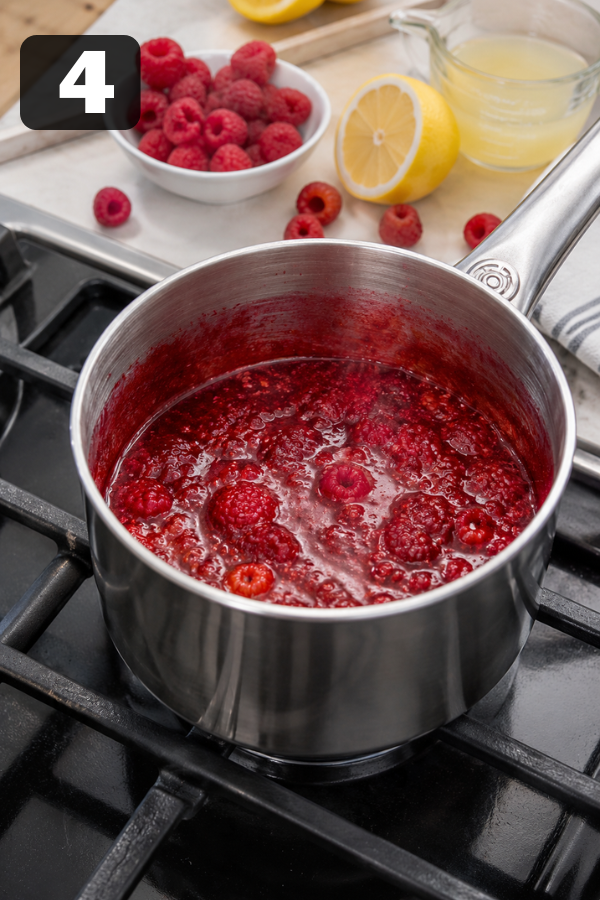
Add raspberries and lemon juice to a saucepan over medium heat.
Cook for 5–7 minutes until the berries break down into a jammy sauce.
If you dislike seeds, strain the mixture through a fine mesh sieve. Some people skip this step. Some swear by it. Honestly, either version tastes good.
Let the raspberry mixture cool completely before using.
Warm berries can ruin the texture of the filling. Learned that the hard way once.
Step 5 – Beat the Cream Cheese
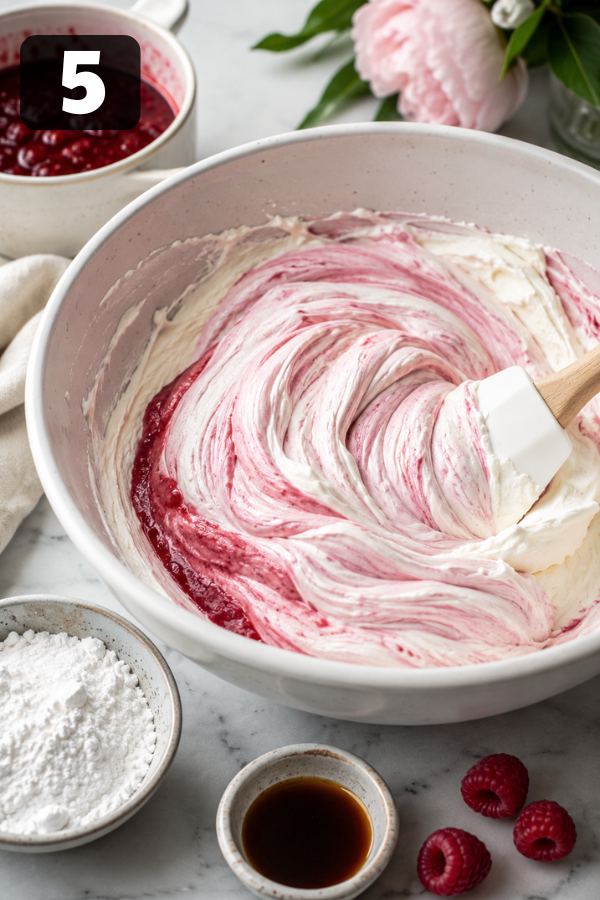
In a large bowl, beat softened cream cheese until smooth.
No lumps. Seriously—take an extra minute here.
Then mix in:
- Powdered sugar
- Vanilla
- Cooled raspberry mixture
The color turns into this soft blush pink that already feels like summer.
Step 6 – Whip the Cream
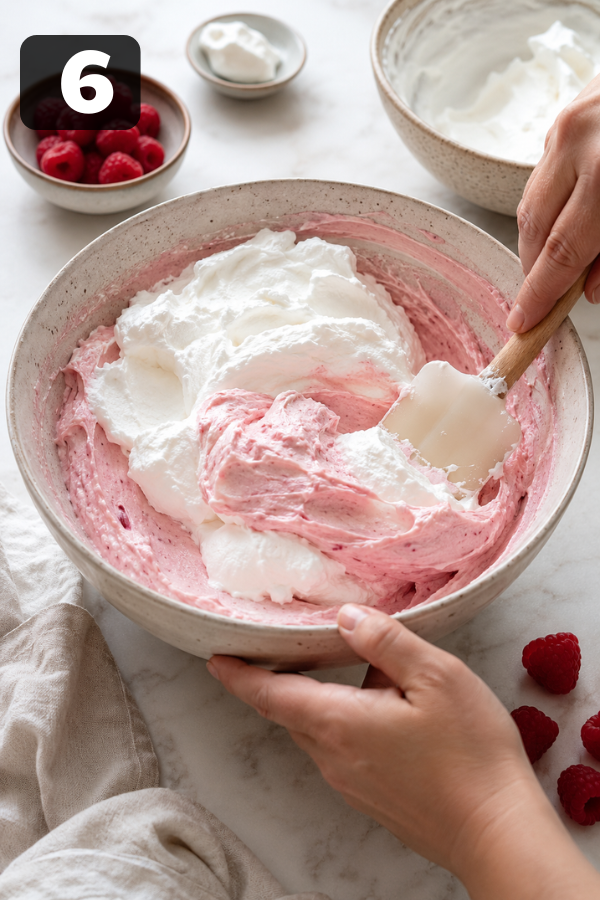
In a separate bowl, whip heavy cream until stiff peaks form.
Don’t overmix. You want structure, not butter.
Then gently fold the whipped cream into the raspberry cream cheese mixture.
This is where the filling becomes airy and silky instead of dense and heavy.
Kind of like folding clouds into cheesecake. Dramatic comparison? Maybe. But also accurate.
Step 7 – Spread the Filling
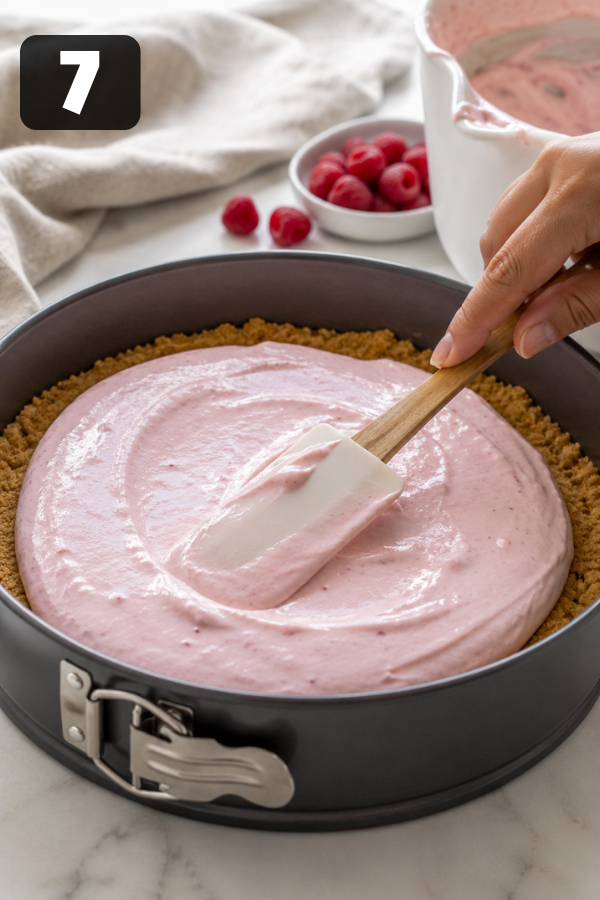
Pour the filling over the chilled crust.
Smooth the top with a spatula.
If you want a prettier finish:
- Swirl extra raspberry sauce on top
- Add whole berries
- Pipe whipped cream around the edges
Step 8 – Chill Until Firm
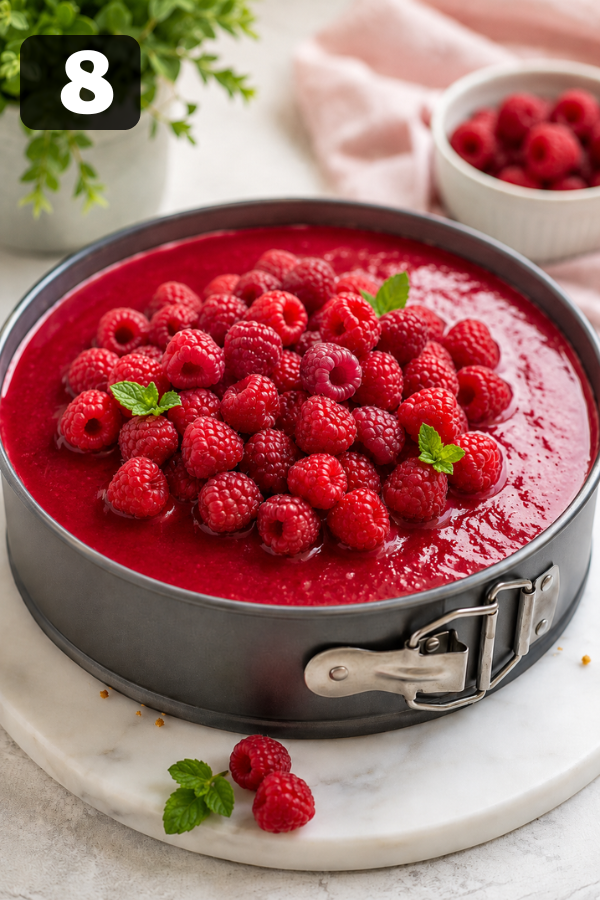
Refrigerate for at least 6 hours.
Overnight is even better.
You know what? This is one of those desserts that actually improves the next day. The flavors settle, the texture firms up, and slicing becomes much easier.
Common Mistakes (and How to Avoid Them)
Cheesecake Too Soft
Possible causes:
- Filling wasn’t chilled long enough
- Whipped cream was under-whipped
- Raspberry mixture was too warm
Fix:
- Chill overnight
- Use cold heavy cream
- Let cooked berries cool completely
Filling Looks Lumpy
Usually caused by cold cream cheese.
Softened cream cheese blends much more smoothly. Leave it out about 30–45 minutes before starting.
Crust Falls Apart
That normally means:
- Not enough butter
- Crumbs were too coarse
- Crust wasn’t packed tightly enough
Press firmly. Really firmly.
Easy Variations If You Want to Change Things Up
Lemon Raspberry Cheesecake
Add:
- Extra lemon zest
- More lemon juice
This version tastes especially bright and fresh during spring and summer.
Chocolate Raspberry Cheesecake
Swap the graham crackers for crushed Oreos.
Then drizzle melted chocolate on top.
Raspberry and chocolate together feel a little nostalgic—like those fancy chocolate boxes people save for holidays.
Mini Cheesecake Cups
Perfect for:
- Baby showers
- BBQs
- Meal-prep desserts
- Portion control
Use jars, cupcake liners, or small glasses.
No slicing needed.
Storage Tips That Actually Matter
In the Refrigerator
- Best within 4–5 days
- Keep covered tightly
In the Freezer
Yes, you can freeze it.
Wrap slices individually and freeze for up to 2 months.
A frozen slice with coffee on a hot afternoon? Pretty underrated, honestly.
Best Way to Thaw
Transfer to the refrigerator overnight.
Avoid microwaving—it changes the texture fast.
What to Serve With No Baked Raspberry Cheesecake
Drinks That Work Well
- Coffee
- Iced latte
- Sparkling lemonade
- Rosé wine
- Hot tea
Light Meal Pairings
After:
- Grilled chicken
- Summer salads
- Pasta dinners
- Seafood meals
It’s rich enough to feel indulgent but fresh enough that it doesn’t weigh everyone down afterward.
Nutrition Info
Estimated per slice (based on 8–10 servings)
- Calories: 380–450 kcal
- Carbohydrates: 28–35g
- Protein: 5–7g
- Fat: 26–32g
- Sugar: 18–24g
FAQs
1. Can I use frozen raspberries?
Absolutely. Thaw and drain them first for best results.
2. Do I need gelatin?
Not necessarily.
Whipped cream helps the cheesecake hold its shape naturally. Gelatin simply creates a firmer texture.
3. Can I make this ahead of time?
Yes—and you probably should.
It tastes better after chilling overnight.
4. Can I use low-fat cream cheese?
You can, but the texture won’t be as creamy or stable.
Full-fat cream cheese gives the best results.
5. How long does it need to chill?
At least 6 hours.
Overnight is ideal.
Final Thoughts
This no baked raspberry cheesecake is proof that an easy dessert can still feel special. With its creamy texture, bright raspberry flavor, and simple no-oven method, it’s the kind of recipe you’ll want to keep on repeat for busy weeknights, holidays, and summer gatherings. Make it ahead, chill, slice, and enjoy every creamy bite.
Don’t Miss: Chocolate Raspberry Cake
Don’t Miss: Lemon Blueberry Cake
Also Try: Easy Lemon Blueberry Trifle

Ingredients
Method
- Step 1 – Crush and MixAdd graham crackers to a food processor and pulse until sandy. Mix with melted butter, sugar, and salt.The texture should resemble damp beach sand. If it looks dry and crumbly, add another spoonful of butter.

- Step 2 – Press Into the PanPress the mixture firmly into the bottom of a springform pan.Use the bottom of a measuring cup to flatten everything evenly. That little trick helps the crust stay together when sliced.
- Step 3 – Chill While You Make the FillingPlace the crust in the refrigerator for about 20 minutes.Cold crust = cleaner layers later. Small detail, big difference.
- Step 4 – Make the Raspberry MixtureAdd raspberries and lemon juice to a saucepan over medium heat.Cook for 5–7 minutes until the berries break down into a jammy sauce.If you dislike seeds, strain the mixture through a fine mesh sieve. Some people skip this step. Some swear by it. Honestly, either version tastes good.Let the raspberry mixture cool completely before using.Warm berries can ruin the texture of the filling. Learned that the hard way once.
- Step 5 – Beat the Cream CheeseIn a large bowl, beat softened cream cheese until smooth.No lumps. Seriously—take an extra minute here.Then mix in:Powdered sugarVanillaCooled raspberry mixtureThe color turns into this soft blush pink that already feels like summer.
- Step 6 – Whip the CreamIn a separate bowl, whip heavy cream until stiff peaks form.Don’t overmix. You want structure, not butter.Then gently fold the whipped cream into the raspberry cream cheese mixture.This is where the filling becomes airy and silky instead of dense and heavy.Kind of like folding clouds into cheesecake. Dramatic comparison? Maybe. But also accurate.
- Step 7 – Spread the FillingPour the filling over the chilled crust.Smooth the top with a spatula.If you want a prettier finish:Swirl extra raspberry sauce on topAdd whole berriesPipe whipped cream around the edges
- Step 8 – Chill Until FirmRefrigerate for at least 6 hours.Overnight is even better.You know what? This is one of those desserts that actually improves the next day. The flavors settle, the texture firms up, and slicing becomes much easier.


