Beef and Cheese Chimichangas are one of those dinners that feel a little indulgent—but in the best way. Think crispy golden tortillas wrapped around juicy seasoned beef and melty cheese, all done in under 40 minutes. It’s simple, budget-friendly, and honestly… kind of addictive.
Whether it’s a busy weeknight or a laid-back weekend, this is the kind of comfort food that doesn’t require a complicated plan.
What Exactly Are Chimichangas—and Why Are They So Irresistible?
Let’s start simple.
A chimichanga is basically a burrito that takes things one step further. Instead of staying soft, it’s fried (or baked, or air-fried) until crispy. Because of that, the texture changes completely.
The outside turns golden and crunchy, while the inside stays warm, cheesy, and rich. As a result, you get contrast in every bite—and that’s exactly why people keep coming back to it.
Even better, while chimichangas feel restaurant-level indulgent, they’re surprisingly easy to make at home. You don’t need fancy ingredients, and you don’t need special skills either. All you really need is a skillet, some tortillas, and a little confidence.
Why You’ll Love This Recipe (Even on a Busy Weeknight)
You know those meals you make once… and then they quietly become part of your routine? This is one of them.
- Ready in about 30–35 minutes
- Uses everyday ingredients (nothing fancy or hard to find)
- Flexible, so it works with what you already have in your fridge
- Great for meal prep, and you can freeze them for later
- Kid-approved because cheese and crispy textures always win
In short, it’s the kind of recipe that doesn’t ask much—but gives a lot back.
Ingredients
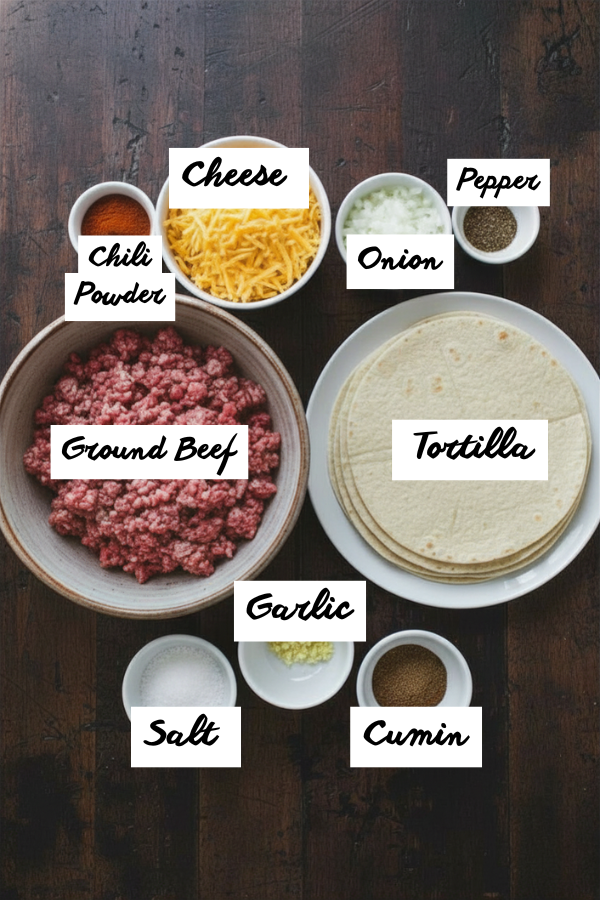
Let’s keep this real—you probably already have most of these.
Main Ingredients
- 1 lb ground beef (80/20 for best flavor, but lean works too)
- 6–8 large flour tortillas (burrito size)
- 1–1.5 cups shredded cheese (cheddar, Monterey Jack, or a mix)
- ½ onion, diced
- 2 cloves garlic, minced
Seasoning (Quick Tex-Mex Blend)
- 1–2 tsp chili powder
- 1 tsp cumin
- ½ tsp paprika
- Salt & pepper to taste
(If you want a shortcut, a taco seasoning packet works perfectly.)
Optional Add-Ins
- Refried beans (for creaminess)
- Cooked rice (to stretch servings)
- Jalapeños (for heat)
- Black beans or corn (for texture and fiber)
For Cooking
- Oil (for frying) OR
- Cooking spray (for air fryer or oven)
Step-by-Step Instructions
Step 1 – Cook the Beef Filling
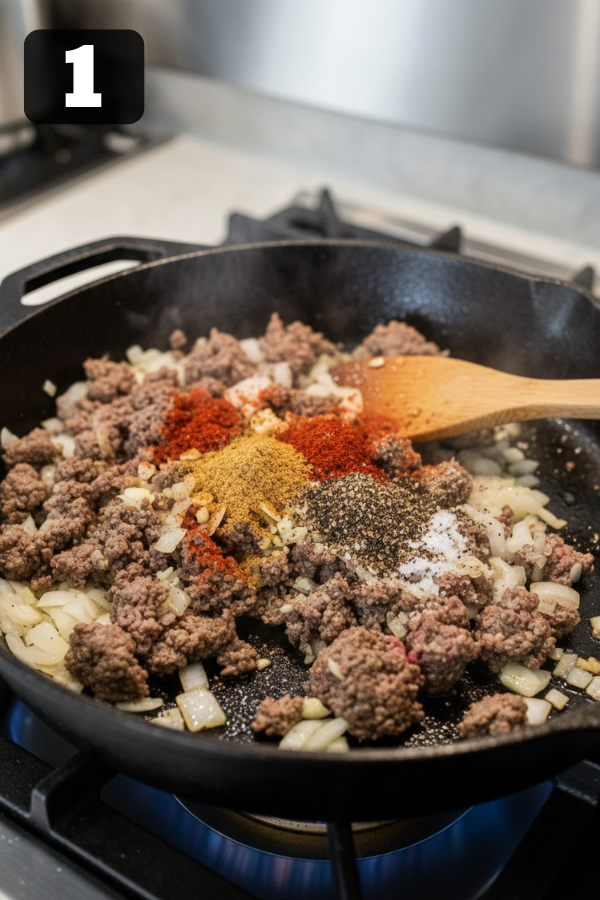
Start with a skillet over medium heat. Add your ground beef and cook for about 5–7 minutes, breaking it apart as it browns.
Once the beef is mostly cooked:
- Drain excess fat, since this prevents soggy chimichangas
- Add onion and cook for 2–3 minutes
- Add garlic and cook for about 30 seconds
Next, sprinkle in your spices and add a splash of water (about ¼ cup). Let it simmer until thick and flavorful.
You’ll know it’s ready when the mixture smells rich and well-seasoned.
Step 2 – Assemble the Chimichangas
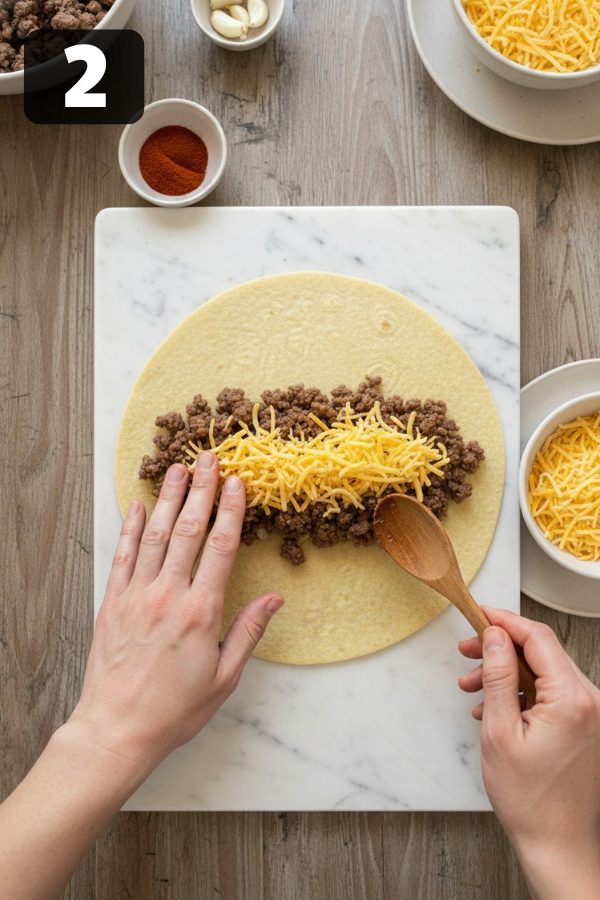
Warm your tortillas slightly in the microwave for 20–30 seconds. This helps prevent cracking.
Then assemble:
- Add about ½ cup of the beef mixture
- Sprinkle cheese on top
- Fold the bottom, then the sides, and roll tightly
Be careful not to overfill. It may seem tempting, but less filling makes rolling easier and prevents breakage.
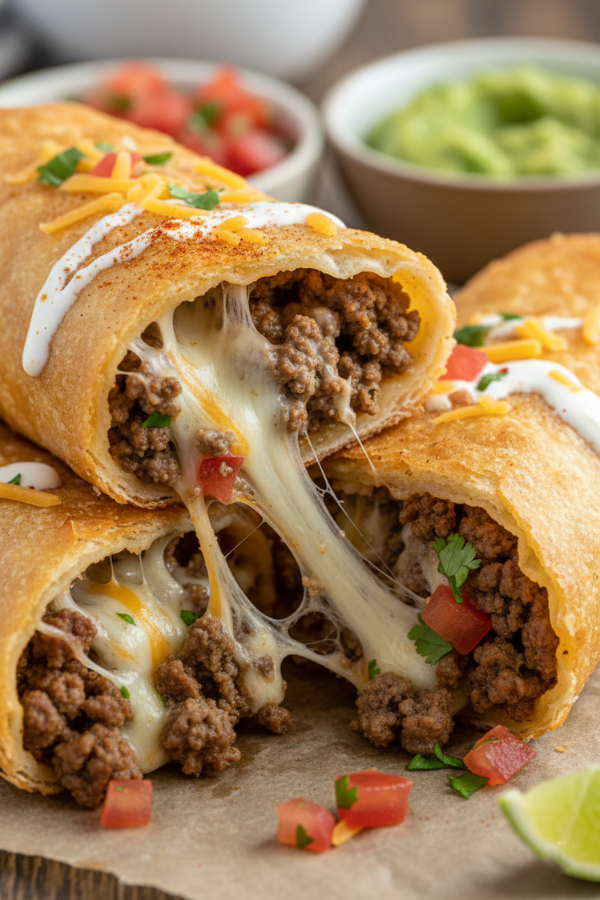
Step 3 – Cook Until Crispy (Choose Your Method)

You’ve got a few solid options here.
Deep Fry (Classic):
Heat oil to 350°F and cook for 2–3 minutes per side until golden and crispy.
Air Fryer (Healthier):
Cook at 375°F for 8–10 minutes with a light spray of oil, flipping halfway through.
Oven-Baked (Easy Cleanup):
Bake at 400°F for 20–25 minutes, brushing lightly with oil.
Overall, the air fryer gives the best balance between crispiness and convenience.
Tips That Actually Make a Difference
Some recipes skip this part, but this is where things go from good to great.
- Drain the beef well; otherwise, the filling can turn soggy
- Avoid overcrowding during cooking, since this helps keep the exterior crisp
- Use a mix of cheeses for better melting and richer flavor
- Roll tightly so the filling stays sealed inside
For best results, let the chimichangas rest for 2–3 minutes after cooking. This helps everything settle and improves the texture.
Storage, Leftovers & Meal Prep
Fridge
Store for up to 3–4 days in an airtight container.
Freezer
Wrap individually and freeze for up to 2 months.
For the best texture later, freeze them before frying.
Reheating
- Oven: 375°F for 10–15 minutes
- Air fryer: 5–7 minutes
Avoid using the microwave if possible, since it softens the crispy shell.
What to Serve With Chimichangas

You could eat them on their own, but pairing them makes the meal even better.
Classic Sides
- Mexican rice
- Refried beans
- Corn salad
Fresh Add-Ons
- Guacamole
- Pico de gallo
- Sour cream
Drinks
- Iced tea
- Lime soda
- Margaritas (for a more indulgent option)
FAQs
1. Can I make these ahead of time?
Yes. You can assemble them and refrigerate for up to 24 hours before cooking.
2. Can I use chicken instead of beef?
Absolutely. Rotisserie chicken works especially well.
3. Are chimichangas spicy?
Not by default. You can adjust the heat level to your preference.
4. Can I air fry instead of deep fry?
Yes, and you’ll reduce the oil while still keeping a crispy texture.
5. Why are mine soggy?
This usually happens if the filling has too much moisture or if the oil wasn’t hot enough.
Common Problems (And Easy Fixes)
Falling apart?
Roll tighter and avoid overfilling.
Not crispy enough?
Make sure the oil is hot enough and increase cooking time slightly.
Too dry inside?
Use beef with a bit more fat or add extra cheese or sauce.
Nutrition Info
- Calories: 350–500
- Protein: 20–25g
- Carbs: 25–35g
- Fat: 18–25g
The air fryer version can reduce calories by about 20–30%.
Final Thoughts
Here’s the honest truth—this isn’t meant to be a light meal.
However, it’s comforting, fast, flexible, and incredibly satisfying. Sometimes, that’s exactly what dinner needs to be.
Make a batch, freeze a few, and enjoy them whenever you want something simple but deeply satisfying.
Don’t Miss: High-Protein Ground Beef Taco Bowl (Easy & Delicious)
Don’t Miss: Crockpot Taco Hashbrown Casserole
Also Try: Simple Doritos Taco Salad
Ingredients
Method
- Step 1 – Cook the Beef FillingStart with a skillet over medium heat. Add your ground beef and cook for about 5–7 minutes, breaking it apart as it browns.Once the beef is mostly cooked:Drain excess fat, since this prevents soggy chimichangasAdd onion and cook for 2–3 minutesAdd garlic and cook for about 30 secondsNext, sprinkle in your spices and add a splash of water (about ¼ cup). Let it simmer until thick and flavorful.You’ll know it’s ready when the mixture smells rich and well-seasoned.

- Step 2 – Assemble the ChimichangasWarm your tortillas slightly in the microwave for 20–30 seconds. This helps prevent cracking.Then assemble:Add about ½ cup of the beef mixtureSprinkle cheese on topFold the bottom, then the sides, and roll tightlyBe careful not to overfill. It may seem tempting, but less filling makes rolling easier and prevents breakage.
- Step 3 – Cook Until Crispy (Choose Your Method)You’ve got a few solid options here.Deep Fry (Classic): Heat oil to 350°F and cook for 2–3 minutes per side until golden and crispy.Air Fryer (Healthier): Cook at 375°F for 8–10 minutes with a light spray of oil, flipping halfway through.Oven-Baked (Easy Cleanup): Bake at 400°F for 20–25 minutes, brushing lightly with oil.Overall, the air fryer gives the best balance between crispiness and convenience.


