One Pan French Onion Smothered Pork Chops
This is the kind of dinner that feels like you cheated—in a good way. You sear pork chops in one skillet, smother them in buttery onions and savory gravy, then finish with melty cheese. It tastes like French onion soup met a cozy pork chop dinner and decided to stay for the weekend. And the best part? It’s built for real life: minimal cleanup, simple ingredients, and leftovers that reheat like a dream.
Why You’ll Love This Recipe
- One pan, one mood: everything happens in the same skillet, so cleanup stays calm.
- French onion comfort, faster: sweet onions + rich gravy + melted cheese hits that cozy spot.
- Juicy pork without stress: the gravy finish helps protect the chops from drying out.
- Meal-prep friendly: leftovers keep well and the flavor actually deepens overnight.
Optional diet notes (simple swaps):
- Gluten-free: use a gluten-free flour blend or a cornstarch slurry to thicken the gravy.
- Lower sodium: use low-sodium broth and taste before adding extra salt (cheese can add salt too).
Ingredients
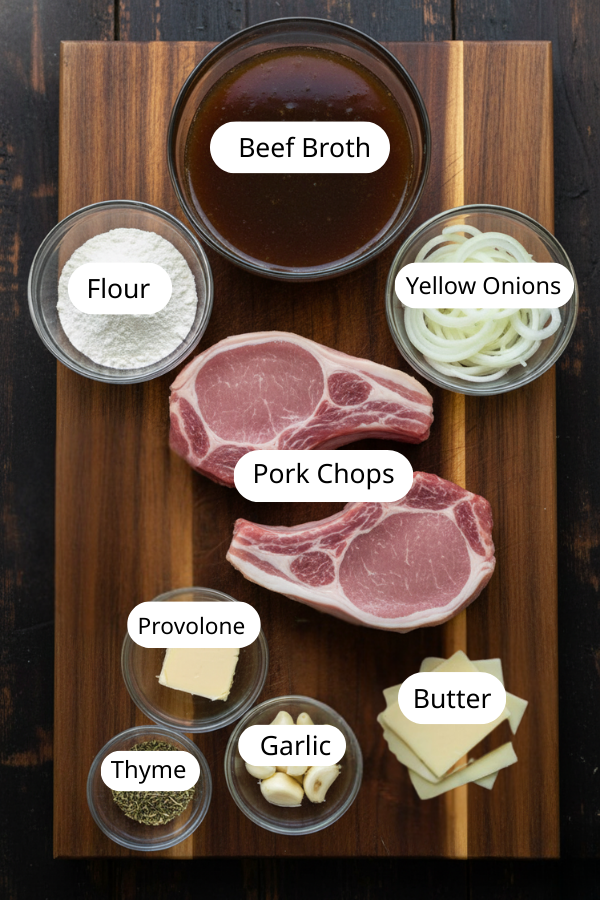
For The Pork
- 4 pork chops (boneless or bone-in)
- Thicker chops (about 1 to 1½ inches) are the easiest way to stay juicy.
- Thinner chops work too—they just cook faster, so timing matters.
- Salt and black pepper
- Garlic powder (optional)
- Dried thyme or a few fresh thyme sprigs (optional, but very “French onion”)
- 1 tablespoon oil (more if needed for searing)
For The Onions + Gravy
- 2 large yellow onions, sliced into rings
- Aim for not-too-thin slices so the onions stay silky and visible.
- 2–4 garlic cloves, minced
- 2 tablespoons butter
- 2–3 tablespoons flour (for thickening)
- 1 to 1½ cups beef broth (low-sodium is nice)
- Optional: a small splash of Worcestershire sauce (adds depth without much effort)
For The Cheesy Finish
- 4 slices provolone (classic melt)
- Optional: a small handful of shredded Swiss or gruyère (extra French onion vibe)
- Fresh parsley or rosemary (optional garnish)
Shortcut Option (For Extra Busy Nights)
- 1 packet onion soup mix (use it if you like quick flavor, but go easy on extra salt)
Step-by-Step Instructions
Step 1: Prep The Chops (2 minutes)
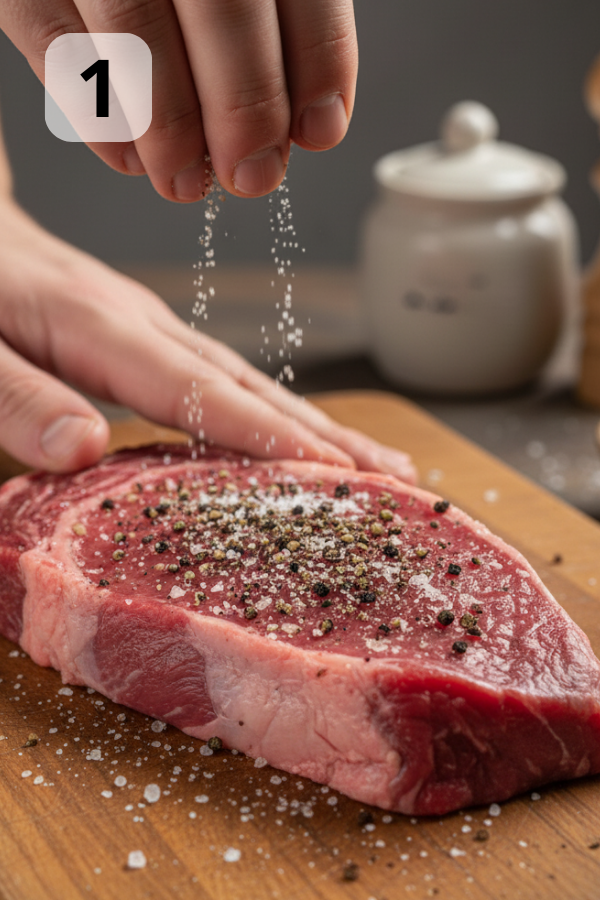
Pat the pork chops dry with paper towels. Season both sides with salt and pepper. If you’re using garlic powder or thyme, add a pinch now.
Small note: drying the chops helps them brown instead of steaming. It’s a tiny step that pays off.
Step 2: Soften And Golden The Onions (12–18 minutes)
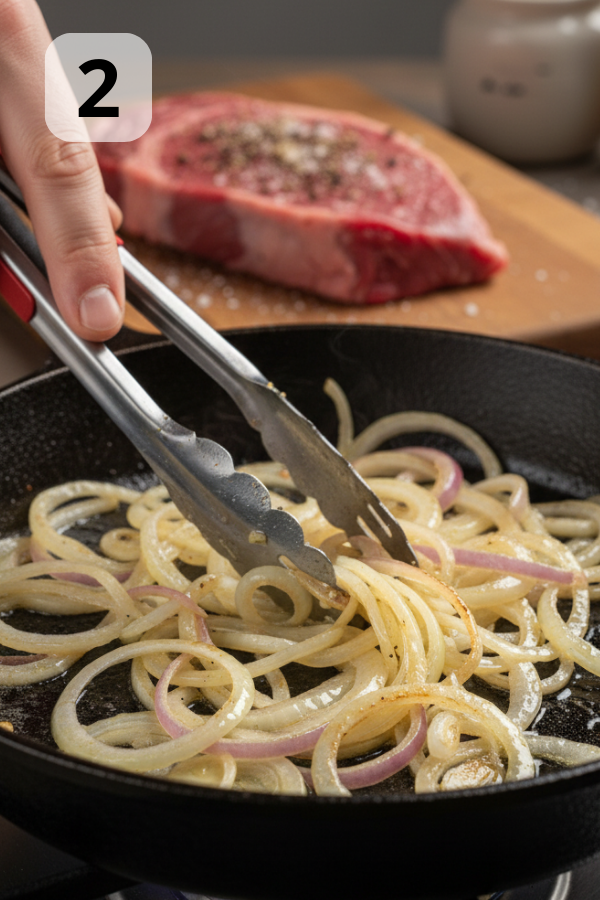
Heat your skillet over medium heat. Add butter and a small drizzle of oil. Add the sliced onions with a pinch of salt.
Cook, stirring every so often, until the onions are very soft and turning golden. You’re not trying to rush them into a deep, dark caramel. You just want that sweet, mellow “French onion” direction.
Add the garlic in the last minute so it doesn’t burn. Then scoop the onions onto a plate.
Step 3: Sear The Pork (2–8 minutes, depending on thickness)
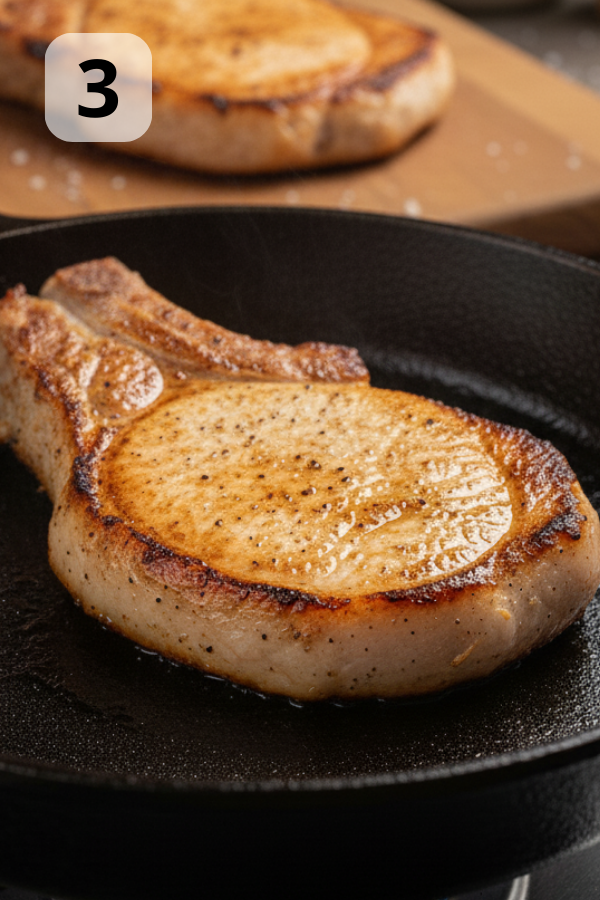
Turn heat to medium-high. Add a bit more oil if the pan looks dry.
Sear the pork chops until browned:
- Thin chops: about 1 minute per side can be enough for color.
- Thicker chops: closer to 3–4 minutes per side for a deeper crust.
Move the chops to a plate. Don’t worry if they aren’t cooked through yet. They’ll finish in the gravy.
Step 4: Make The Onion Gravy (3–5 minutes)
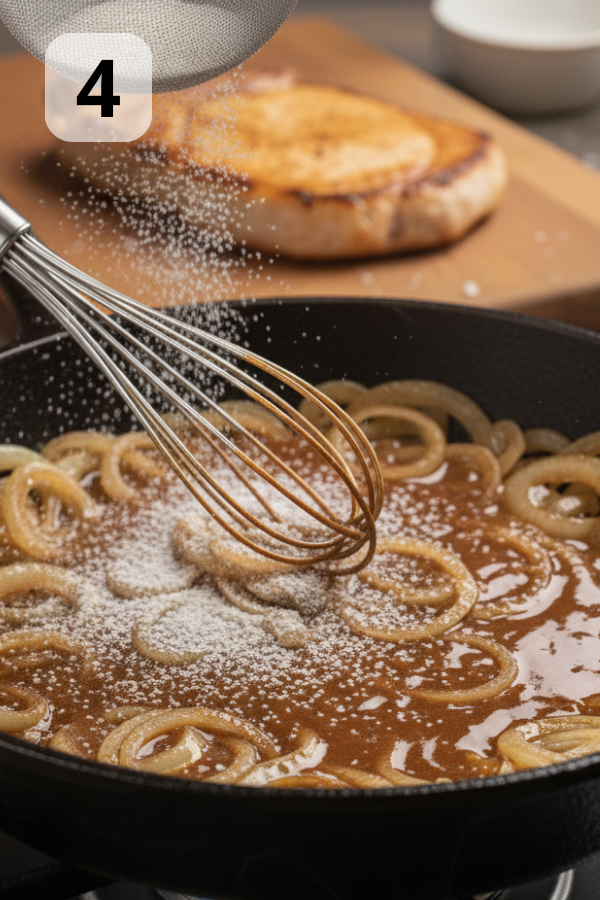
Lower heat to medium. Return the onions to the skillet.
Sprinkle flour over the onions and stir for about 1 minute. You’re coating the onions and cooking off the raw flour taste.
Slowly pour in the beef broth while stirring. Scrape up the browned bits on the bottom of the pan—those bits are flavor.
Simmer until the gravy thickens slightly. If it feels too thick too fast, add a splash more broth.
Optional: add a tiny splash of Worcestershire sauce for extra depth.
Step 5: Smother The Chops And Finish Cooking (3–12 minutes)
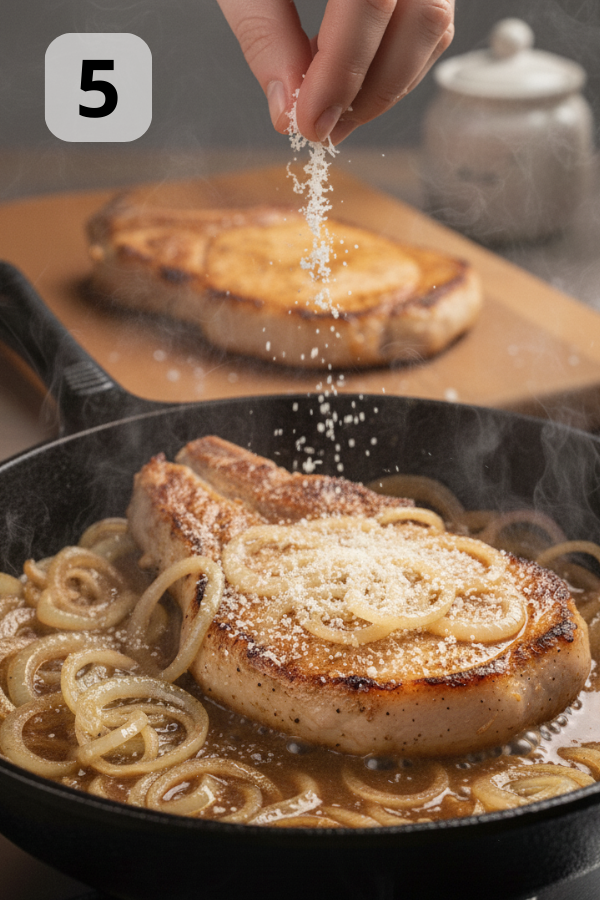
Nestle the pork chops back into the gravy. Spoon onions over the top.
Now pick your finishing path:
Stovetop finish (best for thin chops):
- Cover the pan and simmer gently until chops are cooked through, usually just a few minutes for thin chops.
Oven finish (best for thick chops and the gooey cheese look):
- If your skillet is oven-safe, top chops with cheese and bake at 400°F for about 8–10 minutes, until the cheese melts and the pork is cooked through.
- If your skillet isn’t oven-safe, transfer everything to a baking dish and do the same.
Step 6: Melt The Cheese And Rest (3–5 minutes)
If you didn’t use the oven, top chops with provolone, cover the skillet, and let the cheese melt.
Once done, rest the pork for a few minutes before serving. It helps the juices stay in the meat.
Tips for Success
The “Juicy Pork” Rule (Simple But Important)
Use a thermometer if you can. It removes the guesswork. Pork can go from juicy to tough faster than you’d think—especially thin chops.
If you don’t have a thermometer, here’s the practical approach:
- Use thicker chops when possible.
- Sear for color, then finish gently in the gravy.
- Don’t simmer hard. Keep it calm.
Onion Timing: Sweet And Golden Wins
Onion cooking time can vary based on your pan, your stove, and how crowded things are. If the onions seem slow, that’s normal. Lower heat a bit and keep going. They’ll get there.
If onions start sticking, add a tiny splash of broth or water and scrape gently.
Gravy Texture: Easy Fixes
- Too thick: add broth, a tablespoon at a time.
- Too thin: simmer uncovered for a couple minutes.
- Lumpy: whisk vigorously. If needed, pour gravy through a fine strainer and return it to the pan.
Cheese Choices (And Why Provolone Is Easy)
Provolone melts smoothly and doesn’t overpower the onions. Swiss or gruyère adds a more classic French onion soup flavor. If you only have mozzarella, it’ll work—but the taste is milder.
If You’re Trying To Make It “Lighter”
You can reduce butter a bit and use one slice of cheese per chop. Keep the onions generous, though. Onions are doing the heavy lifting for flavor.
Storage & Leftover Notes
- Fridge: store leftovers in an airtight container for 3–4 days.
- Best reheat method: warm gently on the stove with a splash of broth or water. Cover the pan so the pork warms without drying out.
- Microwave method: use medium power and short bursts. Stir gravy between bursts.
- Freezing: you can freeze it, but onion gravy may change texture slightly after thawing. If freezing, consider adding fresh cheese when reheating.
Meal-prep idea that actually feels doable:
- Make the onions and gravy ahead.
- The next night, sear fresh chops and finish them in the reheated gravy. It feels like a shortcut, because it is.
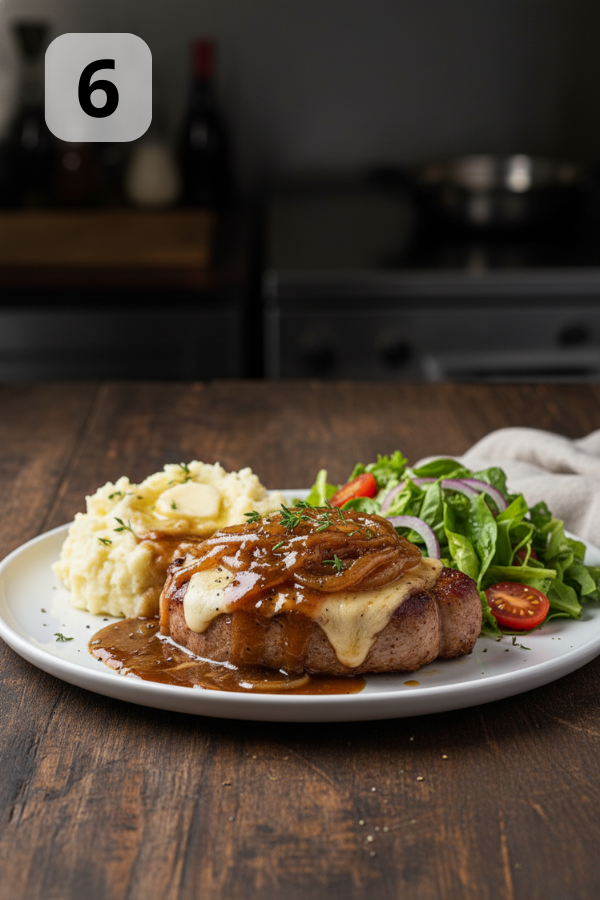
What to Serve With It
Cozy Sides (Gravy Magnets)
- Mashed potatoes
- Egg noodles or buttered pasta
- Rice (great for quick bowls)
Fresh Sides (To Balance The Richness)
- Green salad with a sharp vinaigrette
- Roasted broccoli or green beans
- Simple sautéed spinach with lemon
Drinks
- Sparkling water with lemon
- Iced tea
- If you’re doing wine: something not too heavy, like a light red or a crisp white
FAQs
- Can I make this ahead of time?
Yes. Cook it fully, cool it, and refrigerate. Reheat gently with a splash of broth. If you want the cheese to look freshly melted, add a new slice during reheating.
- Can I use chicken instead of pork chops?
You can. Use the same onion gravy method and cook chicken until it’s fully done. Thicker pieces will benefit from the oven finish.
- Is this spicy?
Not at all. It’s sweet-savory. If you want heat, add red pepper flakes to the gravy or serve hot sauce at the table.
- What if I don’t have beef broth?
Chicken broth works, but beef broth gives deeper “French onion” flavor. If using chicken broth, add a small splash of Worcestershire sauce or soy sauce for depth.
- What onions are best?
Yellow onions are the go-to. They soften nicely and turn sweet as they cook.
Nutrition Info
Nutrition varies widely depending on chop size, cheese amount, and butter. If you want a higher-protein, more balanced plate:
- Choose thicker, lean chops.
- Use one slice of cheese.
Serve with a big salad or roasted veggies.
Final Thoughts
This is one of those recipes that feels a little fancy, even though it’s basically: onions, pork, gravy, cheese. And honestly, that’s the magic—simple moves that stack into something comforting and memorable. If you try it, don’t be surprised if someone asks, “Wait… you made this on a weeknight?”

| Prep Time | 5 minutes |
| Cook Time | 30-35 minutes |
| Servings |
servings
|
- Pork
- 4 pork chops boneless or bone-in; thicker is juicier
- 1 tsp Salt or to taste
- 1/2 tsp black pepper
- 1/2 tsp Garlic powder optional
- 1/2 tsp dried thyme or 2–3 fresh thyme sprigs
- 1 tbsp oil plus more if needed
- Onion Gravy
- 2 large yellow onions sliced into rings (not paper-thin)
- 2 tbsp Butter
- 2 –4 garlic cloves minced
- 2 tbsp –3all-purpose flour
- 1 cups to 1 1/2beef broth low-sodium preferred
- 1 tsp Worcestershire sauce optional
- Cheese + Finish
- 4 slices provolone
- cup Optional: 1/2shredded Swiss or gruyère
- Chopped parsley or rosemary optional
Ingredients
|
|
- Step 1: Prep The Chops Pat the pork chops dry with paper towels. Season both sides with salt and pepper. If you’re using garlic powder or thyme, add a pinch now. Small note: drying the chops helps them brown instead of steaming. It’s a tiny step that pays off.

- Step 2: Soften And Golden The Onions Heat your skillet over medium heat. Add butter and a small drizzle of oil. Add the sliced onions with a pinch of salt. Cook, stirring every so often, until the onions are very soft and turning golden. You’re not trying to rush them into a deep, dark caramel. You just want that sweet, mellow “French onion” direction. Add the garlic in the last minute so it doesn’t burn. Then scoop the onions onto a plate.
- Step 3: Sear The Pork Turn heat to medium-high. Add a bit more oil if the pan looks dry. Sear the pork chops until browned: Thin chops: about 1 minute per side can be enough for color. Thicker chops: closer to 3–4 minutes per side for a deeper crust. Move the chops to a plate. Don’t worry if they aren’t cooked through yet. They’ll finish in the gravy.
- Step 4: Make The Onion Gravy Lower heat to medium. Return the onions to the skillet. Sprinkle flour over the onions and stir for about 1 minute. You’re coating the onions and cooking off the raw flour taste. Slowly pour in the beef broth while stirring. Scrape up the browned bits on the bottom of the pan—those bits are flavor. Simmer until the gravy thickens slightly. If it feels too thick too fast, add a splash more broth. Optional: add a tiny splash of Worcestershire sauce for extra depth.
- Step 5: Smother The Chops And Finish Cooking Nestle the pork chops back into the gravy. Spoon onions over the top. Now pick your finishing path: Stovetop finish (best for thin chops): Cover the pan and simmer gently until chops are cooked through, usually just a few minutes for thin chops. Oven finish (best for thick chops and the gooey cheese look): If your skillet is oven-safe, top chops with cheese and bake at 400°F for about 8–10 minutes, until the cheese melts and the pork is cooked through. If your skillet isn’t oven-safe, transfer everything to a baking dish and do the same.
- Step 6: Melt The Cheese And Rest If you didn’t use the oven, top chops with provolone, cover the skillet, and let the cheese melt. Once done, rest the pork for a few minutes before serving. It helps the juices stay in the meat.


