Garlic Bread Grilled Cheese Sandwich
You know those nights when you’re tired, everyone’s hungry, and your brain just… stalls?
This sandwich is for that night.
Garlic Bread Grilled Cheese is exactly what it sounds like: grilled cheese made with garlic bread on both sides. It tastes like something you’d order at a cozy café, but you’ll cook it in one skillet (or the air fryer) in about 15 minutes.
No fancy techniques. No endless dishes. Just real comfort food that still feels a little special.
Why This Sandwich Works So Well for Busy Home Cooks
Let me explain why this simple recipe keeps showing up in real kitchens, not just on Pinterest boards.
It’s Fast And Low-Stress
- Prep is mostly spreading garlic butter and grating cheese.
- Cook time is around 10 minutes on the stove or 6–8 minutes in the air fryer.
- You can make it while a pot of tomato soup is heating or a salad kit is waiting on the counter.
You don’t need to stand and stir anything. You flip once, maybe twice. That’s it.
It Uses Things You Probably Already Have
Most of the time, you’ll have:
- Sandwich bread or sourdough
- Butter
- Garlic (fresh or even garlic powder in a pinch)
- Some kind of cheese
If you’ve got parsley, Italian seasoning, or a bit of Parmesan in the fridge, you’re already halfway to “wow, this tastes like restaurant garlic bread.”
It Looks Indulgent, But You Can Nudge It Lighter
Is it comfort food? Yes.
Can you make it less heavy? Also yes.
You can:
- Use whole wheat or multigrain bread
- Use part-skim mozzarella or a mix of mozzarella + a little sharp cheddar
- Serve it with a big bowl of soup or salad so you’re not just eating bread and cheese on repeat
You’re still eating grilled cheese, but your plate feels more balanced.
Ingredients You’ll Need
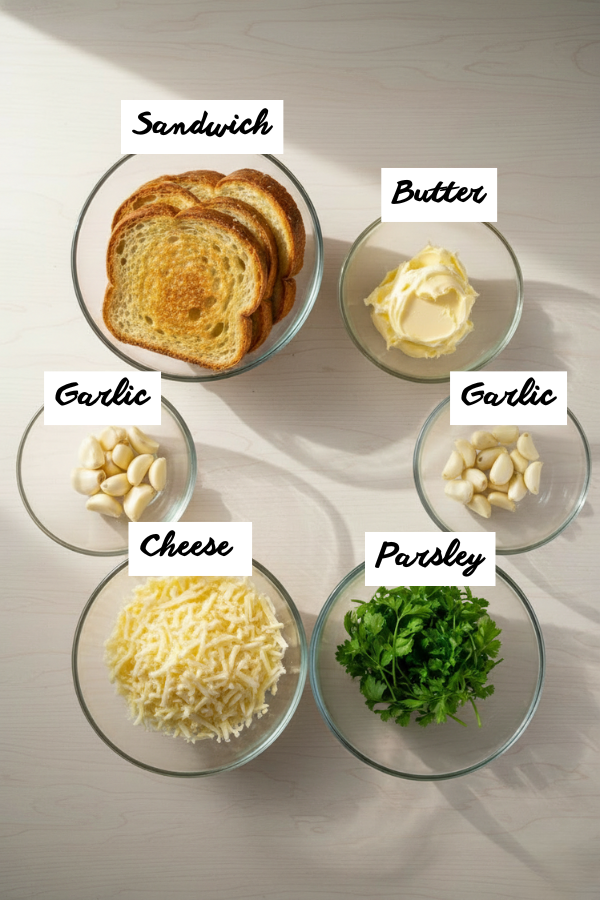
You don’t need to be exact to the gram, but a loose guide makes things easier.
For The Garlic Butter
- 4 tablespoons unsalted butter, softened
- 2–3 cloves garlic, finely minced
- 1 tablespoon fresh parsley, finely chopped (or ½ teaspoon dried Italian seasoning)
- Pinch of salt and black pepper
- Optional: 1 tablespoon mayonnaise (helps the crust crisp even more)
If you’re very tired, garlic powder plus dried parsley still gives good flavor. Fresh just smells better and feels a bit more “weekend treat.”
For The Sandwich
- 4 slices of bread
- White sandwich bread, sourdough, wheat, brioche – anything that’s not too thin or too crusty
- 1 to 1¼ cups shredded cheese, total
- Good melting cheeses:
- Colby Jack
- Mild or medium cheddar
- Mozzarella
- Monterey Jack
- Provolone
- Gruyere
- Good melting cheeses:
- Optional treat: 2–4 tablespoons cream cheese or a soft cheese spread for a super-creamy center
- Optional extras:
- Cooked bacon pieces
- Thin tomato slices (patted dry)
- Caramelized onions
- Jalapeño slices
- A tiny pinch of red pepper flakes
If kids are eating, keep it basic: cheddar + mozzarella. If you and your partner are eating late in peace (rare, but it happens), add the jalapeños and bacon.
Step-by-Step Instructions
Here’s the thing: this isn’t hard, but a few small details make a big difference in crunch, cheese pull, and that garlic smell that pulls everyone into the kitchen.
Step 1 – Mix Your Garlic Butter
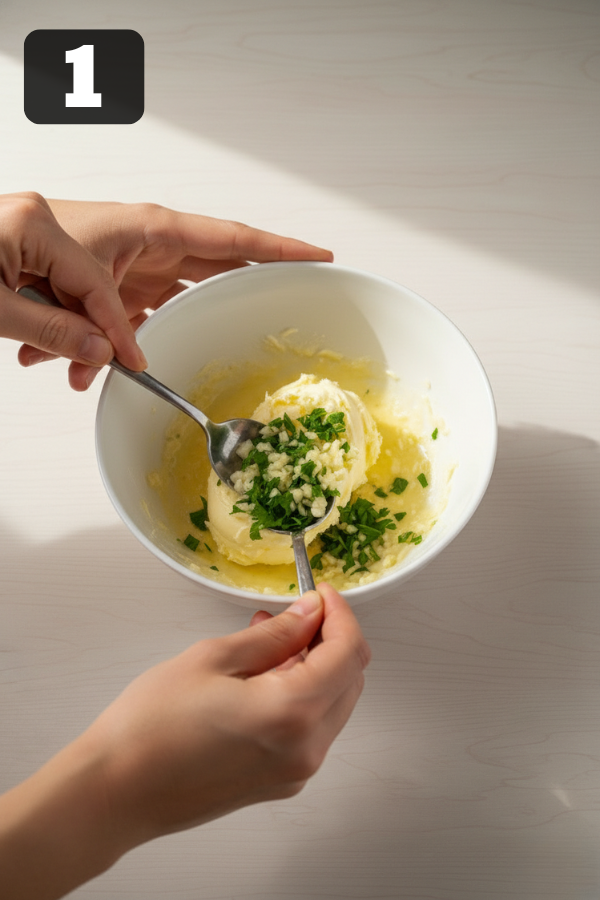
You can do this while the skillet heats.
- Put the softened butter in a small bowl.
- Add the minced garlic, parsley or Italian seasoning, salt, pepper, and mayo if you’re using it.
- Stir until everything looks even and creamy. No big clumps of garlic in one spot.
Taste a tiny bit on the edge of a bread slice. Too strong? Add a little more butter. Not enough garlic? Add half a clove more.
Quick shortcut:
No fresh garlic? Use ½ teaspoon garlic powder and a pinch of onion powder. It’s still really good.
Step 2 – Build the Sandwich
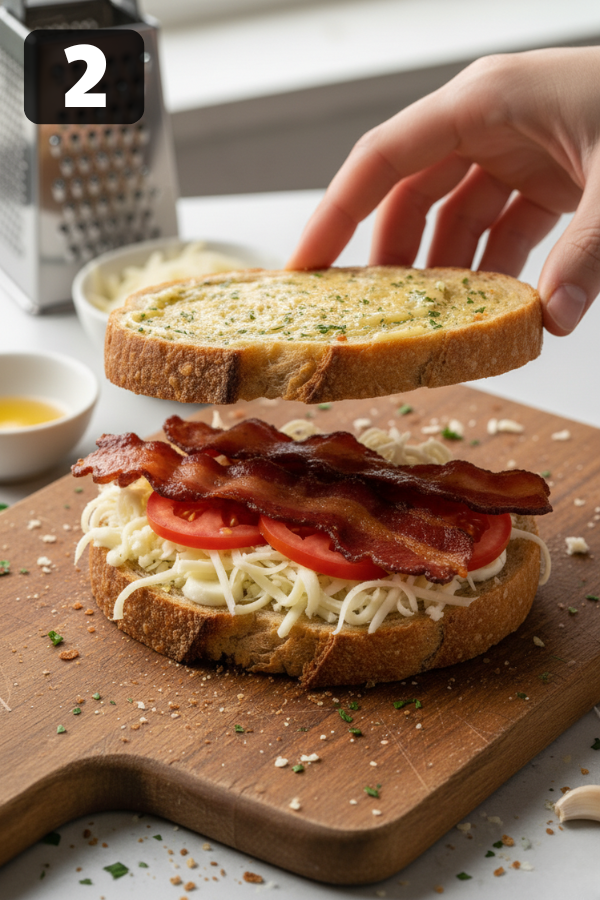
- Lay out your 4 slices of bread on a board.
- Spread a generous layer of garlic butter on one side of each slice. This will be the outside.
- Flip 2 slices so the buttered side is now touching the board.
- Divide your shredded cheese between those two slices (around ½ cup on each).
- If you’re using cream cheese or a soft spread, dot or spread 1–2 tablespoons on top of the shredded cheese.
- Add any extras now: a bit of bacon, one or two tomato slices, a few onions.
- Top each one with the remaining bread slices, buttered side facing out.
You should now have two “garlic bread” sandwiches, ready to crisp.
Step 3 – Cook It in a Skillet (Classic Method)
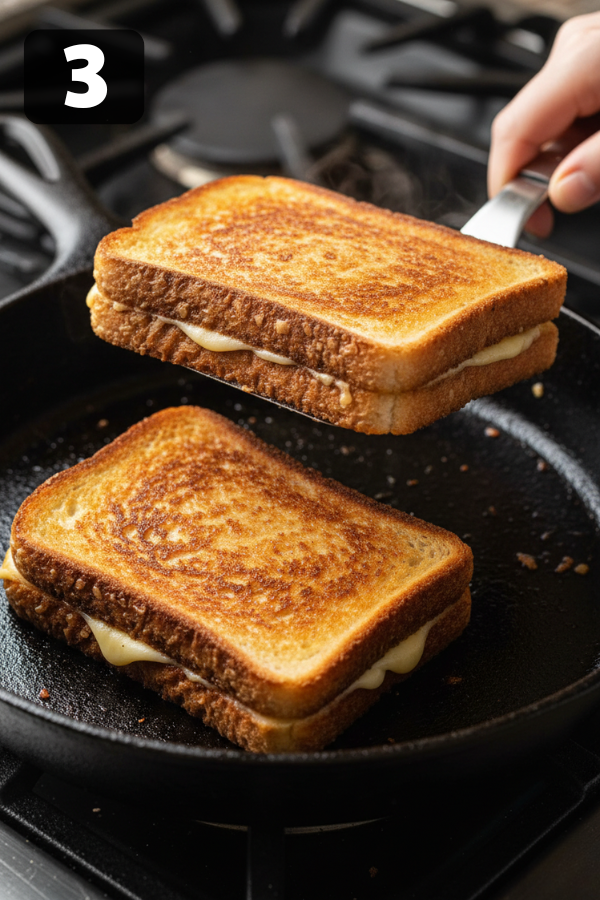
This is the version most people start with.
- Heat a nonstick or cast iron skillet over medium-low heat.
- When the pan feels warm (you can hover your hand a bit above it), place the sandwiches in.
- Cook the first side for about 4–5 minutes, until it’s golden and crisp.
- If it’s browning too fast, lower the heat.
- Flip the sandwiches carefully with a spatula.
- Cover the pan with a lid and cook another 4–5 minutes. The lid traps a bit of steam so the cheese melts all the way through.
- Check the bottom: it should be golden, not dark brown.
- When the cheese looks melty and just starting to ooze at the edges, take them out.
Let the sandwiches sit on a cooling rack or a plate for a minute. That short rest stops the cheese from flooding out when you cut into it.
Step 4 – Air Fryer Method (Hands-Off and Clean)
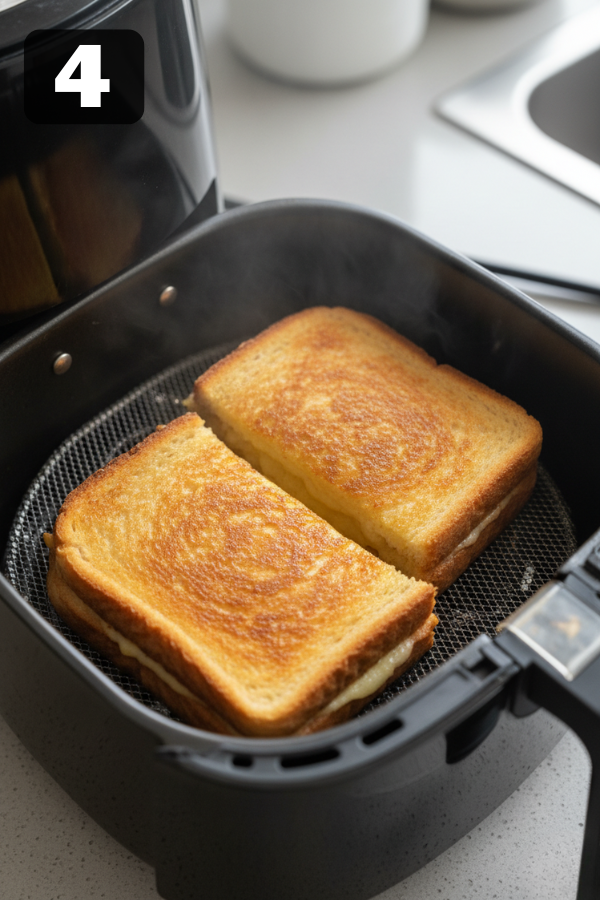
If your air fryer lives on the counter, this is shockingly easy.
- Preheat the air fryer to 370–375°F (185–190°C) for a few minutes.
- Place the sandwiches in the basket in a single layer.
- Cook 3–4 minutes, then flip.
- Cook another 3–4 minutes, until the bread is crisp and the cheese has melted.
- If the top looks pale, add 1 extra minute. If it’s going dark too fast, lower the temperature next time.
Cleanup is basically the basket and a knife. That’s it.
Easy Flavor Variations
Once the basic version becomes “the usual,” little changes can keep it fun.
- “Pizza night” version
- Add a spoon of pizza sauce inside and use mozzarella + a bit of Parmesan.
- Serve with extra warm marinara for dipping.
- Spicy grown-up version
- Add jalapeño slices or crushed red pepper flakes inside.
- Swap a little cheddar for pepper jack.
- Chicken-and-garlic version
- Add thin slices of leftover roast chicken or rotisserie chicken.
- Use mozzarella + provolone for that “hot sub” vibe.
- Roasted garlic treat
- On a weekend, roast a head of garlic and mash the soft cloves into the butter.
- The flavor is sweeter, deeper, and your kitchen will smell ridiculous (in a good way).
You don’t need to overhaul the recipe every time. One extra ingredient can make it feel fresh.
What to Serve With Your Garlic Bread Grilled Cheese
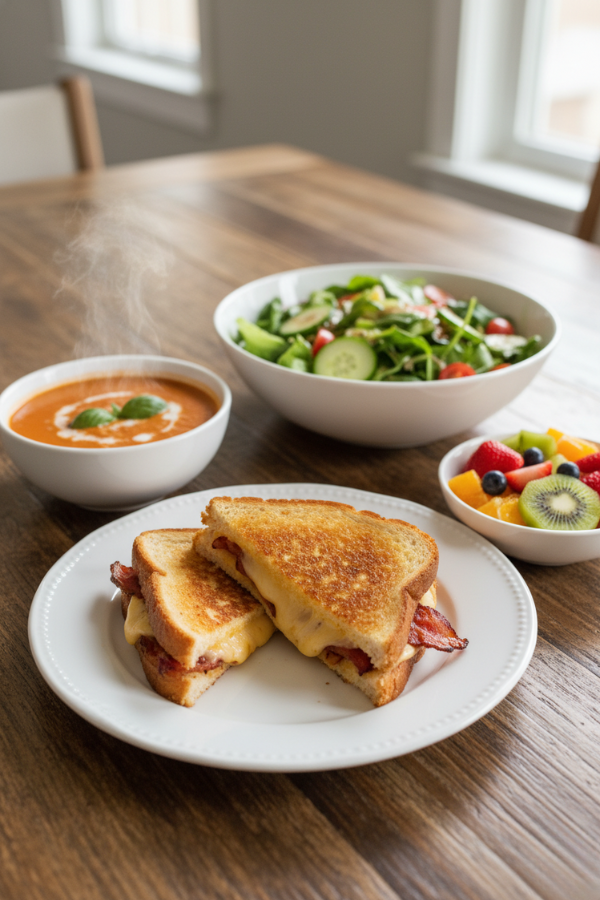
This sandwich is rich, so pairing it with something bright or light helps a lot.
- Tomato soup – the classic
- Canned, boxed, or homemade; nobody’s judging at 7 p.m.
- Simple green salad
- Mixed greens, cherry tomatoes, cucumber, and a sharp vinaigrette.
- Roasted vegetables
- Broccoli, cauliflower, or asparagus roasted with olive oil and salt.
- Fruit on the side
- Apple slices, grapes, or a simple fruit salad balance the richness surprisingly well.
If you’re cooking for kids, a small handful of baby carrots or cucumber sticks on the plate makes the whole meal feel more complete with almost no effort.
Common Questions
- Can I use cheese slices instead of shredded?
Yes. Use 2–3 slices per sandwich. American, Colby Jack, provolone, or mild cheddar slices all melt well. - Which bread is best?
Soft sourdough is great. Regular sandwich bread works. Brioche gives you a slightly sweet, buttery finish. Just avoid ultra-thin bread that tears easily. - Is this very garlicky?
It can be. If you’re serving kids or you’re not sure, start with 1–2 cloves of garlic. You can always add more next time. - Can I make a lighter version?
Sure. Use whole wheat bread, a little less butter, and part-skim mozzarella. Then pair it with a big salad or veggie soup.
Nutrition Snapshot
Numbers will change depending on the bread and cheese you use, but for one sandwich:
- Calories: about 550–650
- Protein: around 20–25 g
- Carbs: around 25–35 g
- Fat: around 35–45 g
Think of this as a comfort main dish. Pair it with fiber and veggies, and it fits more nicely into a normal week.
Conclusion
Honestly, that’s all you really need for a small pocket of comfort on a busy day: a few slices of bread, some butter and garlic, and cheese that actually melts. This Garlic Bread Grilled Cheese Sandwich isn’t fancy, but it feels like a warm pause button in the middle of a loud week—something you can make with one eye on the pan and one eye on the kids, the inbox, or the clock. Keep the basics on hand, play with the fillings when you have extra energy, and let this be one of those recipes you don’t have to overthink—you just make it, enjoy it, and move on with your evening.

| Prep Time | 5 minutes |
| Cook Time | 10 minutes |
| Servings |
sandwiches
|
- 4 slices sandwich or sourdough bread
- 4 tbsp unsalted butter softened
- 2 cloves –3garlic finely minced
- 1 tbsp chopped parsley or ½ tsp Italian seasoning
- Pinch of salt and black pepper
- tbsp Optional: 1mayonnaise
- 1 cups to 1¼shredded cheese (cheddar mozzarella, Colby Jack, or a mix)
- tbsp Optional: 2–4cream cheese or soft cheese spread
- Optional add-ins: cooked bacon tomato slices, caramelized onions, jalapeños
Ingredients
|
|
- Mix Your Garlic Butter You can do this while the skillet heats. Put the softened butter in a small bowl. Add the minced garlic, parsley or Italian seasoning, salt, pepper, and mayo if you’re using it. Stir until everything looks even and creamy. No big clumps of garlic in one spot. Taste a tiny bit on the edge of a bread slice. Too strong? Add a little more butter. Not enough garlic? Add half a clove more. Quick shortcut: No fresh garlic? Use ½ teaspoon garlic powder and a pinch of onion powder. It’s still really good.

- Build the Sandwich Lay out your 4 slices of bread on a board. Spread a generous layer of garlic butter on one side of each slice. This will be the outside. Flip 2 slices so the buttered side is now touching the board. Divide your shredded cheese between those two slices (around ½ cup on each). If you’re using cream cheese or a soft spread, dot or spread 1–2 tablespoons on top of the shredded cheese. Add any extras now: a bit of bacon, one or two tomato slices, a few onions. Top each one with the remaining bread slices, buttered side facing out. You should now have two “garlic bread” sandwiches, ready to crisp.
- Cook It in a Skillet (Classic Method) This is the version most people start with. Heat a nonstick or cast iron skillet over medium-low heat. When the pan feels warm (you can hover your hand a bit above it), place the sandwiches in. Cook the first side for about 4–5 minutes, until it’s golden and crisp. If it’s browning too fast, lower the heat. Flip the sandwiches carefully with a spatula. Cover the pan with a lid and cook another 4–5 minutes. The lid traps a bit of steam so the cheese melts all the way through. Check the bottom: it should be golden, not dark brown. When the cheese looks melty and just starting to ooze at the edges, take them out. Let the sandwiches sit on a cooling rack or a plate for a minute. That short rest stops the cheese from flooding out when you cut into it.
- Air Fryer Method (Hands-Off and Clean) If your air fryer lives on the counter, this is shockingly easy. Preheat the air fryer to 370–375°F (185–190°C) for a few minutes. Place the sandwiches in the basket in a single layer. Cook 3–4 minutes, then flip. Cook another 3–4 minutes, until the bread is crisp and the cheese has melted. If the top looks pale, add 1 extra minute. If it’s going dark too fast, lower the temperature next time. Cleanup is basically the basket and a knife. That’s it.


