Christmas Chocolate Chip Cookies
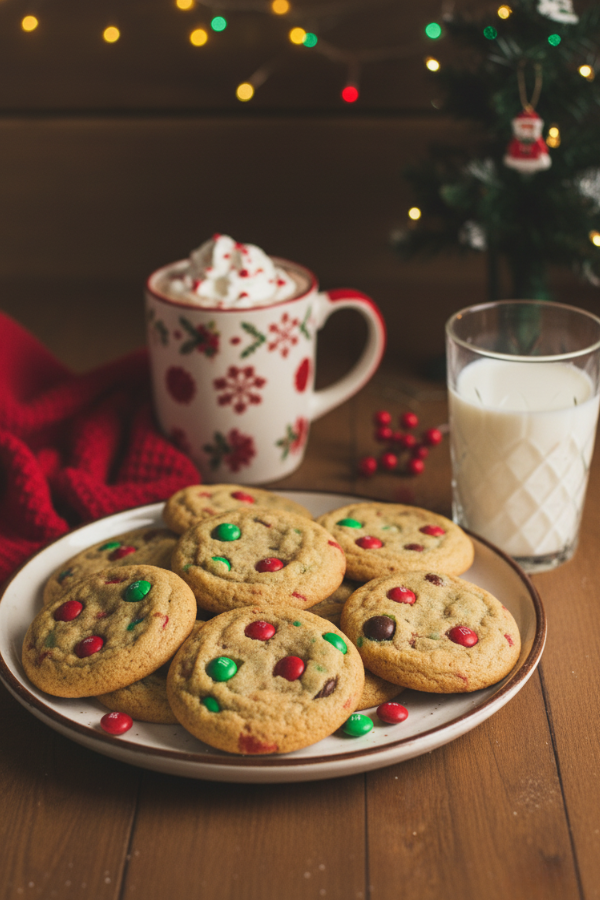
If there’s one cookie that feels like December wrapped in parchment paper, it’s the Christmas Chocolate Chip Cookie. Think of your favorite classic cookie, now dressed up with red and green M&Ms, bright sprinkles, and pockets of melty chocolate. It’s the cookie that kids reach for first… and grown-ups pretend not to have eaten before dinner.
What makes this version special isn’t just the look—it’s the texture. You get crisp, slightly caramelized edges, soft centers that stay tender even the next day, and that rich buttery flavor everyone expects from a holiday cookie. And honestly? They come together faster than most people take to find the gift tags (we’ve all been there).
Baking these often becomes a tradition: kids dumping in sprinkles like confetti, someone sneaking chocolate chips, someone else calling out, “Are they done yet?” It’s all part of the charm.
Why You’ll Love This Recipe
Here’s the thing: people love a cookie that behaves. This one does.
For starters, the base is a classic, no-surprises chocolate chip cookie dough. It’s straightforward, forgiving, and doesn’t demand fancy tools. You don’t even need a mixer if you prefer to keep things simple—just a whisk, a bowl, and a good spatula. That makes it perfect for last-minute baking sessions or those cozy evenings when you want something sweet without creating a sink full of dishes.
And because it’s Christmas, the customization options feel endless. Red and green M&Ms add instant cheer, but you can mix in sprinkles, white chocolate chips, or even crushed peppermint candies if you’re in the mood for something bold. The cookies hold their shape well, so add-ins don’t fall out or create odd lumps.
Planning a cookie platter? These fit right in. Bringing them to a party? They disappear. Packing them into a lunchbox for your kid’s last school day before break? Expect a happy grin later.
Some versions use a no-chill dough, which is great when timing is tight. Others benefit from a short chill if you want slightly thicker cookies. Both work beautifully.
What You’ll Need
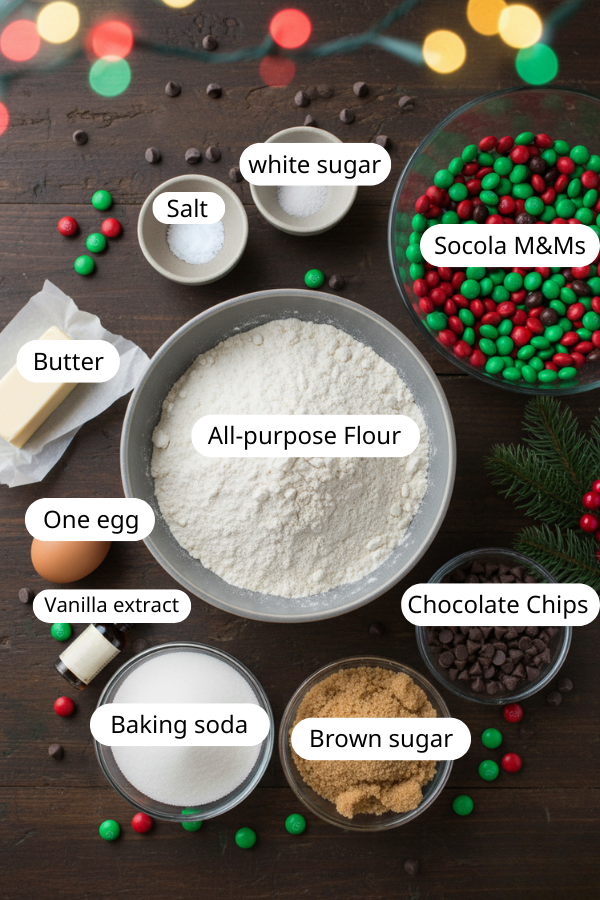
Cookie Base Ingredients
You won’t need anything unusual—just pantry staples that work together to create that holiday bakery smell:
- All-purpose flour to keep the texture balanced and predictable.
- Baking soda (and a tiny bit of baking powder if you enjoy extra lift).
- Salt, because chocolate always tastes deeper with a pinch of it.
- Butter, ideally softened or melted depending on your chosen method.
- Brown sugar for chewiness; white sugar for spread.
- One egg plus vanilla extract for that warm, comforting flavor that reminds everyone of childhood.
Festive Add-Ins & Variations
This part is where the fun begins:
- Red and green M&Ms—instant Christmas energy.
- White chocolate chips + holiday sprinkles for a more colorful, playful cookie.
- Cinnamon or a bit of nutmeg if you’re leaning into that “Christmas morning aroma.”
- Mini chocolate chips for tiny cookies, or full-size chips for dramatic melty bits.
Mix and match as much as you like. Even small adjustments can make the batch feel completely different.
Step-by-Step Instructions
Dough Preparation
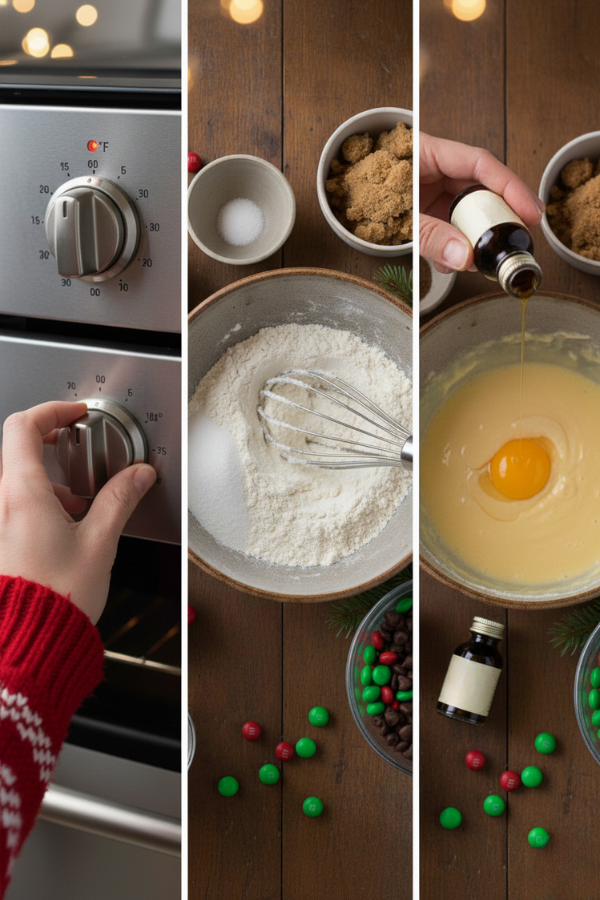
- Start by heating your oven to 350°F—the sweet spot for cookies that spread nicely but don’t burn.
- Whisk your dry ingredients (flour, baking soda, baking powder if using, and salt) in a separate bowl. It’s tempting to skip this, but combining them first keeps your cookies from ending up with random baking soda pockets.
- Butter goes next—soft or melted both work, but melted butter gives a chewier, slightly denser center. Mix it with the sugars until the mixture looks like soft sand. Add the egg and vanilla and whisk until everything looks unified.
- Then fold in the dry ingredients gently. Overmixing can lead to cakey cookies, and nobody wants the disappointment of a dry cookie on Christmas Eve.
Add-Ins & Portioning
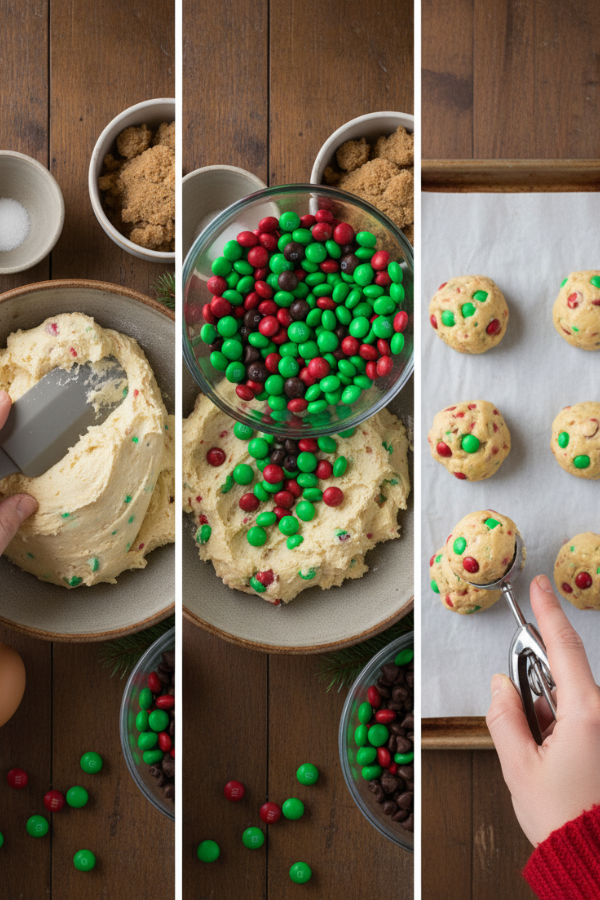
Once the dough looks cohesive, stir in your chocolate chips, M&Ms, sprinkles, or whatever festive mix-ins you’re using. It’s okay if it looks slightly overloaded—that’s part of the charm during the holidays.
A cookie scoop helps with portioning and makes every cookie bake the same way.
- Mini cookies: scoop 1 teaspoon size (makes ~32).
- Standard cookies: 1 tablespoon size (makes ~24).
Uniform size means uniform baking, and that matters more than people think.
Baking & Cooling
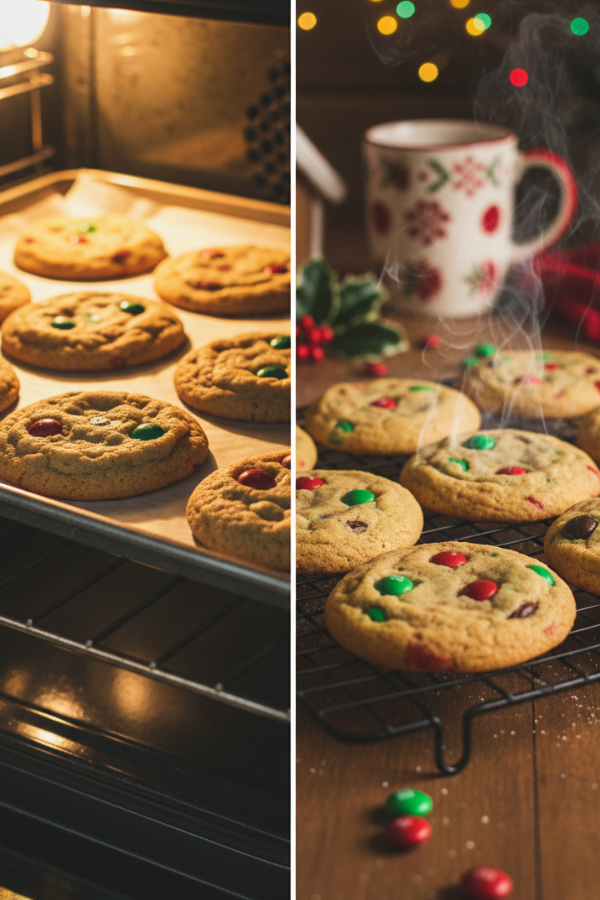
Bake for 7–13 minutes, depending on size. Pull them when the edges are set but the centers look soft—they firm up as they cool.
Let them rest on the baking sheet for at least 5 minutes. This short cooling time helps the centers settle into that iconic chewy texture. Transfer to a rack afterward so they finish cooling without becoming soggy.
Tips for Success
Texture Control
If you prefer chewy cookies, lean heavier on brown sugar. If you like crispier edges, a bit more white sugar or a slightly longer bake helps.
Another key point: don’t overmix after adding flour. It’s the quickest way to go from soft bakery-style cookies to dry, bready ones.
Even Baking
Cookies need space—don’t crowd the pan. Air circulation helps them bake at the right pace, and you’ll avoid those weird cookies that bake unevenly.
Whenever possible, bake one sheet at a time. Yes, you can rotate pans if you must, but single-sheet baking is the most reliable way to get the same texture across the batch.
Festive Customization
Holiday sprinkles are fun, but some tend to bleed. Stick to non-bleeding jimmies or higher-quality holiday sprinkles so your cookies keep those bright, crisp colors.
Want extra shine? Add a pinch of coarse sugar on top before baking. It catches the light in the cutest way.
Common Problems & Solutions
- Cookies Spread Too Much
Warm butter or extra sugar is often the culprit. A quick 15–30 minute chill firms up the dough and helps.
- Cookies Are Too Flat or Hard
You may have overmixed or used too much leavening. Check your oven temperature too—cool ovens flatten cookies.
- Colors Bleeding From Sprinkles
Some holiday sprinkles use water-based dyes. Choose non-bleeding jimmies or higher-quality options.
Storage & Leftover Notes
Keeping Fresh
Store cooled cookies in an airtight container at room temperature for 5–7 days. They stay soft thanks to the high brown sugar content.
You can also freeze baked cookies for up to 2 months. Warming them for 10–15 seconds in the microwave brings them back to life.
Dough Storage
Freeze scooped dough balls and bake them whenever you need a last-minute holiday treat. They go straight from freezer to oven—just add 1–2 minutes to the bake time.
FAQs
1. Can I make this recipe ahead of time?
Yes—chilling the dough for up to 24 hours deepens the flavor and prevents overspreading.
2. What if I don’t have holiday sprinkles?
Use regular chocolate chips or chop red and green candy pieces for pops of holiday color.
3. Can this be gluten-free?
Absolutely. A 1:1 gluten-free baking flour works nicely, though the cookies may be slightly more tender.
4. How do I keep cookies soft?
Underbake slightly and cool on the sheet. Storing cookies with a slice of bread helps retain moisture—strange but effective.
Nutrition & Holiday Serving Info
Mini cookies come in around 38 calories each. Larger ones vary, of course. Sugar content is typical for cookies, but balancing treats with protein-rich meals throughout the day helps mindful eaters enjoy them without worry.
Conclusion
Christmas Chocolate Chip Cookies are the kind of holiday baking win you can count on—easy, festive, and reliably delicious. Whether you keep it classic with red and green M&Ms or go all-in with sprinkles, white chocolate, and a hint of cinnamon, this dough is forgiving enough for busy nights and fun enough for family traditions.
Bake a batch for cookie platters, school parties, or a cozy “just because it’s December” treat—then tuck a few dough balls in the freezer for instant holiday magic later. And remember: the best cookies aren’t the ones that look perfect… they’re the ones that disappear first.

| Cook Time | 10 minutes |
| Servings |
cookies
|
- Flour baking soda, salt
- Butter brown sugar, white sugar
- Egg vanilla
- Chocolate chips M&Ms, sprinkles
Ingredients
|
|
- Dough Preparation Start by heating your oven to 350°F—the sweet spot for cookies that spread nicely but don’t burn. Whisk your dry ingredients (flour, baking soda, baking powder if using, and salt) in a separate bowl. It’s tempting to skip this, but combining them first keeps your cookies from ending up with random baking soda pockets. Butter goes next—soft or melted both work, but melted butter gives a chewier, slightly denser center. Mix it with the sugars until the mixture looks like soft sand. Add the egg and vanilla and whisk until everything looks unified. Then fold in the dry ingredients gently. Overmixing can lead to cakey cookies, and nobody wants the disappointment of a dry cookie on Christmas Eve.

- Add-Ins & Portioning Once the dough looks cohesive, stir in your chocolate chips, M&Ms, sprinkles, or whatever festive mix-ins you’re using. It’s okay if it looks slightly overloaded—that’s part of the charm during the holidays. A cookie scoop helps with portioning and makes every cookie bake the same way. Mini cookies: scoop 1 teaspoon size (makes ~32). Standard cookies: 1 tablespoon size (makes ~24). Uniform size means uniform baking, and that matters more than people think.
- Baking & Cooling Bake for 7–13 minutes, depending on size. Pull them when the edges are set but the centers look soft—they firm up as they cool. Let them rest on the baking sheet for at least 5 minutes. This short cooling time helps the centers settle into that iconic chewy texture. Transfer to a rack afterward so they finish cooling without becoming soggy.


