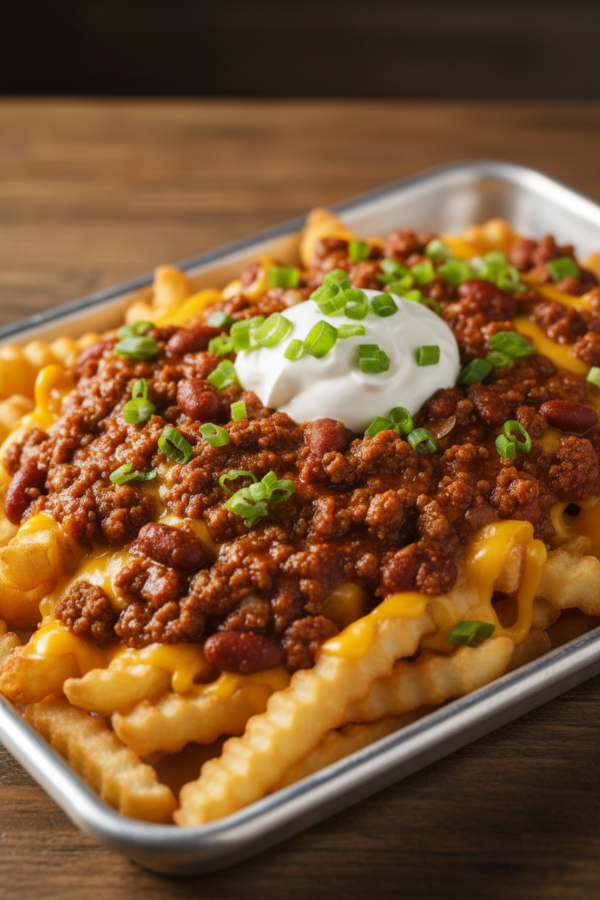
Loaded Chili Cheese Fries are the kind of comfort food you crave when you want something warm, cheesy, and deeply satisfying—without spending hours in the kitchen. Crispy golden fries topped with rich, hearty chili and melty cheese create that perfect balance of texture and flavor.
More importantly, it’s quick enough for a busy weeknight, fun enough for game day, and flexible enough to fit whatever you already have in your fridge.
Why You’ll Love This Recipe (Especially on a Busy Night)
You know those nights when you want something indulgent but don’t want a pile of dishes afterward?
Well, in that case, this recipe is exactly what you need.
- Ready in about 35–40 minutes total
- Uses mostly pantry staples
- One tray + one pan = minimal cleanup
- Easy to scale for meal prep or family dinners
- Flexible: swap beef, go vegetarian, adjust spice level
On top of that, it perfectly balances convenience and indulgence.
What You’ll Need (Simple Ingredients, Big Flavor)
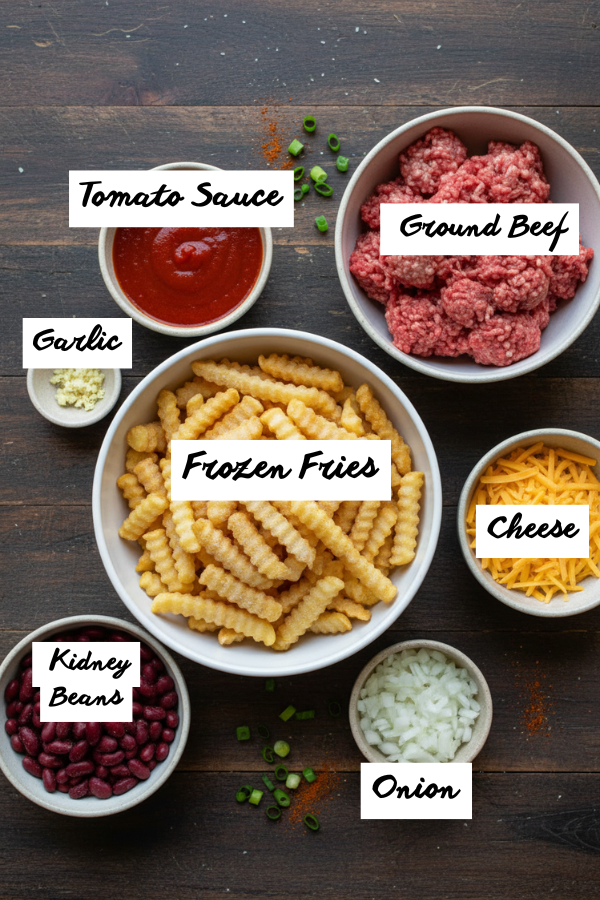
For the Fries
- 1 bag frozen fries (crinkle-cut works best)
- Alternatively, sweet potato fries for a lighter twist
For the Chili
- 1 lb ground beef (or ground turkey)
- 1 can kidney beans (drained)
- 1 cup tomato sauce
- 1 small onion (diced)
- 2 cloves garlic (minced)
- 1 tbsp chili powder
- 1 tsp cumin
- Salt & pepper to taste
For the Cheese Layer
- 1½ cups shredded cheddar
- In addition, Monterey Jack for extra melt
Toppings (Make It “Loaded”)
- Sour cream
- Green onions
- Jalapeños
- Avocado or guacamole
Step-by-Step Instructions
Step 1: Get the Fries Crispy First
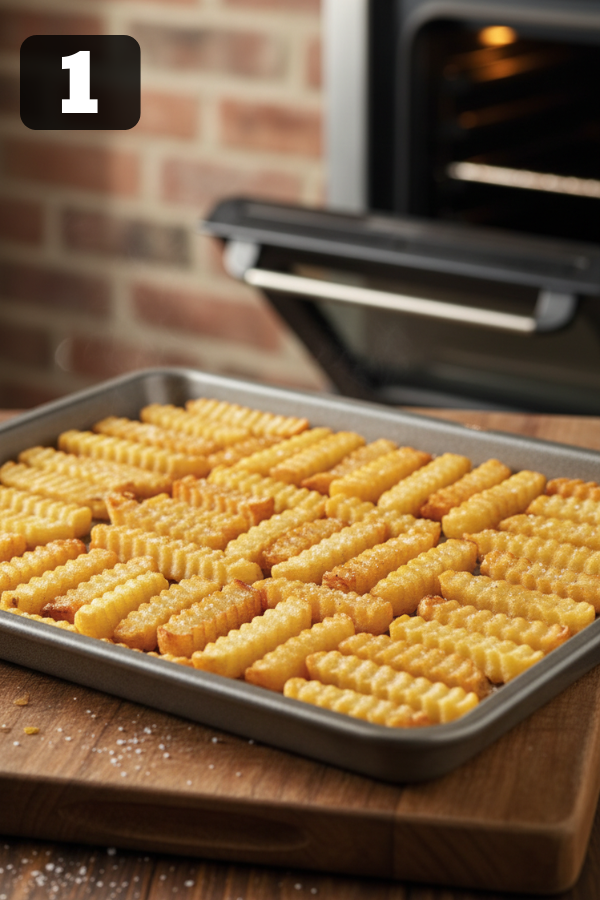
Preheat your oven to 400°F. Then spread the fries in a single layer—don’t crowd them.
After that, bake for about 20–25 minutes, flipping halfway through.
Here’s a small but important tip: leave them in 5 minutes longer than the package suggests.
It might feel like overdoing it—but trust me, it’s not.
In fact, that extra crispiness prevents soggy fries later.
Step 2: Build a Thick, Flavorful Chili
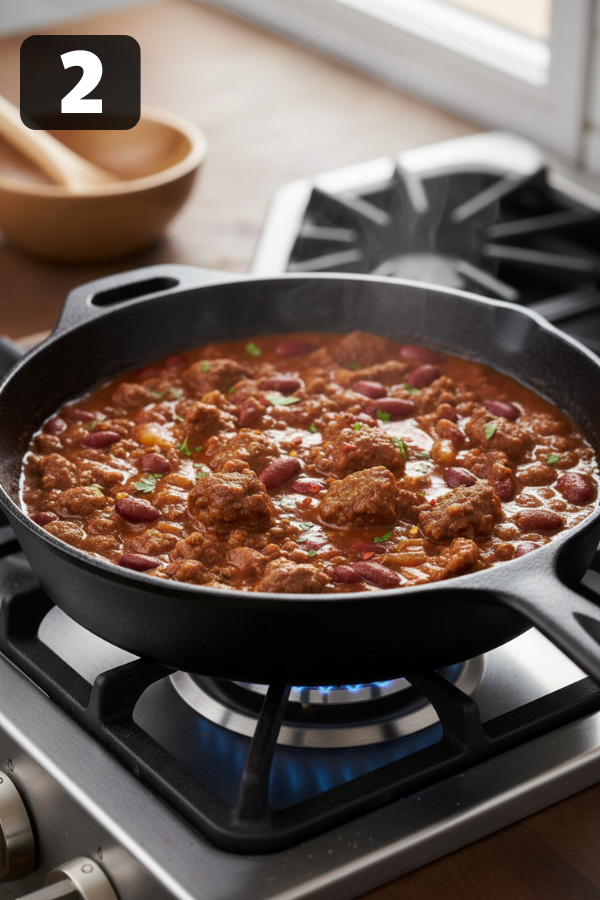
While the fries are baking, start preparing the chili.
First, cook the ground beef over medium heat until browned (about 5–7 minutes).
Next, add onions and garlic, allowing them to cook until fragrant.
Then stir in:
- Tomato sauce
- Beans
- Spices
Let everything simmer for 15–20 minutes.
At this stage, aim for a thick consistency.
In other words, it should be spoonable rather than pourable.
Step 3: Assemble Like a Pro (Layers Matter)
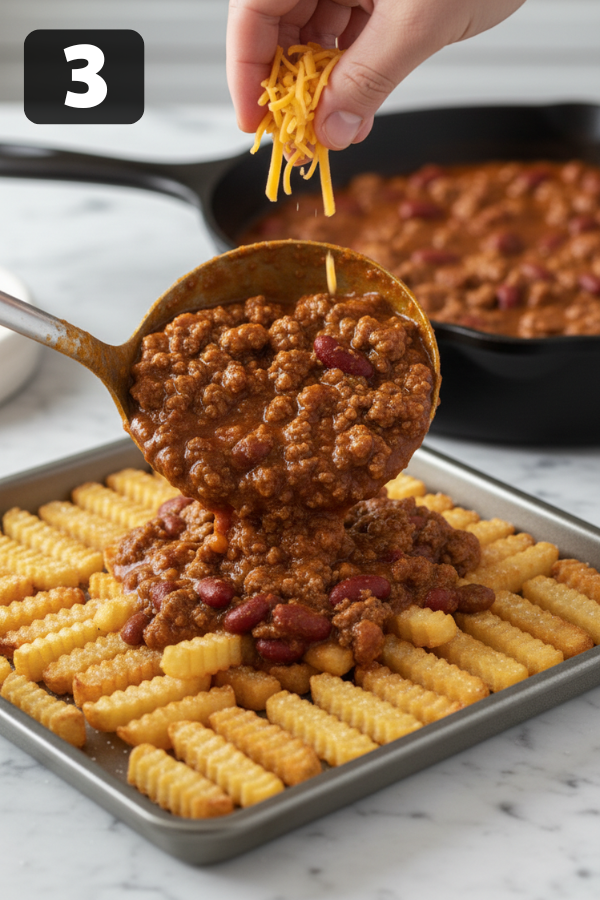
Once the fries are done, transfer them if needed.
Start with a base layer of fries.
Then add the chili evenly across the top.
Finally, sprinkle cheese over everything.
If you want to upgrade it, repeat the layers once more.
As a result, each bite becomes more flavorful and balanced.
Step 4: Melt Everything Together

Place the tray back into the oven at 375°F for about 5–8 minutes.
Alternatively, you can broil for 2–3 minutes to get a golden, bubbly finish.
However, don’t walk away.
Because of the high heat, broilers can burn food very quickly.
Step 5: Finish with Fresh Toppings

Now it’s time to finish the dish.
Instead of just serving it plain, add your toppings right away.
For example, a dollop of sour cream adds creaminess.
Meanwhile, green onions bring freshness.
At the same time, jalapeños add a bit of heat.
Serve immediately, as the texture is best when hot and fresh.
A Few Real-Life Tips (That Make a Big Difference)
Most recipes skip these details, but they matter.
1. Crispy First, Always
If fries aren’t crispy before adding toppings, they won’t recover later.
So, take the extra time upfront.
2. Chili Thickness Is Everything
If the chili is too thin, the fries become soggy.
On the other hand, a thick chili creates the perfect bite.
3. Cheese Choice Matters
Freshly shredded cheese melts more smoothly.
Meanwhile, pre-shredded cheese is easier to use but slightly less creamy.
Make It Your Own (Because Everyone Does Anyway)
You don’t have to follow this exactly—in fact, most people customize it.
Healthier Version
- Use air fryer fries
- Swap beef for turkey
- Replace sour cream with Greek yogurt
Vegetarian Twist
- Use lentils or black beans
- Add roasted vegetables
Spicy Upgrade
- Add hot sauce
- Use pepper jack cheese
Game-Day Style
- Add bacon bits
- Drizzle extra cheese sauce
Storage & Meal Prep
Fries don’t store well—however, the chili does.
For example, chili can last 3–4 days in the fridge.
Additionally, it freezes well for up to 3 months.
Because of this, it’s best to prep the chili in advance.
Then, assemble fresh fries when serving.
What to Serve With It
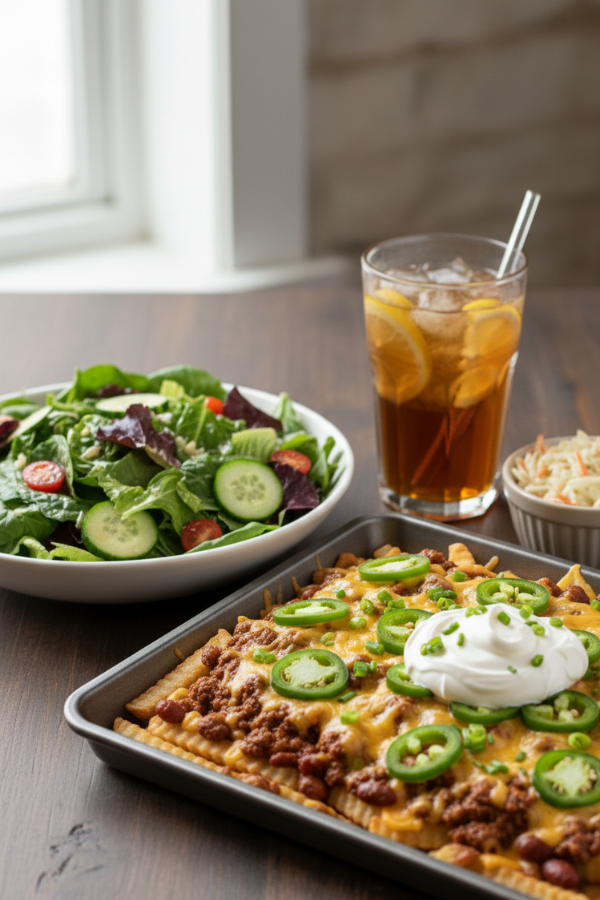
Since this dish is rich, pairing it with something light works best.
- A simple green salad
- Coleslaw for crunch
- Lemon water or iced tea
That said, you can absolutely enjoy it on its own.
Common Mistakes (And How to Avoid Them)
If fries turn soggy, the chili is usually too watery.
Therefore, simmer it longer.
If cheese doesn’t melt properly, it may be pre-shredded.
In that case, switch to freshly shredded cheese.
If the flavor feels flat, it likely needs balance.
To fix this, add salt and a squeeze of lime.
Nutrition Snapshot
- Calories: 450–600 per serving
- Protein: 20–30g
- Carbs: 40–60g
- Fat: 20–35g
Although it’s comfort food, you can still adjust it to fit your goals.
FAQs
- Can I make this ahead of time?
Yes, but only prepare the chili in advance. Then assemble fresh. - Can I use frozen fries?
Absolutely. In fact, they’re the easiest option. - What cheese melts best?
Cheddar and Monterey Jack work well together. - How do I keep fries crispy longer?
Bake them longer first, and serve immediately.
Final Thoughts
Loaded Chili Cheese Fries aren’t complicated—however, small details matter.
In the end, success comes down to three key elements:
- crispy fries
- thick chili
- proper layering
That’s it—that’s the secret.
And once you master it, you’ll want to make it again sooner than you think.
Don’t Miss: Crockpot Taco Hashbrown Casserole
Don’t Miss: Chicken Philly Cheesesteak
Also Try: Easy Air Fryer Chicken Bites
Ingredients
Method
- Step 1: Get the Fries Crispy FirstPreheat your oven to 400°F. Then spread the fries in a single layer—don’t crowd them.After that, bake for about 20–25 minutes, flipping halfway through.Here’s a small but important tip: leave them in 5 minutes longer than the package suggests.It might feel like overdoing it—but trust me, it’s not.In fact, that extra crispiness prevents soggy fries later.

- Step 2: Build a Thick, Flavorful ChiliWhile the fries are baking, start preparing the chili.First, cook the ground beef over medium heat until browned (about 5–7 minutes).Next, add onions and garlic, allowing them to cook until fragrant.Then stir in:Tomato sauceBeansSpicesLet everything simmer for 15–20 minutes.At this stage, aim for a thick consistency.In other words, it should be spoonable rather than pourable.
- Step 3: Assemble Like a Pro (Layers Matter)Once the fries are done, transfer them if needed.Start with a base layer of fries.Then add the chili evenly across the top.Finally, sprinkle cheese over everything.If you want to upgrade it, repeat the layers once more.As a result, each bite becomes more flavorful and balanced.
- Step 4: Melt Everything TogetherPlace the tray back into the oven at 375°F for about 5–8 minutes.Alternatively, you can broil for 2–3 minutes to get a golden, bubbly finish.However, don’t walk away.Because of the high heat, broilers can burn food very quickly.
- Step 5: Finish with Fresh ToppingsNow it’s time to finish the dish.Instead of just serving it plain, add your toppings right away.For example, a dollop of sour cream adds creaminess.Meanwhile, green onions bring freshness.At the same time, jalapeños add a bit of heat.Serve immediately, as the texture is best when hot and fresh.


