Homemade Lemon Crumb Bars can be frustrating when the filling turns runny, the crust goes soggy, or the bars crumble the second the knife touches them. You followed the recipe, set the timer, did everything right — and it still didn’t work. I’ve been there, and I know exactly how disappointing that feels. Runny filling and soggy crusts are two of the most common problems with lemon bars; however, most recipes never explain why they happen.
This one does. You’ll get the full recipe — plus the food-science reason behind every step — so these homemade lemon crumb bars come out perfectly the first time, and every time after. Buttery crumb crust, bright lemon filling, golden crumb topping. Let’s fix this once and for all.
Why Homemade Lemon Crumb Bars Work So Well
This isn’t just a pretty dessert. There are real, structural reasons this recipe delivers consistent results — and why so many lemon bar recipes fail.
First, the crumb layer does double duty. It forms the crust below and the topping above. One mixture, two roles. Less effort, more payoff.
Second, condensed milk sets without eggs. When sweetened condensed milk meets fresh lemon juice, the acid causes the milk proteins to firm naturally into a soft custard — no eggs, no double boiler, no drama.
Third, pre-baking locks in the texture. Baking the crust before adding the filling creates a moisture barrier. As a result, that barrier keeps the base golden instead of wet.
Finally, it’s make-ahead friendly by design. These bars improve after an overnight chill — often better on day two than day one. Therefore, they’re ideal for events, potlucks, and gifting.
The Ingredients You’ll Need
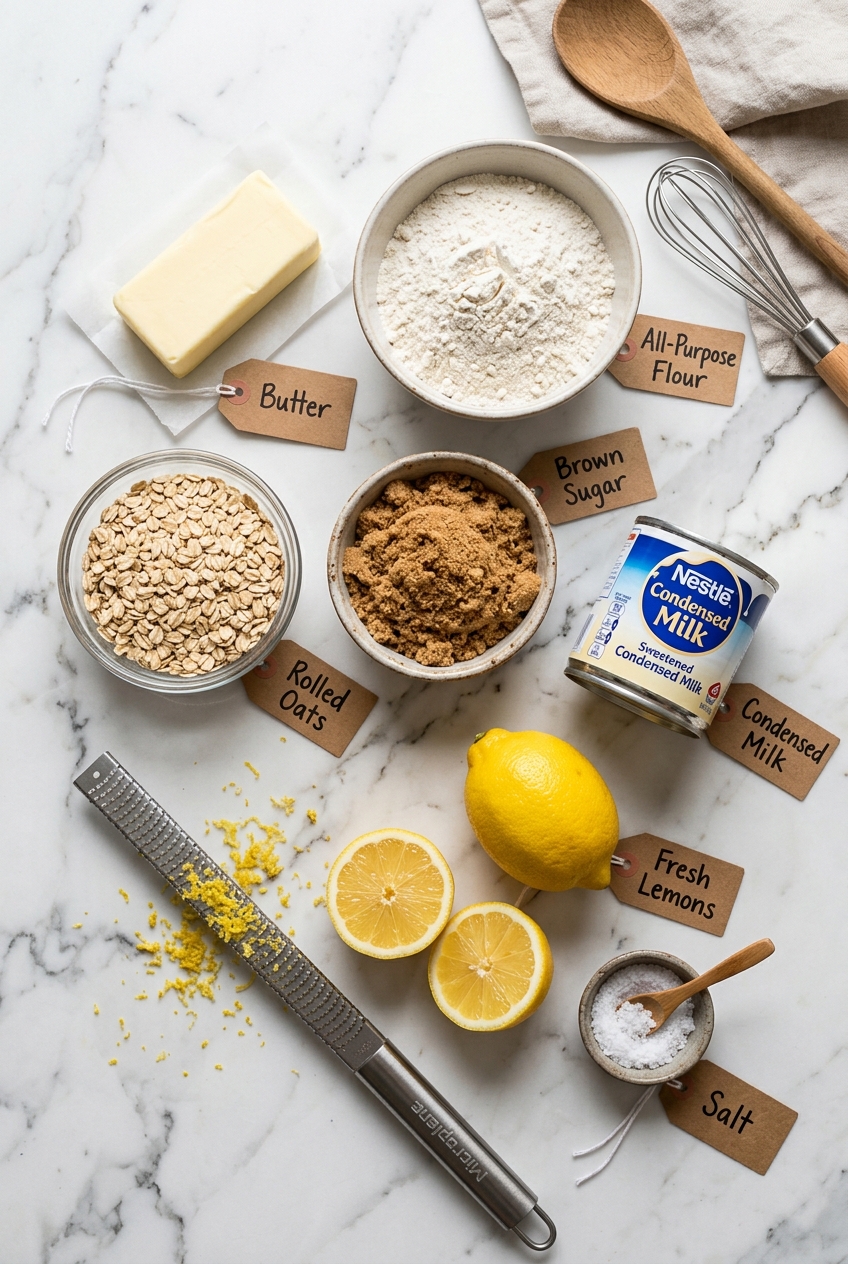
The Crumb Layer
- 1 cup (125g) all-purpose flour — the backbone of the crust. It holds the crumb together and gives the whole thing structure.
- 1 cup (90g) old-fashioned rolled oats — these give the crumb its signature hearty texture. Quick oats work too, but they produce a denser, finer crumb. Rolled oats give you that rustic, slightly chunky topping everyone reaches for.
- 1/2 cup (110g) packed brown sugar — brown sugar adds a subtle molasses depth that white sugar can’t match. Plus, it helps the crumb go beautifully golden in the oven.
- 1/2 teaspoon baking powder — just a touch, to keep the crust from turning too dense.
- 1/4 teaspoon fine salt — always. Even in sweet baking, salt is what makes every other flavor pop.
- 1/2 cup (113g) cold unsalted butter, cut into cubes — cold butter is non-negotiable. Working it in by hand gives you those irregular, crunchy crumbs rather than a paste.
The Lemon Filling
- 1 can (14 oz / 396g) sweetened condensed milk — the star ingredient. Do not substitute evaporated milk. They are completely different products: evaporated milk is thin and unsweetened; condensed milk is thick and sweet. Swapping them gives you a runny, failed filling every single time.
- 1/2 cup (120ml) fresh lemon juice — from about 3 to 4 medium lemons. Fresh is non-negotiable here — the acid chemistry that makes the filling firm up requires freshly squeezed juice. Bottled juice has a flat, slightly hollow taste that nothing can rescue.
- 1 to 3 tablespoons fresh lemon zest — here’s your flavor dial. One tablespoon gives you a mild lemon note. Three tablespoons give you a bold, bakery-bright citrus punch. I usually go for about 2 — that sweet spot between subtle and bold.
- 1/2 teaspoon pure vanilla extract (optional) — it adds a warm depth that rounds out the brightness of the lemon beautifully.
Step-by-Step Instructions: How to Make Homemade Lemon Crumb Bars
Before you start, here’s the fail-safe method at a glance:
The 3-Step Method That Fixes Everything
Step 1: Pre-bake the crust until golden — this creates the moisture barrier.
Step 2: Pour the filling over a warm crust — this improves adhesion between layers.
Step 3: Chill overnight before cutting — this allows the protein gel to fully set.
Follow these steps in order and you won’t have runny bars. It really is that simple.
Step 1: Preheat and Prep Your Pan
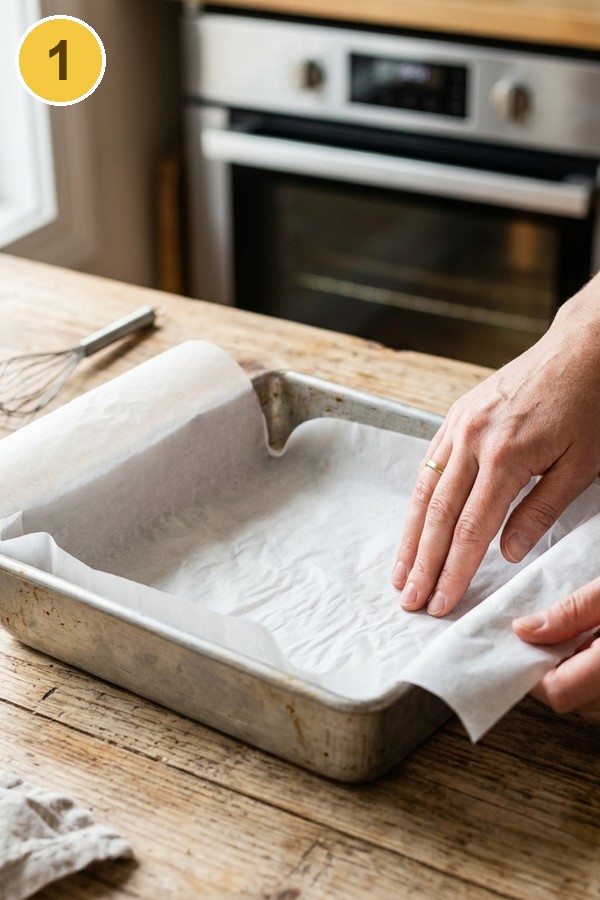
Preheat your oven to 350F (175C). While it warms up, line an 8×8-inch baking pan with parchment paper, leaving about a 1-inch overhang on all four sides. That overhang is your handle later — it lets you lift the whole slab out cleanly for cutting without any wrestling.
Step 2: Make the Crumb Mixture
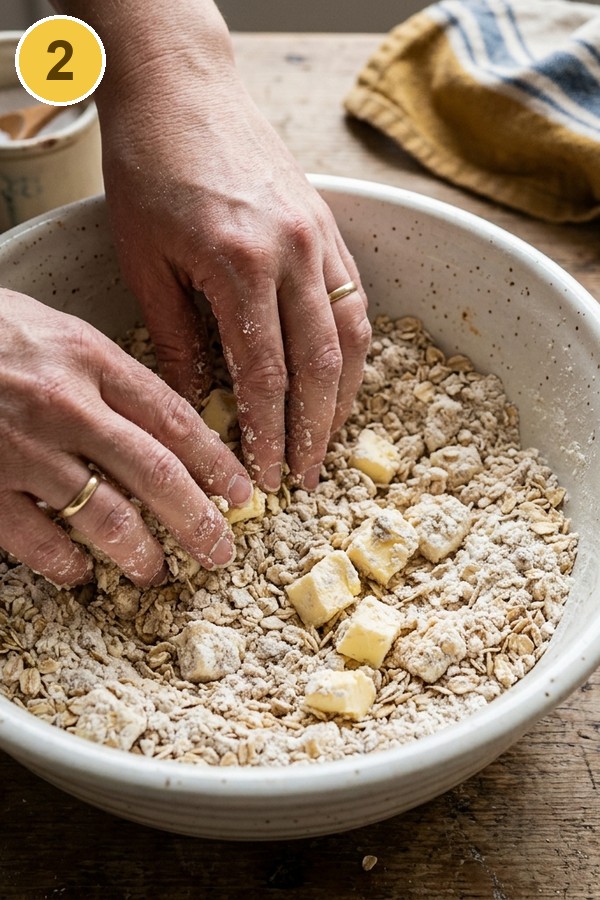
In a large bowl, combine the flour, oats, brown sugar, baking powder, and salt. Add the cold butter cubes. Then, using your fingertips, work the butter into the dry ingredients until the mixture looks like coarse crumbs — think pea-sized chunks of butter still visible, and the whole thing feels slightly sandy between your fingers. That’s exactly right. Do not overmix. Those irregular butter pockets are what create the crumbly, slightly crunchy texture you’re after.
Step 3: Pre-Bake the Crumb Crust
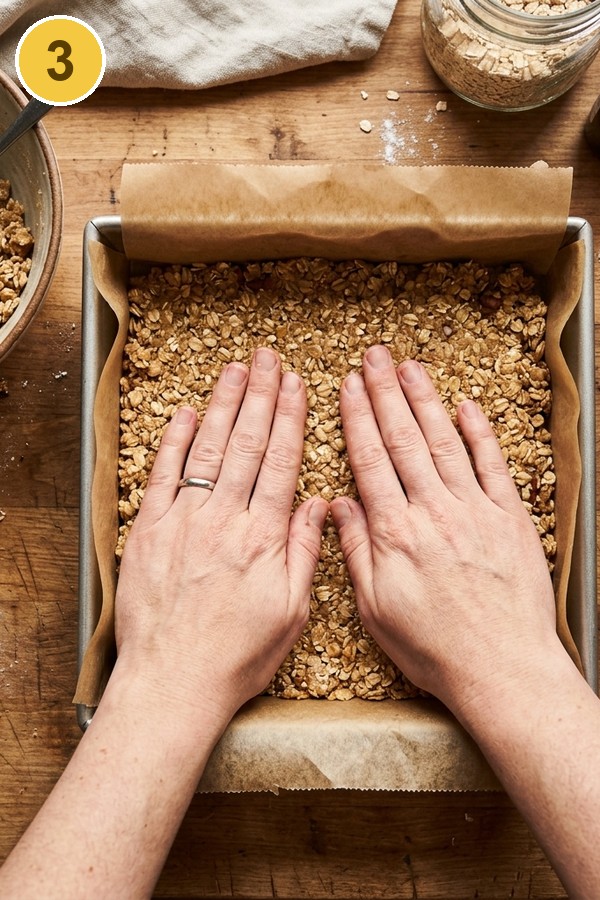
Press two-thirds of the crumb mixture firmly and evenly into the bottom of your prepared pan. Set the remaining third aside — you’ll need it for the topping. Bake for 12 to 14 minutes, until the edges are just turning golden and the kitchen starts to smell like buttery oat cookies. Then pull it out of the oven. Do not turn the oven off.
Here’s the thing: this pre-bake step is not optional. The heat drives off surface moisture and starts the Maillard reaction in the crust — creating a firm, golden barrier. Pour wet filling on an unbaked crust and you get a soggy mess. Pre-bake it and you get a crisp, sturdy base that holds up under the filling no matter what.
Step 4: Make the Lemon Filling
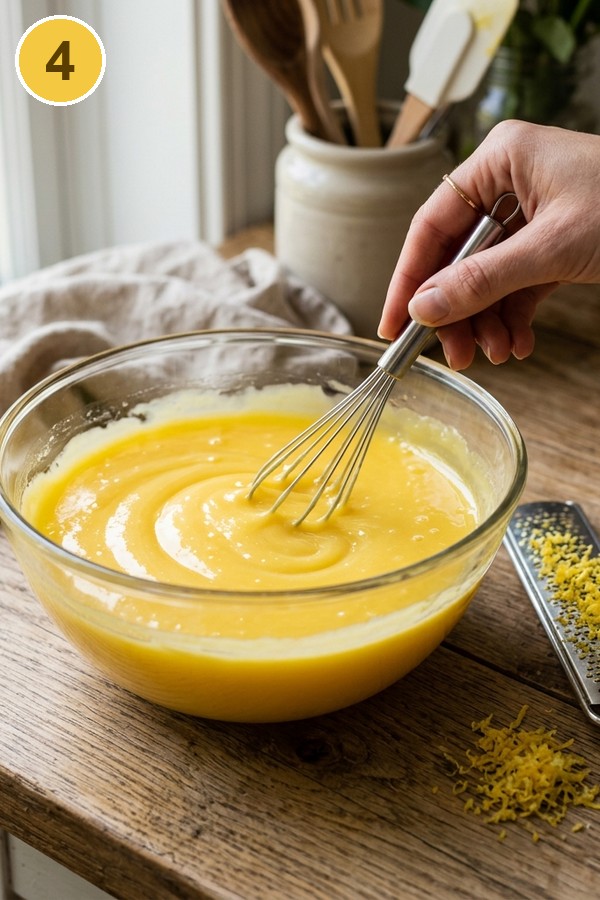
While the crust is still hot, make the lemon filling. In a medium bowl, whisk together the sweetened condensed milk, fresh lemon juice, lemon zest, and vanilla (if using). Whisk gently for about 60 seconds, until the mixture is smooth — it’ll look a little glossier than when you started. However, don’t overbeat it. Too much air creates a foamy top layer that looks rough once baked and ruins that clean, creamy finish.
You’ll notice the filling thickens slightly as the lemon acid reacts with the milk proteins. That reaction is exactly what makes the filling set in the oven without eggs. Simple chemistry, completely reliable — as long as you use sweetened condensed milk and fresh lemon juice.
Step 5: Assemble the Bars
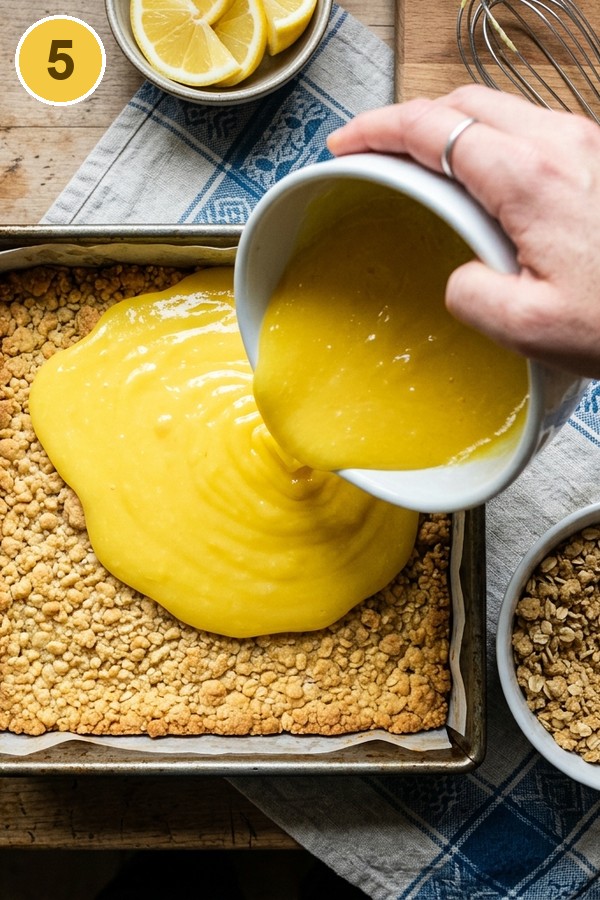
Pour the lemon filling evenly over the warm crust. Spread it gently to the edges if needed. Then sprinkle the reserved crumb topping evenly over the filling. You can press it in very lightly, or leave it loose — both work. Loose crumbs bake up crunchier; pressed crumbs hold together more like a cohesive streusel. Either way, the result is gorgeous.
Step 6: Bake
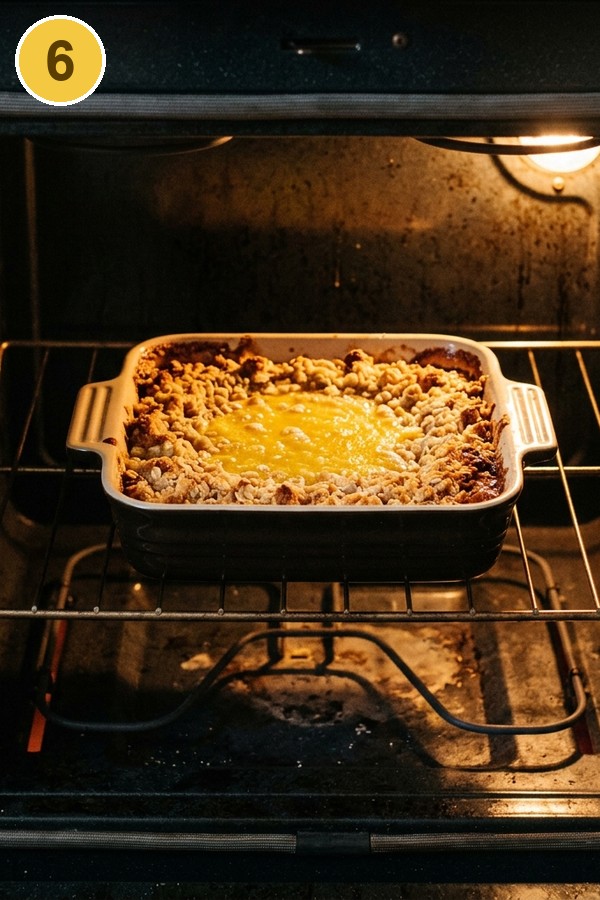
Return the pan to the 350F (175C) oven and bake for 20 to 25 minutes. You’re looking for golden-brown edges and a center that looks set. To check: gently shake the pan. The center should move as one cohesive unit — a slow, gel-like jiggle, not a liquid ripple. If it still ripples like water, give it another 3 to 5 minutes and check again.
Step 7: Cool, Then Chill
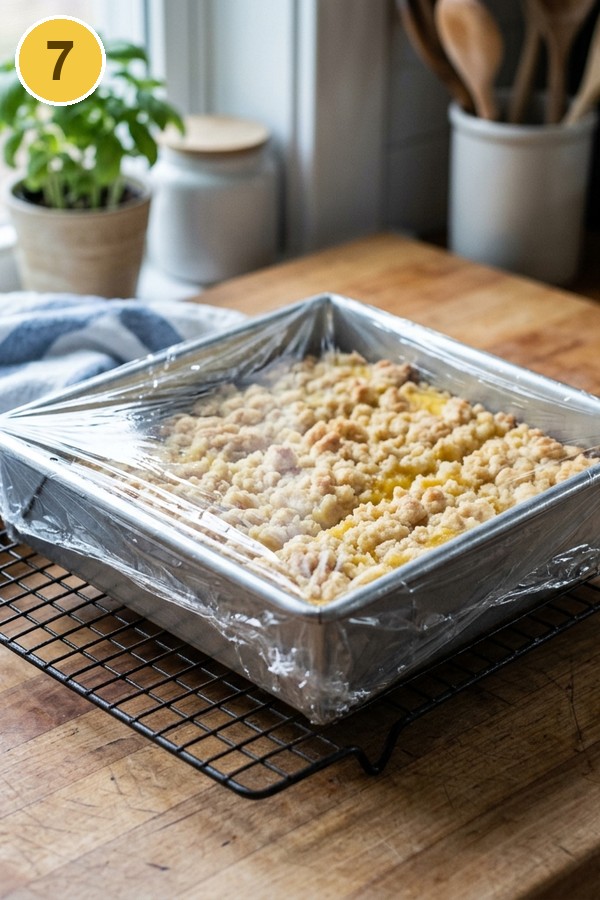
Remove the pan from the oven. The kitchen will smell wonderful right now — that warm lemon-butter scent is a very good sign. Let the bars cool completely at room temperature, about 1 hour. Then transfer the pan to the refrigerator and chill for a minimum of 4 hours. Overnight is strongly preferred. The filling continues to firm as it cools, and the protein network genuinely needs time to fully set. Cutting too early is the single most common reason bars fall apart — so be patient. It’s worth it.
Step 8: Cut and Serve
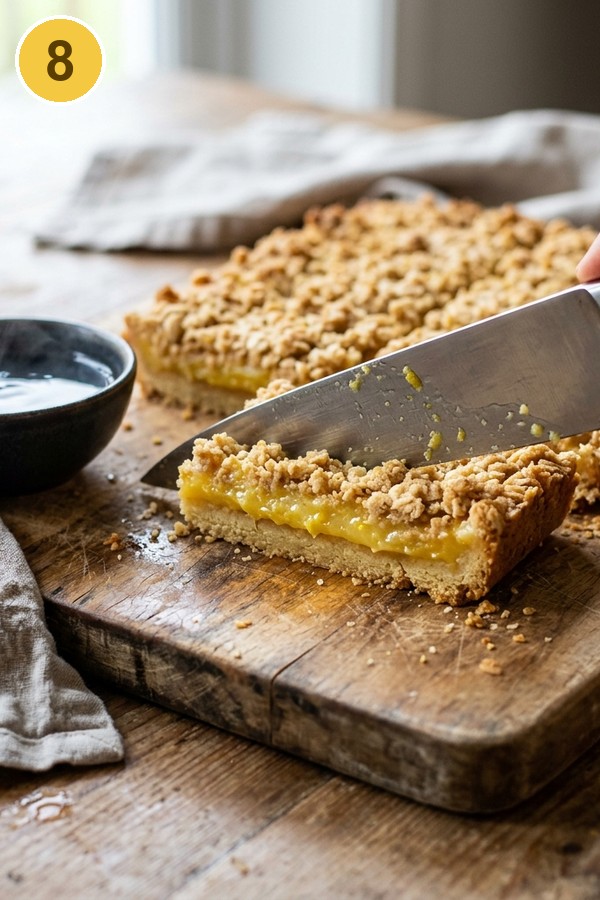
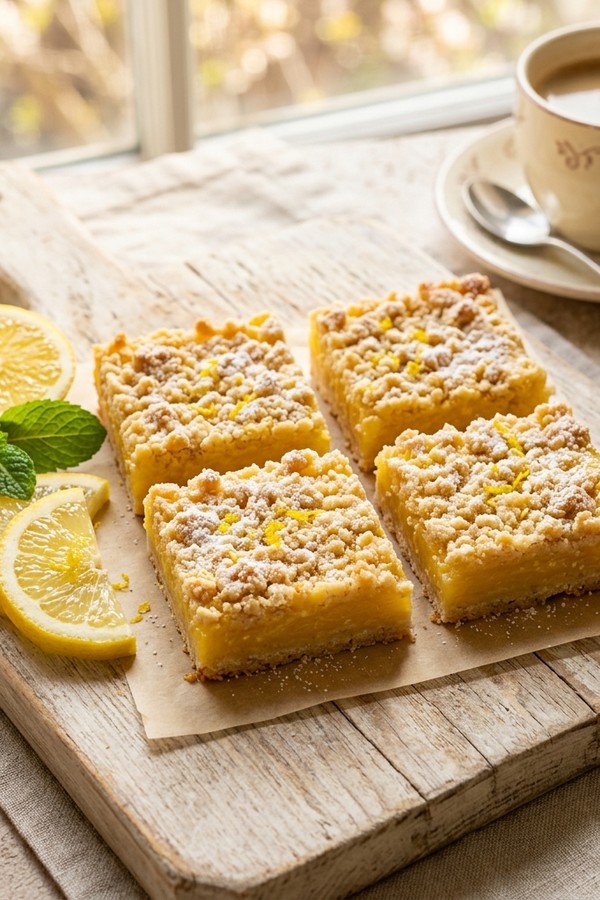
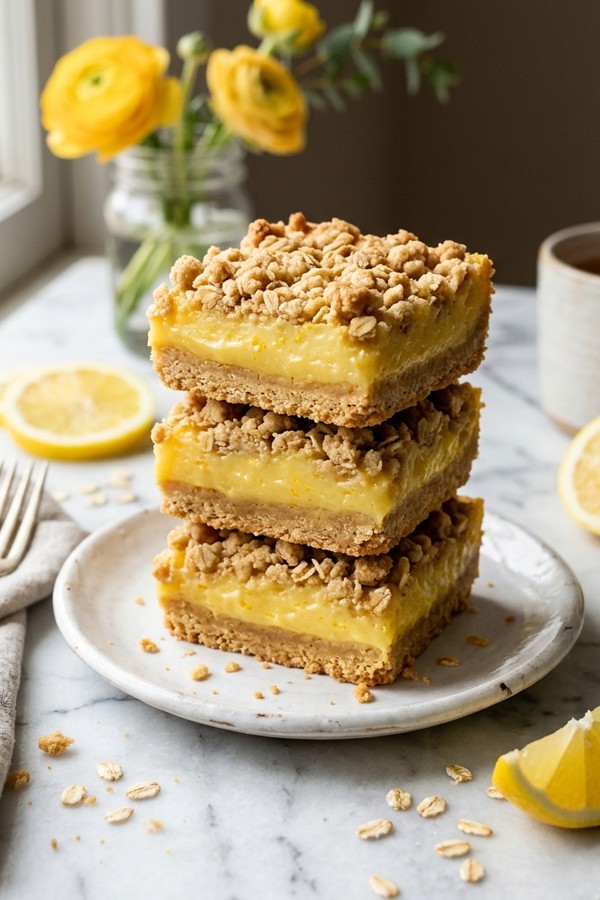
Lift the chilled slab out of the pan using the parchment paper overhang and place it on a cutting board. Run a sharp knife under hot tap water, wipe it completely dry, and slice with one firm downward motion — no sawing. Clean the knife between every cut. This technique is the difference between crumbled, jagged bars and clean, bakery-level squares. Cut into 16 bars and serve chilled or at room temperature.
Make It Your Way — 3 Variations
Classic (Original Recipe)
Follow the recipe as written above. This is the version that works for most bakers and delivers consistent results every time. No changes needed.
Gluten-Free Version
Replace the all-purpose flour with a 1:1 gluten-free flour blend (Bob’s Red Mill or King Arthur Measure for Measure both work well). Also use certified gluten-free rolled oats — regular oats may be processed on shared wheat equipment. Because GF flour binds differently, add 30 extra minutes of refrigeration before cutting. The bars will be equally creamy; the crust just needs a little longer to firm up. Indeed, our Carrot Cake Bars also have a GF-adaptable crumb base worth trying.
Keto / Low-Carb Version
Replace the flour and oats with 2 cups of almond flour. Swap the brown sugar for a granulated keto sweetener — erythritol, monk fruit, or allulose all work well. For the filling, use a keto-friendly sweetened condensed milk (available online, or easy to make at home with heavy cream and powdered sweetener). The texture will be slightly softer than the original, so plan for a full overnight chill before cutting. Also, our Healthy No-Bake Cookie Dough Bars are naturally lower-carb and completely oven-free.
Tips for Getting These Perfect Every Time
- Cold butter, not melted. Melted butter gives you a dense, greasy crust. Cold butter — worked in by hand — is what creates that crumbly, crunchy texture.
- Pour over a warm crust — not a cold one. Letting the crust cool before adding the filling increases the risk of layers separating. The warmth helps the filling adhere and bake as one unified bar.
- Overnight chill is the real secret. Trust me on this one: four hours gets you there, but overnight produces noticeably cleaner cuts, a firmer set, and a richer lemon flavor. If you can, make these the night before.
- Hot knife, clean between every cut. This is non-negotiable for clean edges. Dip the blade, wipe it dry, cut once, repeat. Every single time.
- Zest before juicing. Always zest your lemons first, then juice them. Trying to zest an already-juiced lemon is a frustrating waste of time — the rind collapses and the zester slips.
Storage, Make-Ahead and Party Planning
How Long Do Lemon Crumb Bars Keep?
These bars store well — and honestly taste better after a day or two:
- Room temperature: Up to 2 days in an airtight container. Best in a cool kitchen.
- Refrigerator: Up to 7 days. The flavor peaks somewhere around day 2 to 3.
- Freezer: Up to 3 months. Flash-freeze individual bars on a baking sheet first, then wrap each one in plastic wrap and store in a freezer-safe bag. Thaw overnight in the fridge. Don’t dust with powdered sugar before freezing — add it fresh just before serving.
These bars freeze just as well as our Peanut Butter Blondies — the same flash-freeze method works beautifully for both.
Make-Ahead Party Timeline
Planning ahead for an event? Here’s the schedule that works every time:
- 3 days before: Bake and chill the full slab. Refrigerate uncovered until cold, then cover with foil.
- 1 day before: Lift out of the pan, cut into squares, and refrigerate in an airtight container.
- Day of event: Dust generously with powdered sugar right before serving. At outdoor summer events, keep the bars on a platter set over a container of ice.
What to Serve With Lemon Crumb Bars
These bars shine at spring brunches, afternoon bake sales, and casual dinner parties alike.
Drinks
- Hot black coffee or a latte — the bitterness balances the sweetness perfectly
- Iced hibiscus tea or sparkling lemonade — doubles down on citrus in the best way
- Earl Grey tea with bergamot — a natural complement to lemon
More Lemon Desserts
- Easy Lemon Blueberry Trifle — same bright lemon flavor, zero baking required
- Lemon Blueberry Cake — for when you want to go all-in on lemon season
Other Bar Recipes to Love
- Carrot Cake Bars — equally crowd-friendly, perfect for spring gatherings
- Healthy No-Bake Cookie Dough Bars — a quick no-oven option when you need something sweet fast
Any of these pairings work well. But honestly, these lemon bars hold their own on a plate with nothing more than a good cup of coffee.
Nutrition Info
These are estimates based on 1 bar (1 of 16 bars, crumb topping and filling included). Actual values will vary depending on brands used.
| Per Bar | |
|---|---|
| Calories | ~210 kcal |
| Carbohydrates | ~30g |
| Fat | ~9g |
| Protein | ~3g |
| Sugar | ~18g |
| Fiber | ~0.5g |
| Sodium | ~85mg |
Common Questions and Easy Fixes
1. Why won’t my lemon crumb bars set?
Almost always it comes down to one of two things: the crust wasn’t pre-baked, or the bars weren’t chilled long enough. Pre-bake until golden, then refrigerate at least 4 hours — overnight is better.
2. Can I use bottled lemon juice instead of fresh?
You can, but the flavor difference is real — fresh lemon juice is brighter and provides the correct acid level for the filling to set properly.
3. Can I substitute evaporated milk for sweetened condensed milk?
No. Evaporated milk is thin and unsweetened; using it gives you a runny, unset filling every time.
4. How do I get clean cuts without the bars crumbling?
Chill overnight, then use a sharp knife dipped in hot water and wiped dry. One firm downward press per cut — no sawing. Clean the blade each time.
5. Can I make these gluten-free?
Yes — use a 1:1 GF flour blend and certified GF oats. Allow an extra 30 minutes of refrigeration before cutting.
6. Should I use quick oats or old-fashioned rolled oats?
Old-fashioned rolled oats give the best result — a heartier, crunchier crumb. Quick oats work but produce a finer, denser texture.
7. How far in advance can I make lemon crumb bars for a party?
Up to 3 days ahead. Bake and chill the slab, cut the day before, and store covered in the refrigerator. Dust with powdered sugar right before serving.
These bars have saved more than a few of my spring gatherings. Once you understand why each step matters, they’re genuinely not difficult. Pre-bake the crust. Pour the filling warm. Chill overnight. Use a hot knife. That’s it.
If you’re building out a spring baking spread, also try our Easy Lemon Blueberry Trifle — same bright lemon flavors, zero baking, and it comes together in under 20 minutes.
More Recipes You’ll Love
🔥 Don’t Miss: Carrot Cake Bars — soft, spiced bars with cream cheese frosting — another spring crowd-pleaser
🔥 Don’t Miss: Peanut Butter Blondies — fudgy, rich, and freezer-friendly — the same make-ahead method applies
🔥 Don’t Miss: Healthy No-Bake Cookie Dough Bars — naturally lower-carb, completely oven-free, and ready fast
Ingredients
Method
- Preheat oven to 350F (175C). Line an 8x8-inch baking pan with parchment paper, leaving 1-inch overhang on all four sides.

- In a large bowl, combine flour, oats, brown sugar, baking powder, and salt. Add cold butter cubes and work in with fingertips until the mixture resembles coarse crumbs with pea-sized butter pieces. Do not overmix.
- Press two-thirds of the crumb mixture firmly into the pan. Reserve remaining third for topping. Bake for 12 to 14 minutes until edges turn golden. Remove from oven but do not turn it off.
- Whisk together sweetened condensed milk, fresh lemon juice, lemon zest, and vanilla (if using) until smooth and slightly thickened, about 60 seconds. Do not overbeat.
- Pour lemon filling evenly over the warm crust. Sprinkle reserved crumb topping evenly over the filling.
- Bake at 350F for 20 to 25 minutes until edges are golden and center has a gel-like set (not a liquid ripple) when pan is gently shaken.
- Cool completely at room temperature, about 1 hour. Then refrigerate for a minimum of 4 hours. Overnight is strongly preferred before cutting.
- Lift the chilled slab from the pan using the parchment overhang. Use a sharp knife dipped in hot water (wiped dry) to cut into 16 squares with a single downward press. Clean knife between every cut.