Let’s start with the obvious question—why are these tiny frozen treats suddenly everywhere?
Because they solve a real kitchen problem.
You want dessert, but you don’t want something heavy. You want something sweet, but not a sugar bomb. And ideally, you want something already made so you can grab it between school pickups, work calls, or dinner prep.
That’s where Frozen Greek Yogurt Peanut Butter Bites shine. They’re like the love child of a peanut butter cup and a frozen yogurt bar—except you make them at home with five ingredients.
And yes, they taste as good as that sounds.
Why You’ll Love This Recipe
Some recipes promise a lot and deliver… well, not much. This one actually earns its hype.
Here’s why home cooks keep coming back to these bites:
- No baking required. The freezer does the work.
- High in protein. Greek yogurt plus peanut butter makes a surprisingly filling snack.
- Meal-prep friendly. A batch lasts weeks in the freezer.
- Kid approved. They taste like dessert but feel a little smarter nutritionally.
- Minimal cleanup. One bowl, one tray, done.
And maybe the biggest reason? They hit that sweet spot between comfort food and healthy snack.
Not too rich. Not too “diet.” Just right.
Ingredients
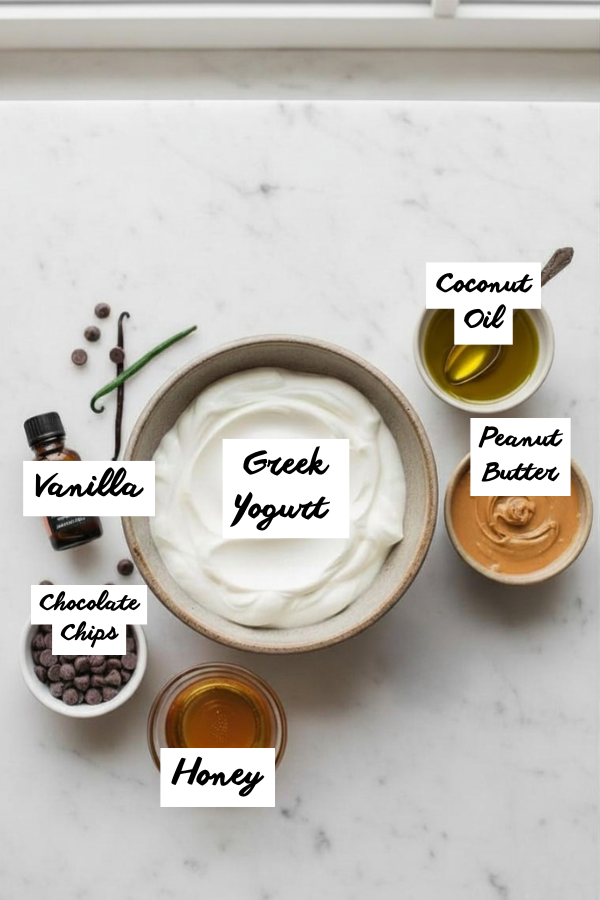
Good recipes often have a secret. This one doesn’t. The ingredient list is short—and that’s the beauty of it.
The Base Ingredients
You’ll need:
- 1 cup Greek yogurt (plain or vanilla)
- ½ cup peanut butter (natural peanut butter works best)
- 2 tablespoons honey or maple syrup
- ½ teaspoon vanilla extract
- 1 cup chocolate chips
That’s really it.
But a few small choices can change the result.
For example, full-fat Greek yogurt creates a creamier frozen texture. Low-fat yogurt tends to freeze harder and slightly icy.
And peanut butter? If it’s too thick, stir it first or warm it for a few seconds in the microwave.
It mixes easier that way.
Step-by-Step Instructions
The process is simple enough to do while dinner cooks. Let me walk you through it.
Step 1: Mix the Yogurt Base
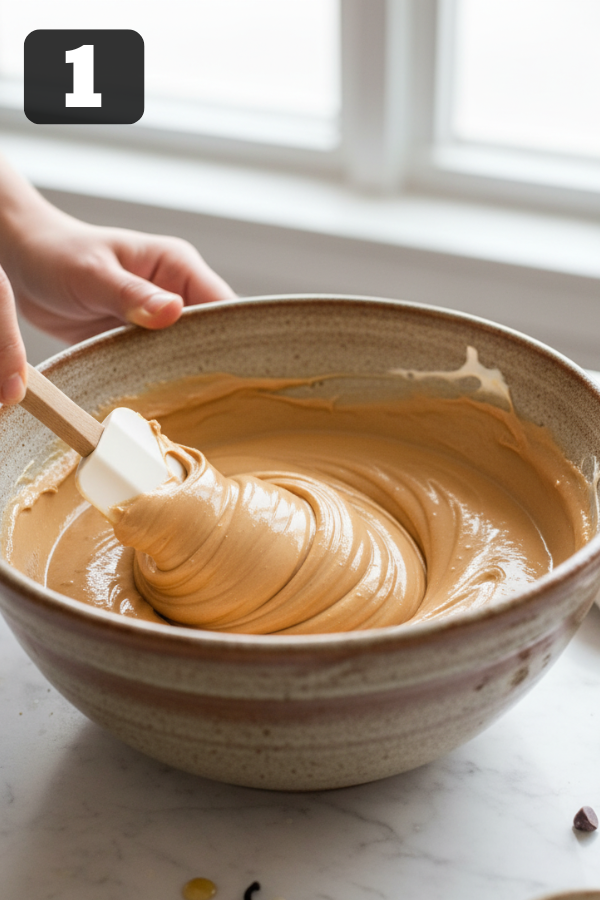
Start with a medium mixing bowl.
Add:
- Greek yogurt
- peanut butter
- honey
- vanilla extract
Stir until smooth.
The mixture should be thick but creamy—something like soft peanut butter frosting.
If it feels stiff, add a teaspoon of yogurt.
If it feels thin, add a spoon of peanut butter.
Cooking isn’t chemistry here. Adjust it until it feels right.
Step 2: Portion the Bites
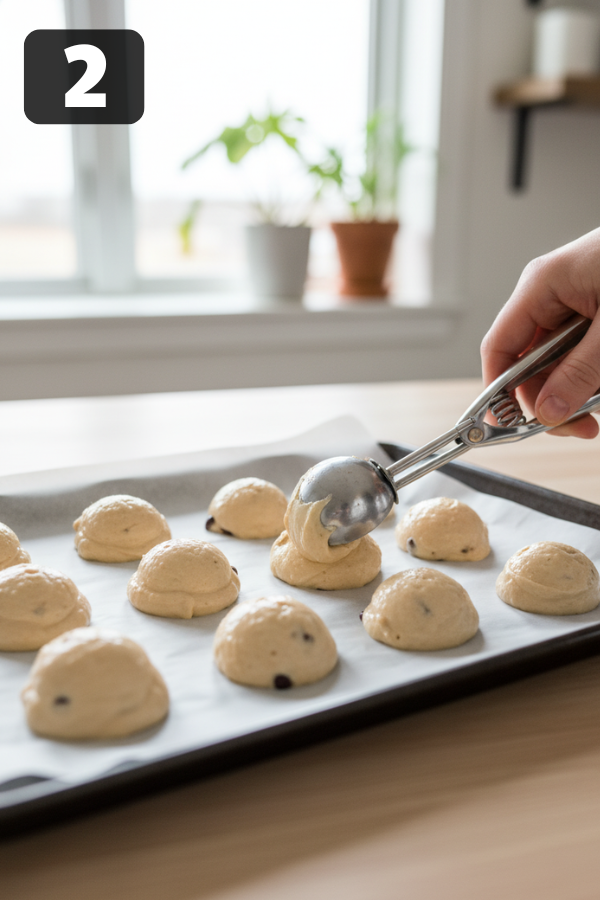
Line a baking sheet with parchment paper.
Now scoop the mixture onto the tray.
A tablespoon works well. If you have a small cookie scoop, even better.
You’ll get about 15–18 bites depending on size.
Try to keep them roughly round—but don’t stress too much. Once frozen and coated in chocolate, they’ll look great.
Step 3: Freeze Until Firm
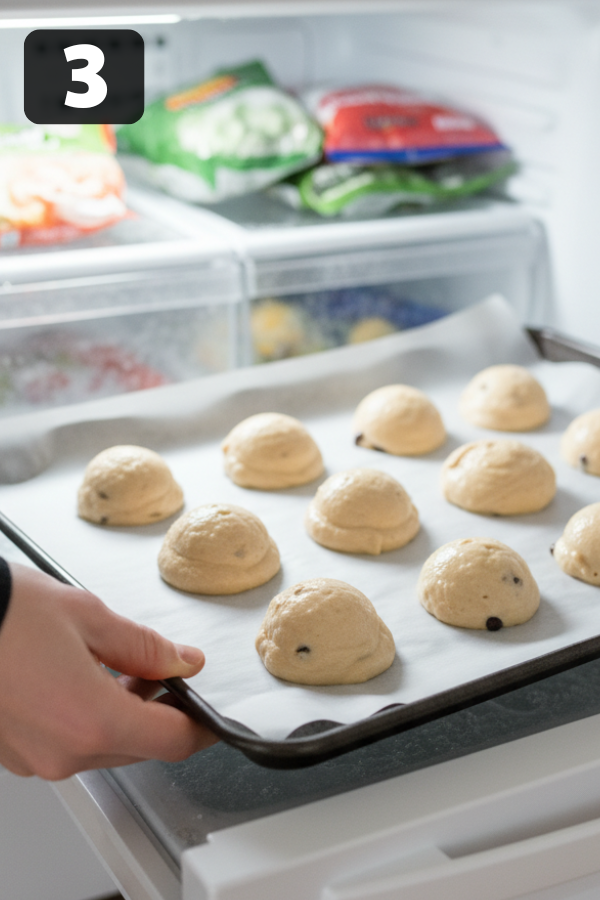
Slide the tray into the freezer.
Wait about 2–3 hours.
When ready, the bites should feel firm and hold their shape when lifted.
This step matters. If they’re too soft, dipping them in chocolate becomes messy.
Step 4: Melt the Chocolate
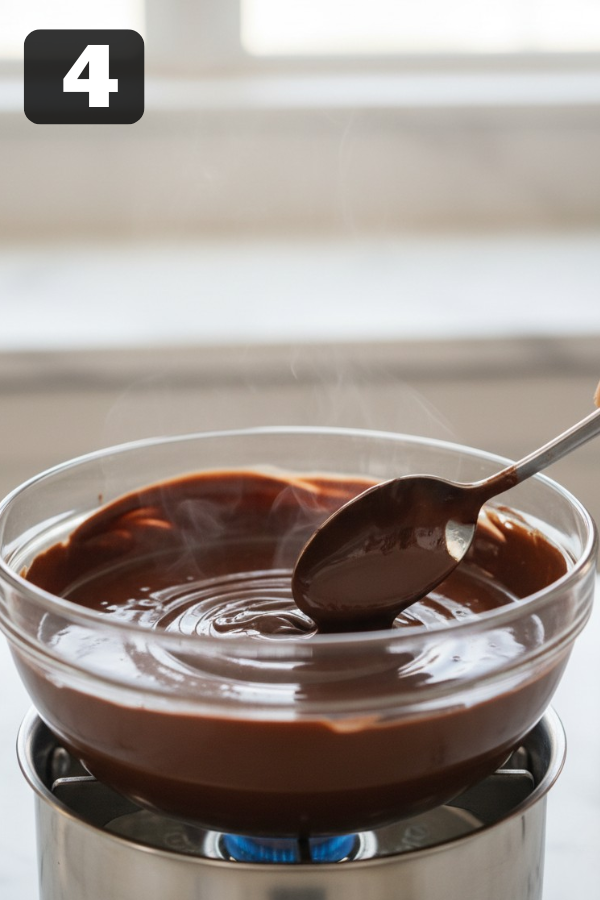
While the bites freeze, prepare the chocolate coating.
Add to a microwave-safe bowl:
- 1 cup chocolate chips
- 1 teaspoon coconut oil (optional but helpful)
Heat in 30-second intervals, stirring each time.
Within a minute or so, the chocolate should be smooth and glossy.
That coconut oil? It gives the shell that satisfying snap when it hardens.
Step 5: Dip or Drizzle
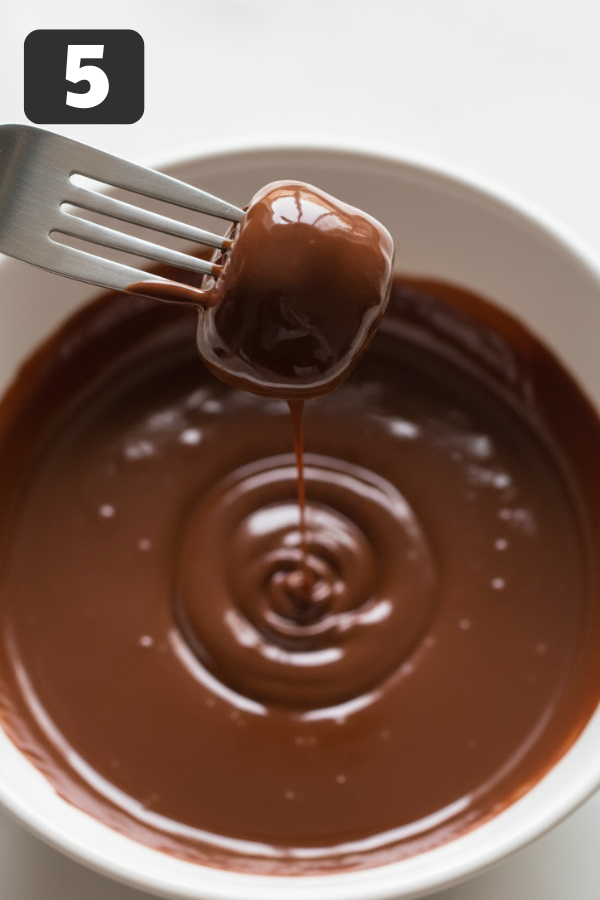
Remove the yogurt bites from the freezer.
Using a fork or spoon, dip each bite into the melted chocolate.
Let the extra drip off before placing it back on the parchment.
You can also drizzle chocolate across the tops if you prefer a lighter coating.
A tiny sprinkle of sea salt here is incredible.
Sweet, salty, creamy—it’s a perfect combination.
Step 6: Freeze Again
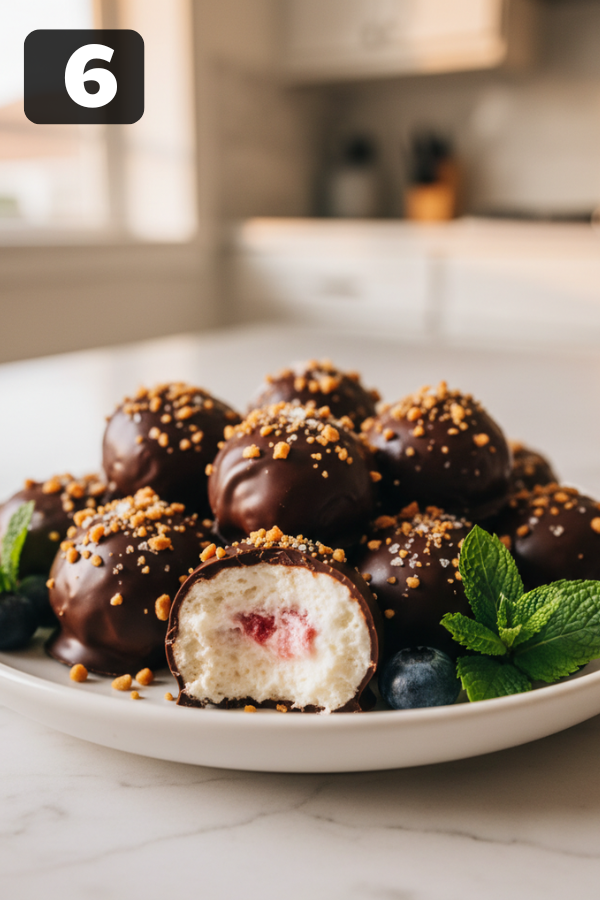
Place the tray back in the freezer for 15–20 minutes.
The chocolate will harden quickly.
Once set, transfer the bites to an airtight container.
Congratulations—you’ve just stocked your freezer with one of the easiest snacks around.
Tips That Make These Bites Even Better
Small details can make a big difference.
Here are a few tricks seasoned home cooks swear by.
Use Thick Yogurt
Greek yogurt works best because it’s strained and creamy.
Regular yogurt tends to freeze icy.
Add A Pinch Of Salt
Just a pinch brings out the peanut butter flavor.
Let Them Sit Before Eating
Right from the freezer they’re very firm.
Wait one minute and the texture becomes creamy again.
Try Crunchy Peanut Butter
It adds texture and feels a bit like a frozen candy bar.
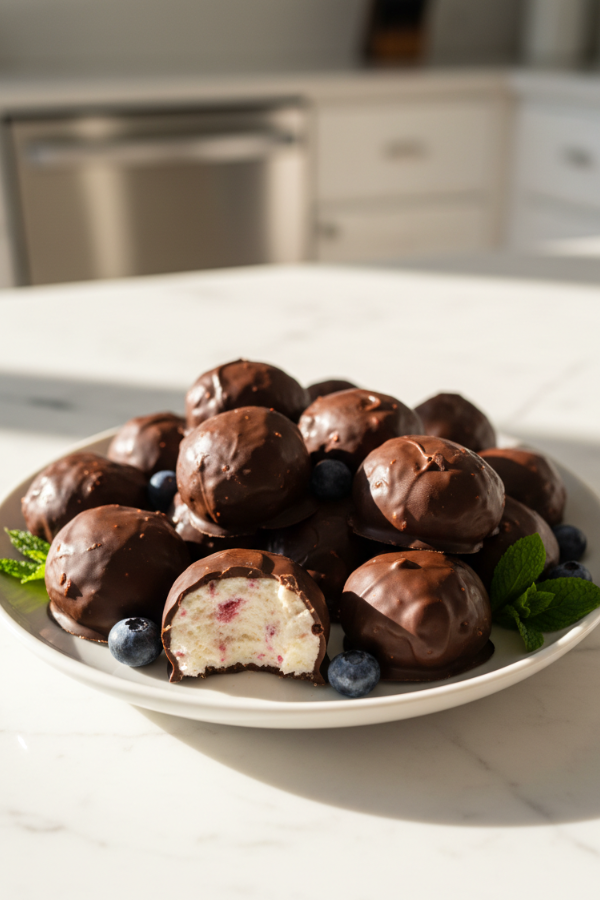
Storage & Make-Ahead Tips
One reason these bites are so popular in busy households?
They store beautifully.
Keep them in a sealed freezer container and they’ll last up to three months.
You can also:
- pack them into snack-size bags
- keep a few in lunchboxes
- serve them as mini desserts after dinner
Honestly, many people make a double batch because they disappear fast.
What to Serve With Them
These bites are great on their own—but they also play well with other snacks.
Try serving them alongside:
- fresh strawberries
- sliced apples
- a smoothie bowl
- iced coffee or cold brew
They’re also surprisingly good with hot coffee.
The contrast between cold chocolate and warm coffee is… pretty wonderful.
Nutrition Snapshot
The exact numbers vary by ingredients, but a typical bite contains roughly:
- 70–90 calories
- 3–4 g protein
- 4–5 g fat
- 5–7 g carbs
Compared to many desserts, that’s pretty balanced.
They’re not “diet food,” but they’re far lighter than most candy bars.
FAQs
1. Can I make Frozen Greek Yogurt Peanut Butter Bites ahead of time?
Yes—actually, that’s the point. They’re perfect for meal prep and keep well in the freezer for several months.
2. Can I use regular yogurt instead of Greek yogurt?
You can, but the texture will be softer and slightly icy. Greek yogurt produces the best creamy result.
3. Can I skip the chocolate coating?
Absolutely. They’ll taste like frozen peanut butter yogurt drops—still delicious.
4. Are these healthy?
They’re healthier than many desserts thanks to protein from yogurt and peanut butter. But they’re still a treat, just a smarter one.
5. Can kids help make these?
Definitely. Kids love scooping the bites and dipping them in chocolate. It’s an easy recipe to make together.
Conclusion
Frozen Greek Yogurt Peanut Butter Bites are the kind of recipe busy home cooks keep coming back to—simple ingredients, almost no prep, and a snack that feels both comforting and a little wholesome. With their creamy peanut butter center and crisp chocolate shell, they satisfy that sweet craving without requiring a full dessert project. Keep a batch in the freezer and you’ll always have an easy treat ready—whether it’s a quick afternoon pick-me-up, a post-dinner bite, or a small reward at the end of a long day in the kitchen.
Don’t Miss: EASY CROCKPOT CHICKEN AND RICE
Ingredients
Method
- Mix the Yogurt Base Start with a medium mixing bowl. Add: Greek yogurt peanut butter honey vanilla extract Stir until smooth. The mixture should be thick but creamy—something like soft peanut butter frosting. If it feels stiff, add a teaspoon of yogurt. If it feels thin, add a spoon of peanut butter. Cooking isn’t chemistry here. Adjust it until it feels right.

- Portion the Bites Line a baking sheet with parchment paper. Now scoop the mixture onto the tray. A tablespoon works well. If you have a small cookie scoop, even better. You’ll get about 15–18 bites depending on size. Try to keep them roughly round—but don’t stress too much. Once frozen and coated in chocolate, they’ll look great.
- Freeze Until Firm Slide the tray into the freezer. Wait about 2–3 hours. When ready, the bites should feel firm and hold their shape when lifted. This step matters. If they’re too soft, dipping them in chocolate becomes messy.
- Melt the Chocolate While the bites freeze, prepare the chocolate coating. Add to a microwave-safe bowl: 1 cup chocolate chips 1 teaspoon coconut oil (optional but helpful) Heat in 30-second intervals, stirring each time. Within a minute or so, the chocolate should be smooth and glossy. That coconut oil? It gives the shell that satisfying snap when it hardens.
- Dip or Drizzle Remove the yogurt bites from the freezer. Using a fork or spoon, dip each bite into the melted chocolate. Let the extra drip off before placing it back on the parchment. You can also drizzle chocolate across the tops if you prefer a lighter coating. A tiny sprinkle of sea salt here is incredible. Sweet, salty, creamy—it’s a perfect combination.
- Freeze Again Place the tray back in the freezer for 15–20 minutes. The chocolate will harden quickly. Once set, transfer the bites to an airtight container. Congratulations—you’ve just stocked your freezer with one of the easiest snacks around.


