If you love sneaking bites of cookie dough but don’t love the sugar crash (or the raw eggs), these healthy no-bake cookie dough bars are your new secret weapon. They’re soft, fudgy, filled with wholesome ingredients like nut butter and almond or oat flour, and come together in about 20 minutes of hands-on time. Chill, slice, and you’ve got grab-and-go snacks for the whole week—without turning on the oven.
Why These Bars Are A Busy-Home-Cook Dream
Let’s start with a simple truth: you want something sweet, but you also want to feel good after eating it. And you’re juggling work, family, dishes, and maybe a late-night inbox. A dessert that’s easy, hands-off, and not a sugar bomb is a small miracle.
That’s where healthy no-bake cookie dough bars fit in:
- No oven, low effort
Most batches need around 10–20 minutes of hands-on prep. You stir, press, chill. That’s it. No preheating, no baking, no worrying if you overcooked the edges. - Made with “real” ingredients
The base is usually a mix of nut butter (cashew, almond, or peanut), almond or oat flour, a natural sweetener like maple syrup, a splash of vanilla, and dark chocolate chips. No powders you can’t pronounce. - Easy to adapt to your diet
With a few simple swaps, these bars can be gluten-free, dairy-free, vegan, or lower in sugar. Many popular versions are already naturally gluten-free and egg-free. - Actually satisfying
Thanks to healthy fats and fiber from nuts and almond/oat flour, these bars fill you up more than regular cookies or candy. They’re perfect for that 3 p.m. “I need something” moment.
And honestly, there’s a quiet kind of joy in opening the fridge, seeing a neat container of homemade cookie dough bars, and thinking, “Okay, maybe I don’t have everything figured out—but snacks? Snacks are handled.”
Ingredients
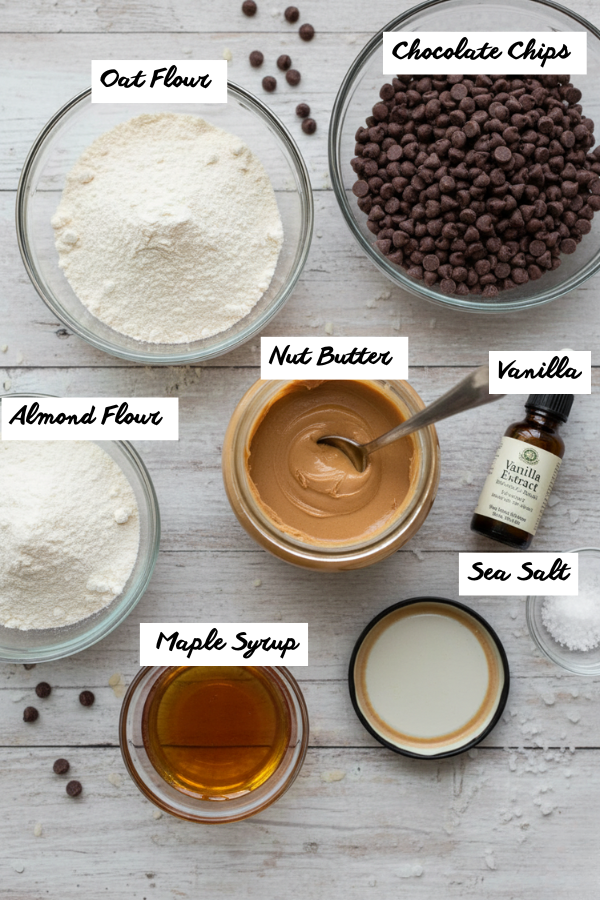
Think of this recipe as a template you can adjust around what you already have in the pantry.
The Base (Cookie Dough Layer)
Nut butter – This is your main “glue” and flavor.
- Cashew butter
- Very soft and neutral.
- Gives the most “classic cookie dough” flavor.
- Almond butter
- Slightly nuttier, still mild.
- Great if you like a light nutty taste.
- Peanut butter
- Stronger flavor and usually cheaper.
- Makes the bars taste like peanut butter cookie dough.
Flour (safe to eat unbaked)
- Almond flour
- Gluten-free, grain-free, and naturally higher in healthy fats.
- Gives a rich, tender texture.
- Oat flour
- Made by blending rolled oats until fine.
- Feels familiar—like cookie dough you grew up with.
Sweetener
- Maple syrup
- Dissolves easily and adds a gentle caramel note.
- Other options
- Honey (if you don’t need the bars to be vegan).
- Stevia or similar sweeteners for low-sugar versions (often combined with a small amount of maple or honey).
Flavor boosters
- Vanilla extract – that cookie-dough smell we all know.
- Sea salt – just a pinch so it tastes like a bakery treat, not just “sweet paste.”
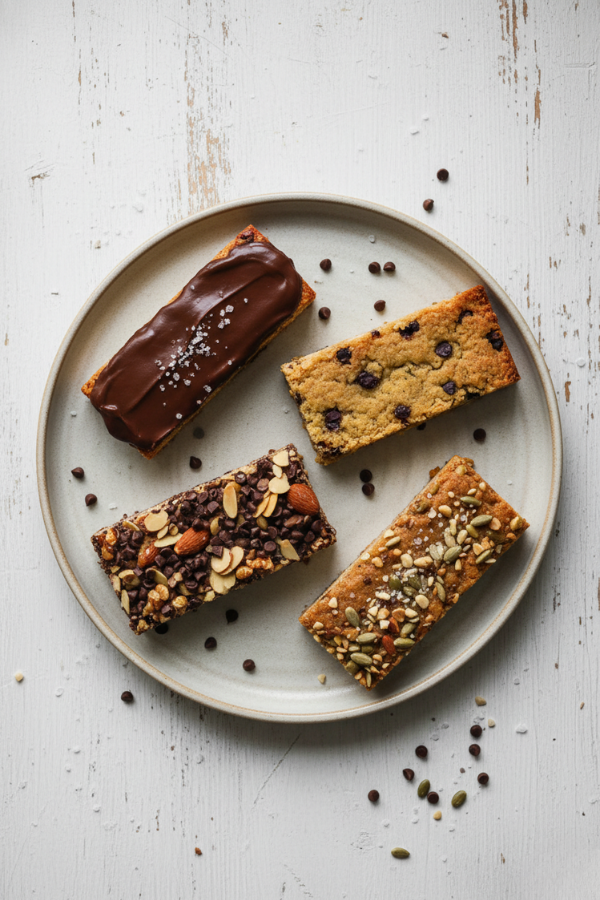
Chocolate chips
- Dark chocolate chips or chopped dark chocolate work best.
- Use dairy-free chips if you want the bars to be fully vegan.
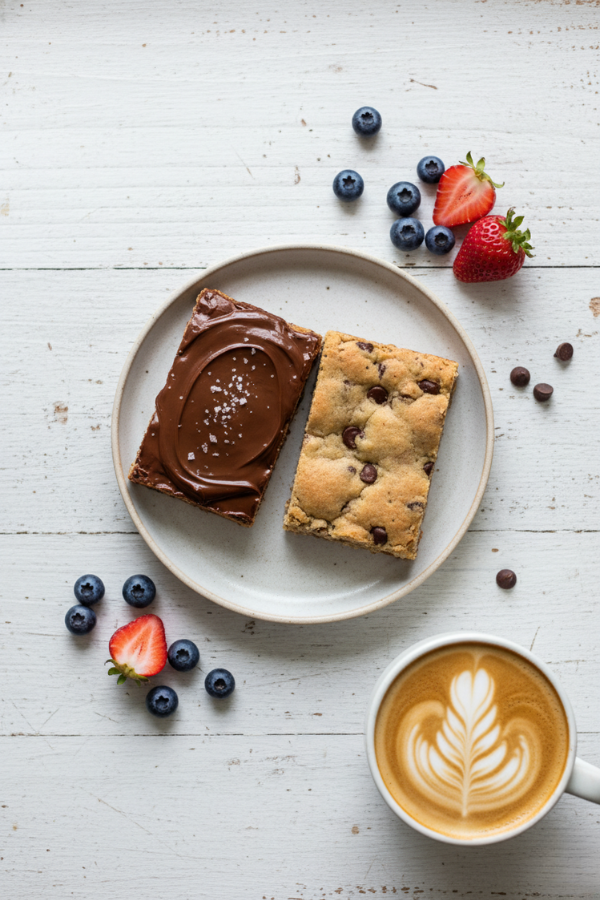
The Topping (optional, but very worth it)
You’ll see this pattern in a lot of no-bake bar recipes: a simple, soft chocolate layer on top.
- Melt dark chocolate chips with a spoonful or two of nut butter.
- The nut butter keeps the top from becoming rock-hard in the fridge.
- When set, it looks glossy, slices cleanly, and tastes like a thin layer of fudge.
You can skip the topping to keep things lighter, but that shiny chocolate layer really makes the bars feel like a proper dessert.
Step-by-Step Instructions
You can think of this recipe as a 4-step system you can memorize easily.
Step 1 – Stir Together The Cookie Dough
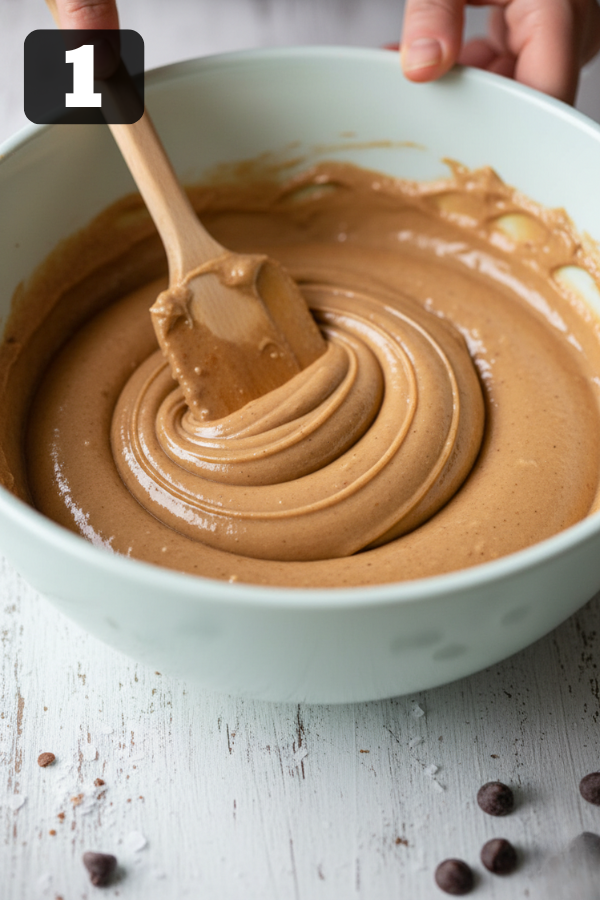
In a large mixing bowl:
- Combine the wet ingredients
- Add nut butter, maple syrup (or your sweetener), and vanilla.
- Stir until smooth, thick, and glossy.
- Add the dry ingredients
- Sprinkle in almond flour or oat flour and a pinch of sea salt.
- Fold everything together until a thick dough forms.
- Adjust the texture if needed
- If the dough feels crumbly and won’t hold when pressed, add 1–2 teaspoons of nut butter or a bit more maple syrup.
- If it feels too wet or sticky, add a tablespoon of flour at a time.
- Fold in chocolate chips
- Stir in dark chocolate chips at the end so they don’t melt.
- The dough should feel soft but hold its shape, like classic cookie dough.
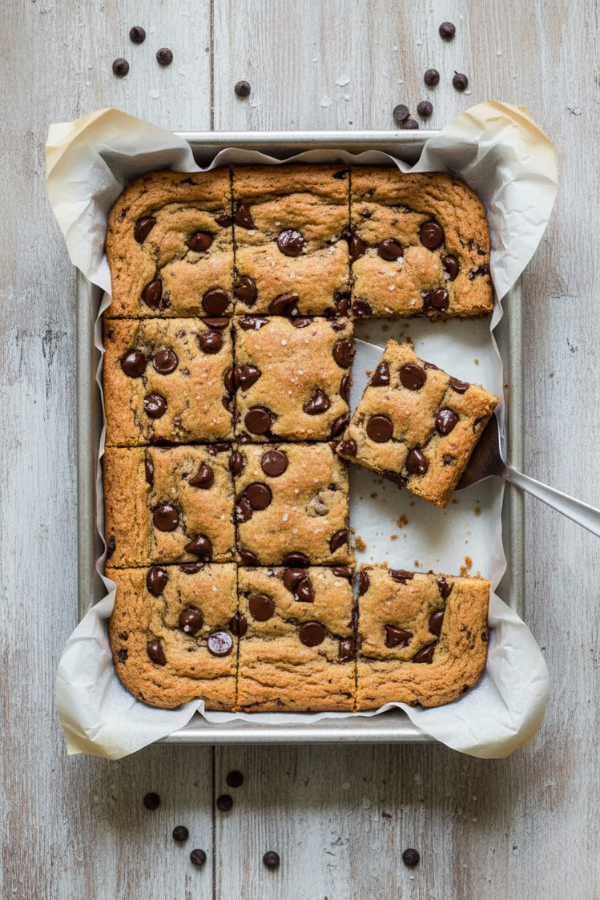
Step 2 – Press Into A Pan

- Line a loaf pan or an 8×8-inch square pan with parchment paper.
- Leave some paper hanging over the sides so you can lift the bars out later.
- Scrape the dough into the pan.
- Press it firmly and evenly into the bottom using a spatula or the back of a spoon.
- Take a moment to smooth the top—this makes your final bars look much neater.
Some people like to use a silicone pan for easy release. Either way, the key is pressing firmly so the bars don’t crumble later.
Step 3 – Add The Chocolate Layer (Optional But Recommended)
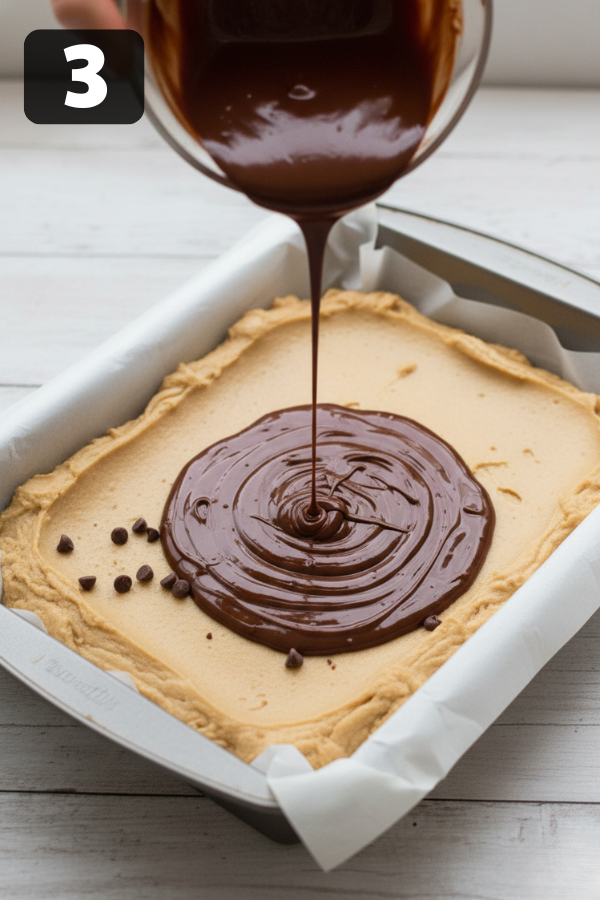
- Place dark chocolate chips and a spoonful of nut butter into a small microwave-safe bowl or saucepan.
- Gently warm until the chocolate starts to melt.
- In the microwave: short bursts, stirring each time.
- On the stove: very low heat, stirring often.
- Stir until completely smooth and glossy.
- Pour the mixture over the cookie dough base and spread to the edges.
If you’re watching sugar more closely, you can:
- Spread a thinner layer of chocolate.
- Or drizzle just a bit over the top rather than fully covering it.
Step 4 – Chill, Slice, And Stash
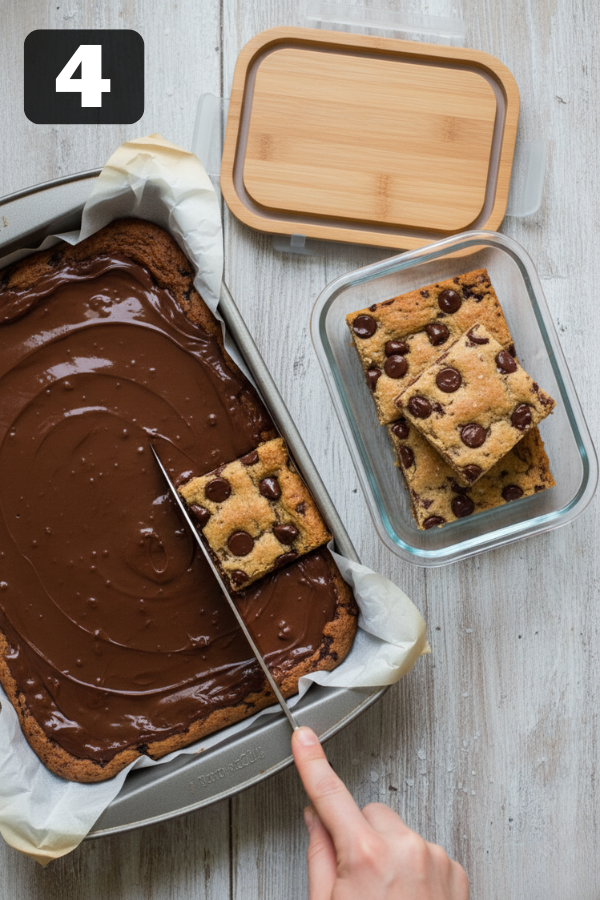
- Place the pan in the fridge for 1–2 hours, or in the freezer for about 30–40 minutes, until the bars are firm and the chocolate topping is set.
- When firm, lift the slab out of the pan using the parchment paper.
- Run a sharp knife under hot water, dry it, then slice into bars or small squares.
If you chilled the bars in the freezer and they feel very hard, let them sit at room temperature for a few minutes before cutting. That helps prevent the chocolate from cracking.
Simple Ways to Adjust These Bars to Your Diet
Not every week looks the same, and not every pantry is stocked the same. The good news is this recipe is flexible.
Make Them Vegan
- Use maple syrup instead of honey.
- Choose chocolate chips that are labeled dairy-free.
Make Them Gluten-Free
- Stick with almond flour or certified gluten-free oat flour.
- Check that your oats and chocolate chips are also labeled gluten-free if needed.
Make Them Nut-Free
- Swap nut butter for sunflower seed butter or tahini.
- The taste changes a bit, but the texture stays close.
- For school snacks, double-check labels so everything is made in nut-free facilities if that’s required.
Make Them Lower In Sugar
- Use a mix of maple syrup and a low-calorie sweetener (like liquid stevia or monk fruit drops) in the dough.
- Use very dark chocolate or sugar-free chocolate chips.
- Skip the full chocolate topping and keep the chocolate just inside the dough.
Add More Protein
- Stir a scoop of vanilla protein powder into the dry ingredients.
- Add a little extra nut butter or a splash of plant milk if the dough becomes too dry.
- You’ll end up with bars that feel like a dessert but behave more like a protein snack.
Easy Tricks for Perfect Cookie Dough Bars
Tiny details can make these bars feel special.
- Press firmly
If you only tap the dough in lightly, the bars can crumble when sliced. Press with real intention so it becomes a uniform, compact layer. - Don’t skip the chill time
Chilling isn’t optional here. It helps everything set so each slice holds together. Cutting too early usually gives messy, soft bars. - Soften the chocolate topping
Stirring nut butter into the melted chocolate keeps the top from becoming a hard shell. It’s much nicer to bite through and much easier to cut. - Use a warm knife for neat slices
This is a small touch, but running your knife under hot water before slicing gives very clean edges—especially if you’re planning to share photos or serve these at a gathering.
These little habits don’t take long, but they do make the bars feel “wow.”
Serving Ideas Beyond “Just Eat One”
Yes, you can absolutely eat these straight from the container. But if you want to make them feel more special, here are a few ideas.
- After-dinner dessert plate
- One or two bars with a handful of fresh berries and a cup of herbal tea.
- Coffee break pairing
- A bar with hot coffee or cold brew for a mid-morning or mid-afternoon pause.
- Kids’ movie-night platter
- Mini squares of cookie dough bars, popcorn, and sliced fruit all on one tray.
- Party platter
- Mix a few variations—classic chocolate chip, peanut butter, nut-free—on a big plate so guests can try different styles.
Small changes like these turn a batch of bars into little moments of calm during a busy week.
FAQs
- Are these bars safe to eat “raw”?
Yes. There are no raw eggs and no raw wheat flour. You’re using almond flour or oat flour, which are safe to eat without baking. - Can I make them ahead for a party?
You can. Make them 1–2 days ahead, keep them in the fridge, and slice just before serving so the edges stay sharp and neat. - Do they work in lunchboxes?
They do, especially if you keep them cool. Chill them overnight, then pack them in an insulated lunch bag with a small ice pack so the chocolate doesn’t melt. - Can I leave out the chocolate topping?
Yes. You’ll just have a single-layer cookie dough bar. Add a few extra chocolate chips into the dough if you skip the topping so each bite still feels special. - How big should I cut them?
For adults, 12 bars from an 8×8-inch pan is a good snack size. For kids or lighter portions, 16–20 smaller pieces work very well. - What if I mess it up?
Honestly, even “imperfect” batches usually taste good. If the texture isn’t quite right this time, adjust next time: a bit more nut butter for moisture, a little more flour for structure, or a longer chill.
Nutrition Snapshot
Estimated (12 bars):
- Calories: 220–280
- Protein: 5–8g
- Carbs: 18–26g (Fiber 3–5g, Sugar 9–14g)
- Fat: 15–20g
Varies by nut butter, flour, and chocolate used.
Final Thoughts
Healthy no-bake cookie dough bars are one of those “quiet win” recipes—you spend 20 minutes mixing and pressing, and the rest of the week you’ve got something sweet, filling, and homemade sitting in the fridge waiting for you. They’re flexible enough to match your pantry and your diet, and forgiving enough that even a slightly “off” batch still tastes great. If you’re looking for a small ritual that makes busy weeks feel a bit calmer, this is a pretty good place to start.
Don’t Miss: 3 INGREDIENT COTTAGE CHEESE PANCAKES HIGH PROTEIN FLUFFY
Ingredients
Method
- Stir Together The Cookie Dough In a large mixing bowl: Combine the wet ingredients Add nut butter, maple syrup (or your sweetener), and vanilla. Stir until smooth, thick, and glossy. Add the dry ingredients Sprinkle in almond flour or oat flour and a pinch of sea salt. Fold everything together until a thick dough forms. Adjust the texture if needed If the dough feels crumbly and won’t hold when pressed, add 1–2 teaspoons of nut butter or a bit more maple syrup. If it feels too wet or sticky, add a tablespoon of flour at a time. Fold in chocolate chips Stir in dark chocolate chips at the end so they don’t melt. The dough should feel soft but hold its shape, like classic cookie dough.

- Press Into A Pan Line a loaf pan or an 8×8-inch square pan with parchment paper. Leave some paper hanging over the sides so you can lift the bars out later. Scrape the dough into the pan. Press it firmly and evenly into the bottom using a spatula or the back of a spoon. Take a moment to smooth the top—this makes your final bars look much neater. Some people like to use a silicone pan for easy release. Either way, the key is pressing firmly so the bars don’t crumble later.
- Add The Chocolate Layer (Optional But Recommended) Place dark chocolate chips and a spoonful of nut butter into a small microwave-safe bowl or saucepan. Gently warm until the chocolate starts to melt. In the microwave: short bursts, stirring each time. On the stove: very low heat, stirring often. Stir until completely smooth and glossy. Pour the mixture over the cookie dough base and spread to the edges. If you’re watching sugar more closely, you can: Spread a thinner layer of chocolate. Or drizzle just a bit over the top rather than fully covering it.
- Chill, Slice, And Stash Place the pan in the fridge for 1–2 hours, or in the freezer for about 30–40 minutes, until the bars are firm and the chocolate topping is set. When firm, lift the slab out of the pan using the parchment paper. Run a sharp knife under hot water, dry it, then slice into bars or small squares. If you chilled the bars in the freezer and they feel very hard, let them sit at room temperature for a few minutes before cutting. That helps prevent the chocolate from cracking.


