These Baked Cream Cheese Chicken Taquitos are crisp on the outside, creamy and cheesy inside, and easy enough for a busy weeknight. They use shredded chicken, cream cheese, salsa, spices, and tortillas, then bake until golden instead of frying. Many similar baked taquito recipes use about 15 minutes of prep and 15–22 minutes of baking, making this a realistic 30–40 minute dinner.
Why You’ll Love These Baked Cream Cheese Chicken Taquitos
Here’s the thing: taquitos are comfort food, but they don’t have to be heavy.
Baking gives you that crisp shell without the hassle of frying. The cream cheese keeps the chicken moist, the salsa adds brightness, and the spices make everything taste like it took more effort than it did.
You’ll love this recipe because it’s:
- Quick enough for a weeknight — especially if you use rotisserie chicken.
- Easy to clean up — one bowl, one baking sheet, done.
- Kid-friendly — keep the salsa mild, and everyone’s happy.
- Meal-prep friendly — assemble ahead, freeze, or reheat leftovers.
- Flexible — use flour tortillas, corn tortillas, pepper jack, cheddar, green chiles, beans, or whatever’s hanging out in the fridge.
You know what? This is also a great “use what you have” dinner. That half bag of shredded cheese? Good. Leftover chicken from Sunday? Perfect. A lonely jar of salsa in the fridge door? That’s dinner trying to happen.
Ingredients You’ll Need
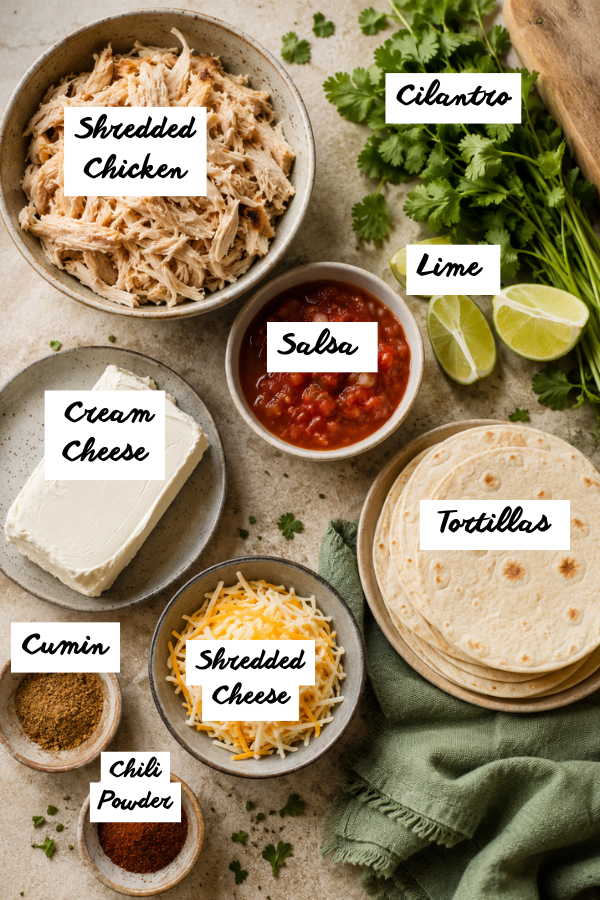
The beauty of Baked Cream Cheese Chicken Taquitos is that the ingredient list is short, familiar, and forgiving.
Main Ingredients
Shredded chicken
Use 2 to 3 cups of cooked shredded chicken. Rotisserie chicken is the easiest shortcut. Poached chicken breast, leftover roast chicken, or slow cooker chicken also work.
Cream cheese
Use softened cream cheese so it blends smoothly. Full-fat gives the richest filling, but reduced-fat works too.
Shredded cheese
Monterey Jack melts beautifully. Cheddar brings sharper flavor. Pepper Jack adds a little kick.
Salsa
Use red salsa, salsa verde, or even a chunky restaurant-style salsa. Just avoid anything too watery, or the filling may get loose.
Spices
Cumin, chili powder, garlic powder, salt, and pepper give the filling warmth without making it too spicy.
Tortillas
Flour tortillas are easier to roll and less likely to crack. Corn tortillas are more traditional and can be gluten-free, but they need to be warmed first. Isabel Eats explains that taquitos are commonly made with corn tortillas, while flautas are often made with flour tortillas.
Optional Add-Ins
If you want to make them heartier, add:
- Black beans
- Corn
- Diced green chiles
- Jalapeños
- Green onions
- Cilantro
- A squeeze of lime juice
Don’t overload the filling, though. Taquitos are a little like tiny suitcases. Pack too much in, and things start bursting out.
Step-by-Step Instructions
Step 1: Make the Creamy Chicken Filling
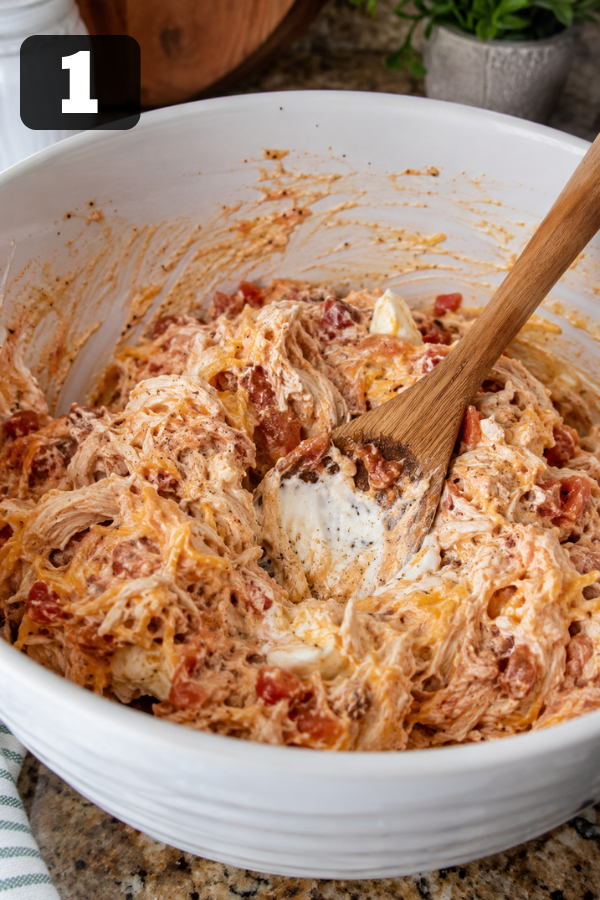
In a large bowl, mix softened cream cheese, salsa, shredded cheese, spices, and shredded chicken.
Stir until everything looks creamy and well coated. The filling should hold together, not drip. If it looks too loose, add a little more chicken or cheese.
Taste it before rolling. It should be savory, creamy, and lightly spiced. Need more punch? Add lime juice, more cumin, or a pinch of smoked paprika.
Step 2: Warm the Tortillas
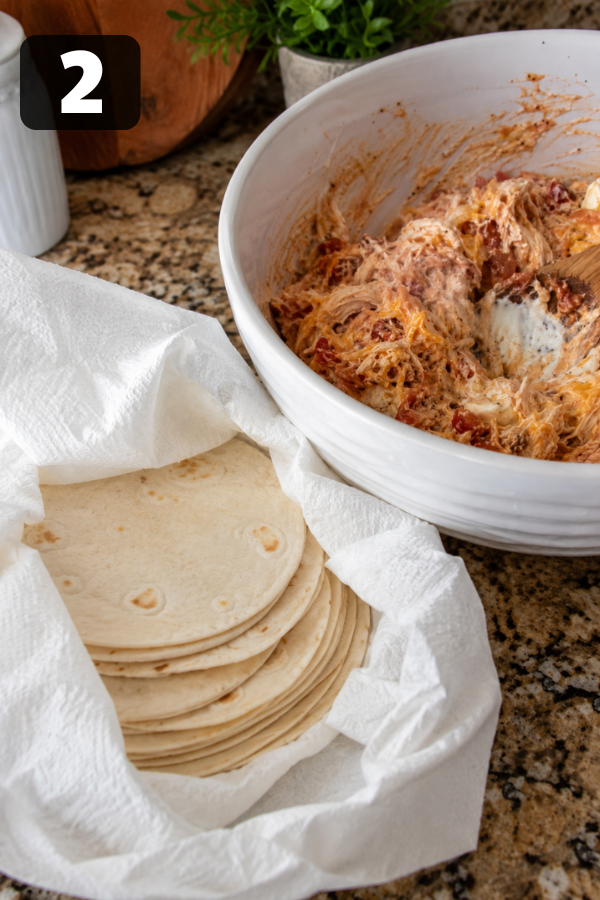
Don’t skip this step.
Cold tortillas crack. Warm tortillas roll.
Wrap tortillas in a damp paper towel and microwave them for 20–30 seconds. You can also warm them in a dry skillet for a few seconds per side.
Keep them covered while you work so they stay soft.
Step 3: Fill and Roll
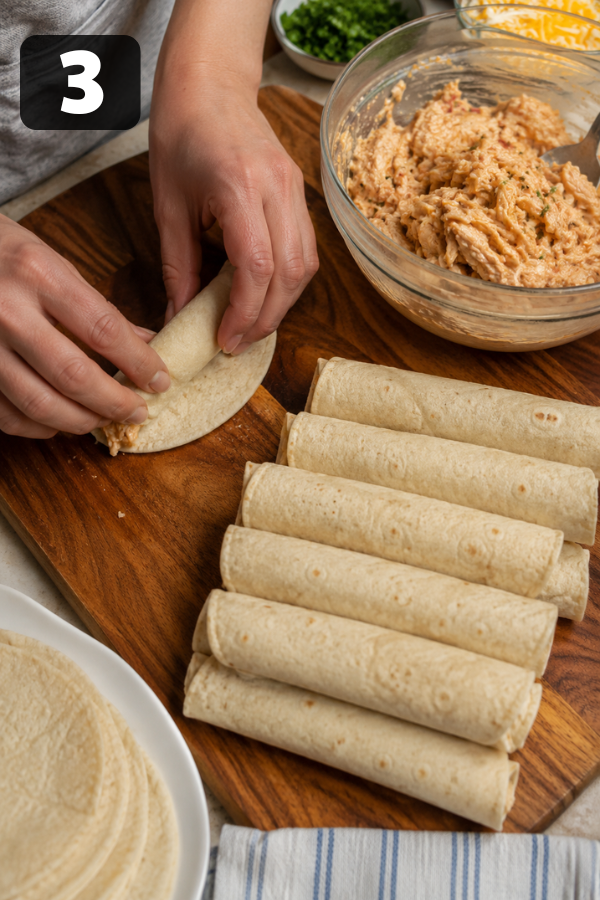
Spoon 2 to 3 tablespoons of filling near one edge of each tortilla. Roll tightly, but not so tight that the filling squeezes out.
Place each taquito seam-side down on a parchment-lined baking sheet.
Leave a little space between each one. Crowding traps steam, and steam is the enemy of crispy edges.
Step 4: Bake Until Golden and Crisp
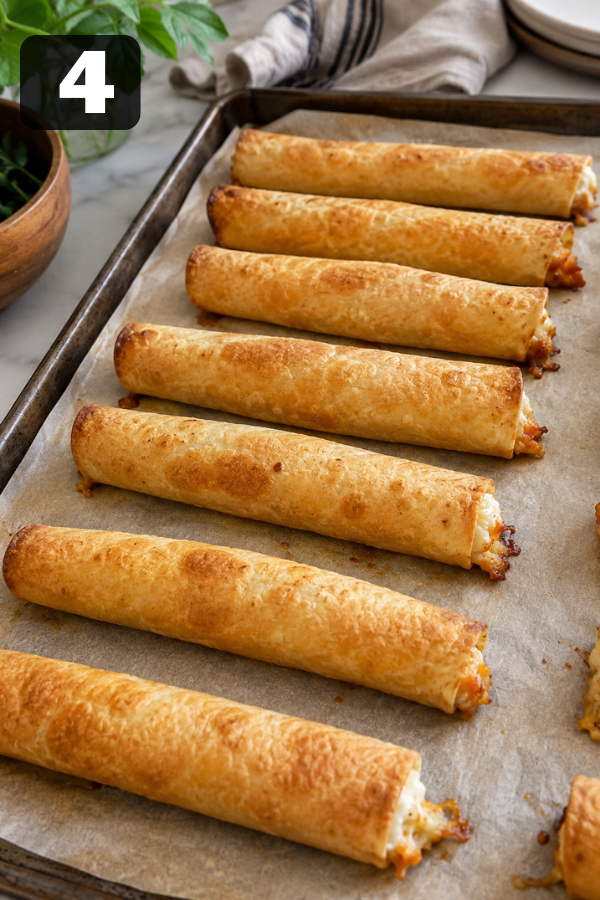
Lightly spray or brush the taquitos with oil.
Bake at 400°F to 425°F for about 15–20 minutes, depending on tortilla size and oven strength. Our Best Bites lists a 20-minute cook time for baked creamy chicken taquitos, while several similar recipes use high heat to help the tortillas crisp.
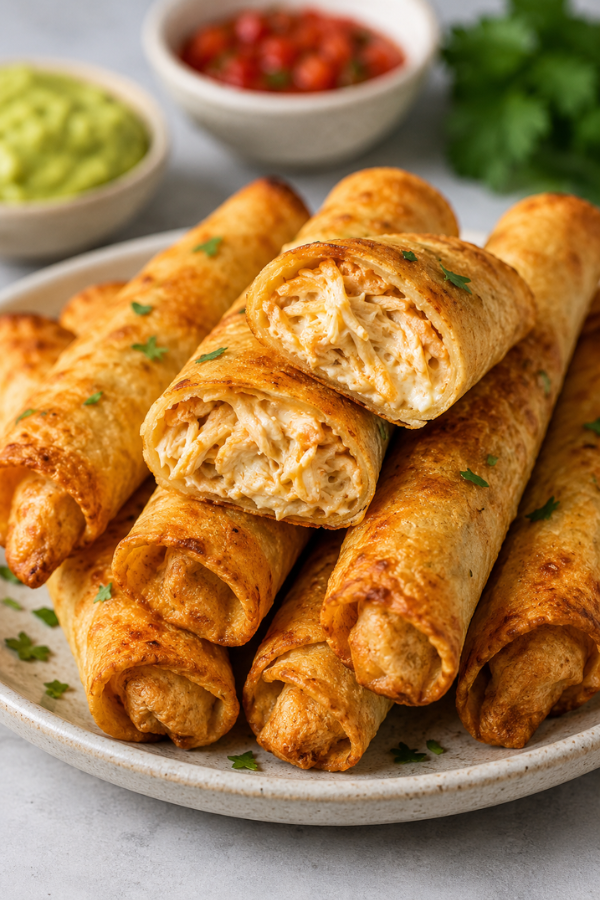
They’re ready when the edges are golden, the shells feel crisp, and the filling is hot.
Step 5: Serve With Dips and Toppings
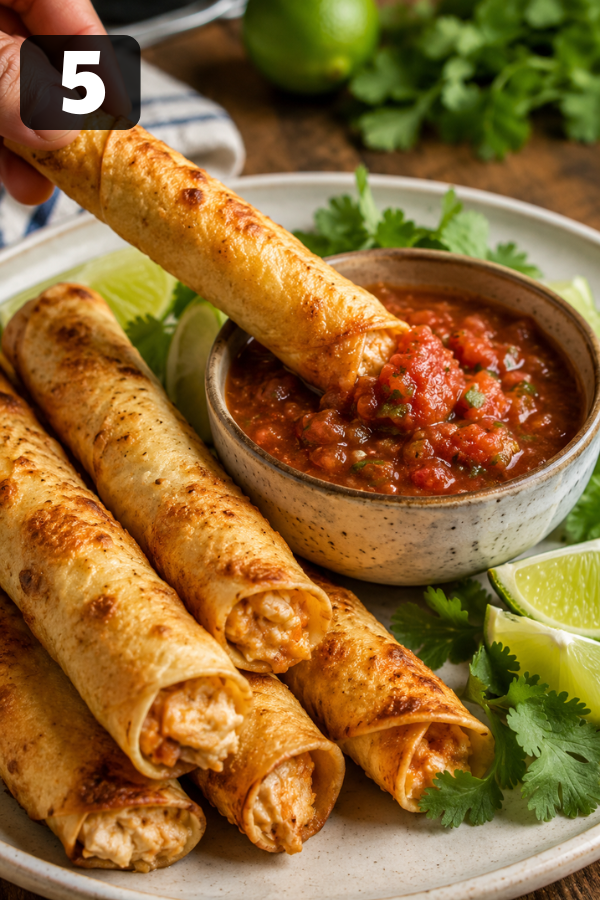
This is where they go from “good dinner” to “everyone is reaching across the table.”
Serve with:
- Sour cream
- Guacamole
- Salsa verde
- Pico de gallo
- Cilantro
- Lime wedges
- Avocado crema
- Queso dip
A squeeze of lime at the end makes the creamy filling taste brighter. Tiny detail, big difference.
Air Fryer Option
Yes, you can air fry these.
Place taquitos seam-side down in the air fryer basket. Spray lightly with oil. Cook at 375°F to 400°F for about 8–10 minutes, flipping halfway if needed.
Don’t stack them. Air needs room to move around each taquito so the tortilla gets crisp instead of chewy.
Tips for Crispy, Creamy Taquitos
A few little moves make a big difference.
First, don’t use watery salsa. If your salsa has a lot of liquid, spoon mostly the chunky part into the filling.
Second, warm the tortillas. Really. This is the difference between smooth rolling and tortilla heartbreak.
Third, spray the outside with oil. You don’t need much, but a light coating helps the tortillas brown.
Fourth, place them seam-side down. That keeps them closed while they bake.
And finally, don’t overfill. I know, it’s tempting. But a neat taquito beats an exploding one every time.
Common Problems and Easy Fixes
Why are my tortillas cracking?
They were probably too cold or dry.
Warm them in the microwave with a damp paper towel, and work with a few at a time. Corn tortillas especially need heat before rolling.
Why are my taquitos soggy?
The filling may be too wet, or the pan may be crowded.
Use thicker salsa, drain any watery ingredients, and leave space between the taquitos.
Why did the filling leak out?
They may be overfilled.
Use 2 to 3 tablespoons per tortilla and roll firmly. Place seam-side down.
Why aren’t they crispy?
They may need more oil spray, more space, or a hotter oven.
Bake closer to 425°F if your oven runs cool. A wire rack over the baking sheet also helps the bottoms crisp.
Storage and Leftovers
Leftovers keep well, which is one reason this recipe is so useful.
Store cooled taquitos in an airtight container in the fridge for 3–4 days.
To reheat, use:
- Oven: 375°F to 400°F until hot and crisp
- Air fryer: 350°F to 375°F for a few minutes
- Microwave: fastest, but the shell will soften
For freezing, arrange taquitos in a single layer on a baking sheet. Freeze until firm, then move them to a freezer bag. Many baked taquito recipes note that they freeze well, making them great for future meals.
What to Serve With Baked Cream Cheese Chicken Taquitos
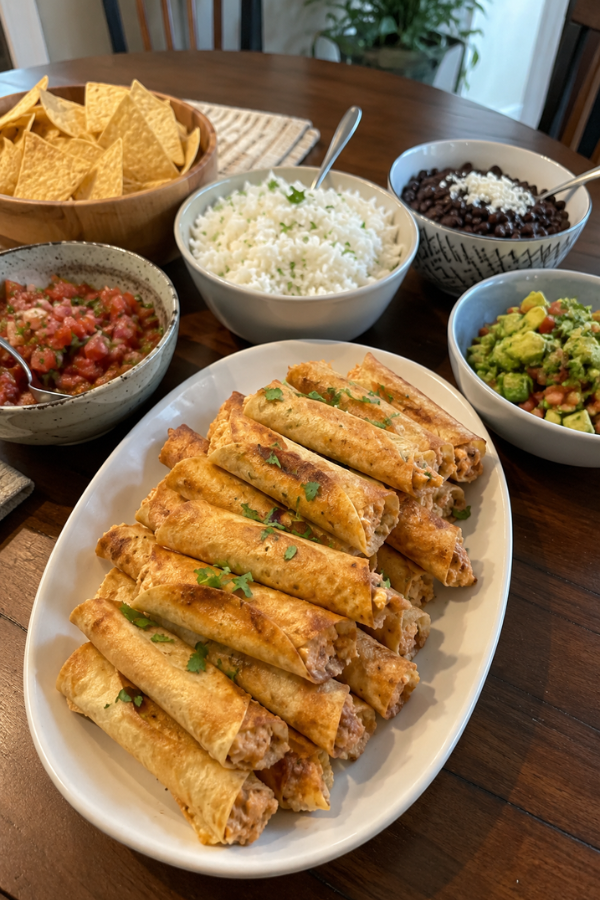
These taquitos can stand alone, but sides make them feel like a full meal.
Try them with:
- Cilantro lime rice
- Mexican rice
- Black beans
- Refried beans
- Street corn salad
- Avocado salad
- Simple slaw
- Chips and salsa
For drinks, keep it fresh: lime sparkling water, iced tea, agua fresca, or a simple margarita mocktail.
For dessert? Cinnamon sugar cookies, churro bites, or a small bowl of fruit with lime and honey. Nothing fussy.
Easy Variations
Spicy Jalapeño Taquitos
Add diced jalapeños, Pepper Jack cheese, and chipotle sauce.
Salsa Verde Chicken Taquitos
Use salsa verde instead of red salsa. Add lime and cilantro for a brighter flavor.
Buffalo Chicken Taquitos
Swap salsa for buffalo sauce. Use cheddar and serve with ranch or blue cheese dressing.
BBQ Chicken Taquitos
Use barbecue sauce, cheddar, and a few thin red onion slices.
Vegetarian Cream Cheese Taquitos
Skip the chicken. Use black beans, corn, spinach, and cheese. Mash some of the beans so the filling holds together.
Nutrition Info
These numbers are estimates and will vary based on tortilla size, cheese amount, and toppings.
Approximate nutrition per 1 taquito:
- Calories: 180–230
- Protein: 10–14g
- Carbs: 14–20g
- Fat: 8–12g
- Fiber: 1–3g
- Sodium: 300–450mg
For a lighter version, use reduced-fat cream cheese, part-skim cheese, corn tortillas, and serve with salsa or avocado instead of heavy dips.
FAQs
1. Can I make Baked Cream Cheese Chicken Taquitos ahead of time?
Yes. Assemble them up to 24 hours ahead, cover, and refrigerate. Bake when ready.
2. Can I freeze them?
Yes. Freeze before or after baking. For best texture, reheat in the oven or air fryer.
3. Can I use rotisserie chicken?
Absolutely. It’s the easiest shortcut and works perfectly.
4. Are these spicy?
Not unless you make them spicy. Use mild salsa and Monterey Jack for a kid-friendly version.
5. Can I use corn tortillas?
Yes. Warm them first so they don’t crack.
6. Can I make them gluten-free?
Yes, use certified gluten-free corn tortillas and check all packaged ingredients.
Conclusion
These Baked Cream Cheese Chicken Taquitos are the kind of recipe busy home cooks come back to again and again. They’re crispy, creamy, easy to customize, and simple enough for a hectic weeknight without feeling boring. Whether you make them fresh for dinner, freeze a batch for later, or load them up with your favorite dips and toppings, they hit that sweet spot between comfort food and practical cooking — and honestly, that’s hard to beat.
Don’t Miss: Buffalo Chicken Wrap Cheddars Copycat
Don’t Miss: Easy and Juicy Smoked Chicken Breast
Also Try: Breaded Air Fryer Chicken Tenders
Ingredients
Method
- Step 1: Make the Creamy Chicken FillingIn a large bowl, mix softened cream cheese, salsa, shredded cheese, spices, and shredded chicken.Stir until everything looks creamy and well coated. The filling should hold together, not drip. If it looks too loose, add a little more chicken or cheese.Taste it before rolling. It should be savory, creamy, and lightly spiced. Need more punch? Add lime juice, more cumin, or a pinch of smoked paprika.

- Step 2: Warm the TortillasDon’t skip this step.Cold tortillas crack. Warm tortillas roll.Wrap tortillas in a damp paper towel and microwave them for 20–30 seconds. You can also warm them in a dry skillet for a few seconds per side.Keep them covered while you work so they stay soft.
- Step 3: Fill and RollSpoon 2 to 3 tablespoons of filling near one edge of each tortilla. Roll tightly, but not so tight that the filling squeezes out.Place each taquito seam-side down on a parchment-lined baking sheet.Leave a little space between each one. Crowding traps steam, and steam is the enemy of crispy edges.
- Step 4: Bake Until Golden and CrispLightly spray or brush the taquitos with oil.Bake at 400°F to 425°F for about 15–20 minutes, depending on tortilla size and oven strength. Our Best Bites lists a 20-minute cook time for baked creamy chicken taquitos, while several similar recipes use high heat to help the tortillas crisp.They’re ready when the edges are golden, the shells feel crisp, and the filling is hot.
- Step 5: Serve With Dips and ToppingsThis is where they go from “good dinner” to “everyone is reaching across the table.”Serve with:Sour creamGuacamoleSalsa verdePico de galloCilantroLime wedgesAvocado cremaQueso dipA squeeze of lime at the end makes the creamy filling taste brighter. Tiny detail, big difference.


