There’s something oddly comforting about a thick slice of Starbucks banana bread next to a hot coffee. It’s soft, rich, slightly dense, and somehow feels like a small reward in the middle of a busy day. The good news? You can make a homemade version that tastes incredibly close—some people swear it tastes even better. This Starbucks Copycat Banana Bread is moist, easy to prep, freezer-friendly, and made with simple pantry ingredients you probably already have sitting in the kitchen right now.
Why Everyone Loves This Banana Bread So Much
Some banana breads lean fluffy and cake-like. Starbucks banana bread doesn’t. It’s richer than that. Denser, too—but in a good way. Think bakery loaf instead of airy breakfast cake.
And honestly, that texture is part of the charm.
The loaf stays moist for days, the walnuts add crunch, and the banana flavor actually tastes like bananas instead of sugar pretending to be bananas. You know what else helps? The thick slices. Starbucks serves hefty pieces, and that changes the whole experience somehow. It feels cozy. Filling. A little indulgent without going overboard.
This homemade version hits those same notes while giving you more control over sweetness, ingredients, and cost. Which matters these days.
Why This Recipe Works for Busy Weeknights Too
Banana bread isn’t just a baking project for lazy Sundays anymore.
A lot of home cooks keep a loaf around for:
- grab-and-go breakfasts
- lunchbox snacks
- late-night sweet cravings
- quick coffee breaks
- easy meal prep
And this recipe fits that rhythm nicely.
The batter comes together fast. No complicated steps. No fancy mixer required. In fact, slightly messy banana bread often tastes better anyway. Funny how that works.
You can also freeze slices individually and reheat them in about 20 seconds. That alone makes it worth baking.
Ingredients You’ll Need
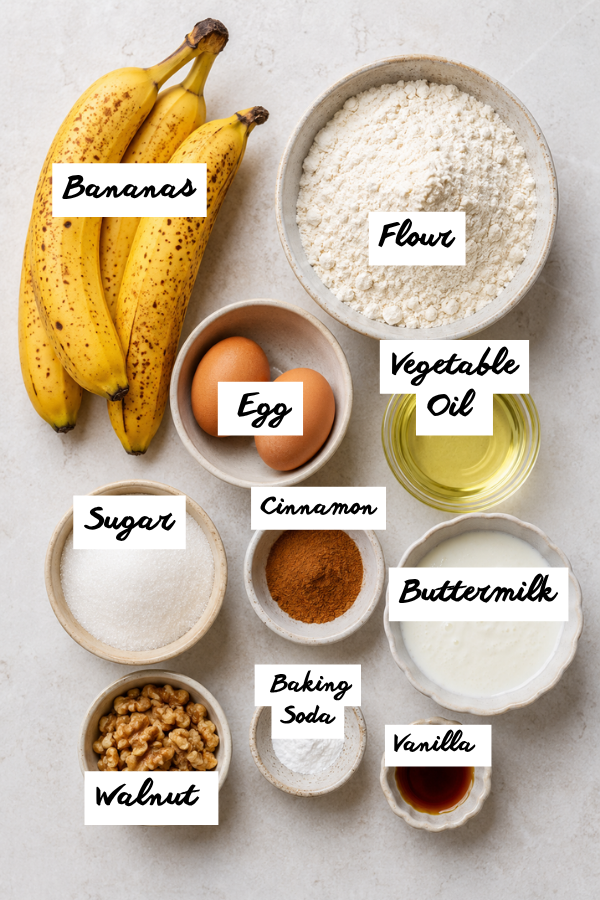
Dry Ingredients
- 2 cups all-purpose flour
- 1 teaspoon baking soda
- 1/2 teaspoon salt
- 1 teaspoon cinnamon
Wet Ingredients
- 3 very ripe bananas, mashed
- 2 eggs
- 1/2 cup vegetable oil
- 3/4 cup sugar
- 1/4 cup buttermilk
- 1 teaspoon vanilla extract
Mix-Ins
- 1 cup chopped walnuts
- Extra walnuts for topping
The Secret? Seriously Ripe Bananas
Here’s the thing: yellow bananas won’t give you that deep Starbucks-style flavor.
You want the ugly bananas.
Dark spots. Brown peel. Almost-too-soft bananas. Those contain more natural sugars and stronger banana flavor. The texture changes too—it becomes smoother and richer.
If your bananas aren’t ripe enough, there’s a shortcut:
- Bake unpeeled bananas at 300°F for 15–20 minutes
- Let cool
- Mash and use normally
Not exactly glamorous, but it works surprisingly well.
Step-by-Step Instructions
Step 1: Prep the Pan and Oven
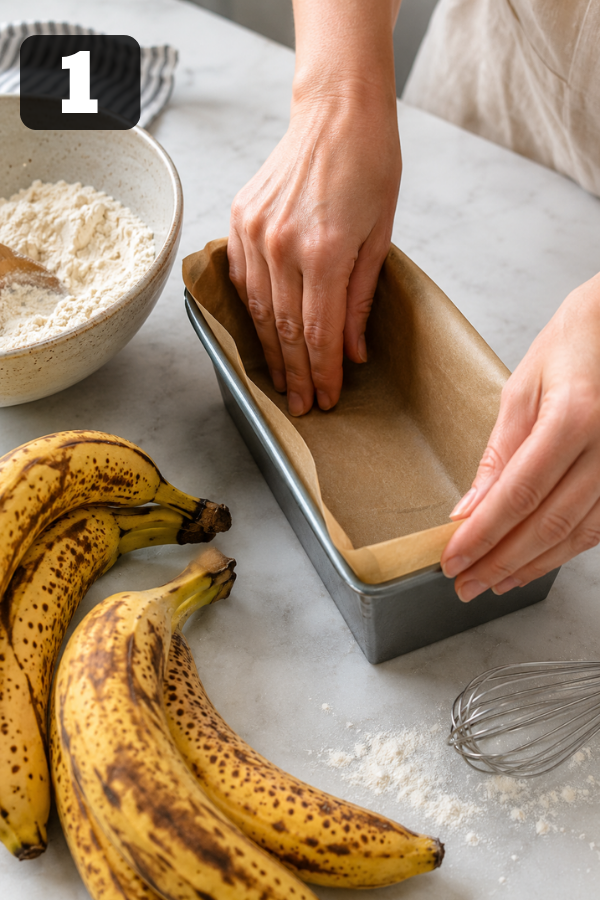
Preheat your oven to 325°F.
Grease a 9×5 loaf pan or line it with parchment paper. Parchment makes cleanup easier and helps lift the loaf cleanly later.
And honestly, fewer dishes always feels like a win.
Step 2: Mix the Dry Ingredients
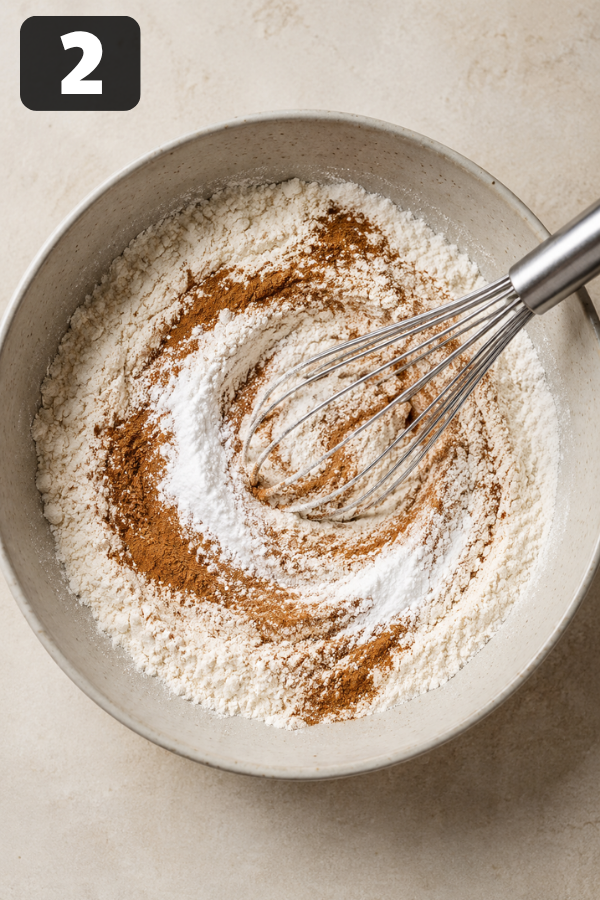
In a medium bowl, whisk together:
- flour
- baking soda
- salt
- cinnamon
This helps distribute the baking soda evenly so you don’t get weird bitter pockets later.
Step 3: Combine the Wet Ingredients
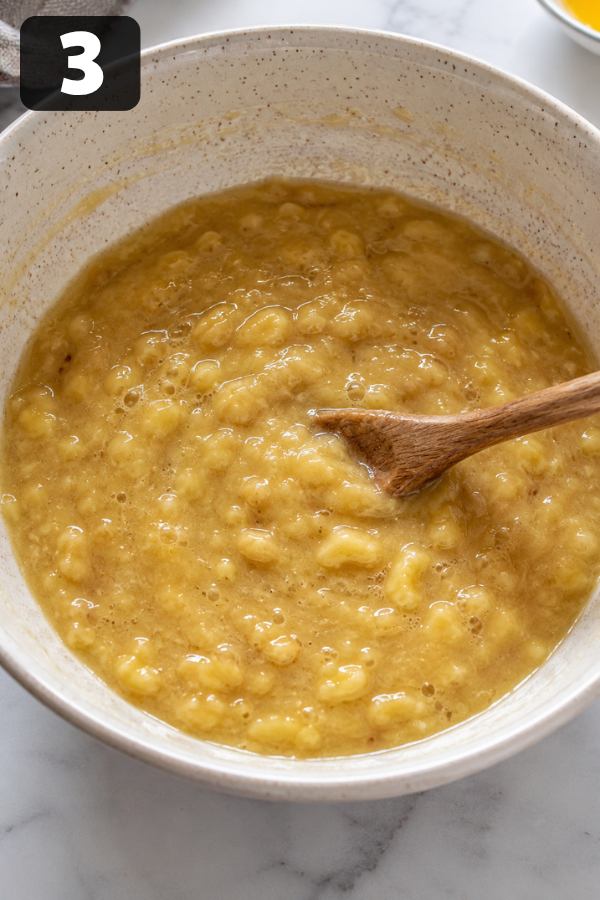
In a larger bowl:
- mash bananas
- whisk in eggs
- add sugar
- pour in oil
- stir in vanilla and buttermilk
The mixture should look slightly thick and creamy with a few banana lumps left behind. Perfectly smooth batter actually isn’t the goal here.
Step 4: Bring Everything Together
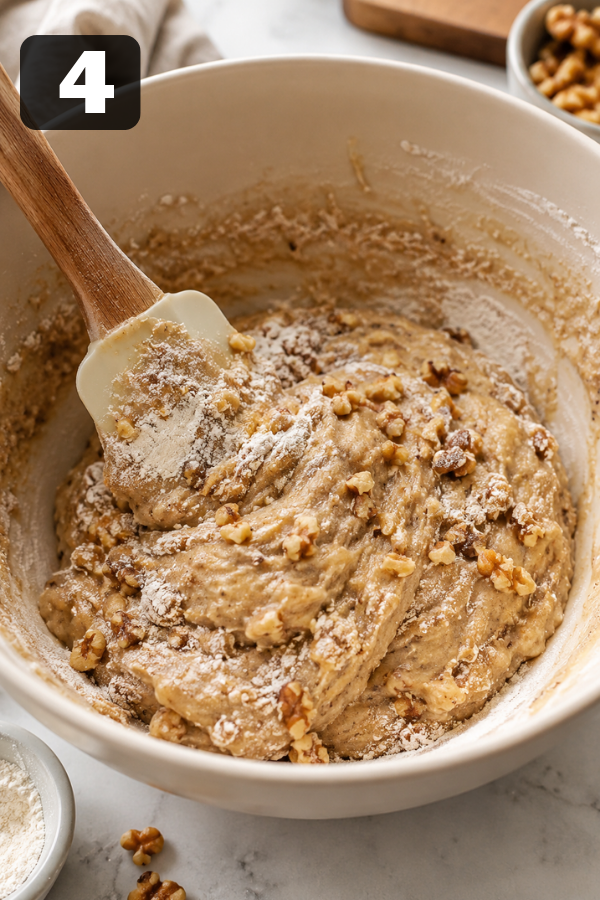
Add the dry ingredients into the wet mixture.
Fold gently with a spatula until just combined.
Then add the walnuts.
Don’t overmix. Really. Banana bread goes from soft to rubbery faster than people think. Once the flour disappears, stop stirring.
A few streaks are fine.
Step 5: Bake Until Golden
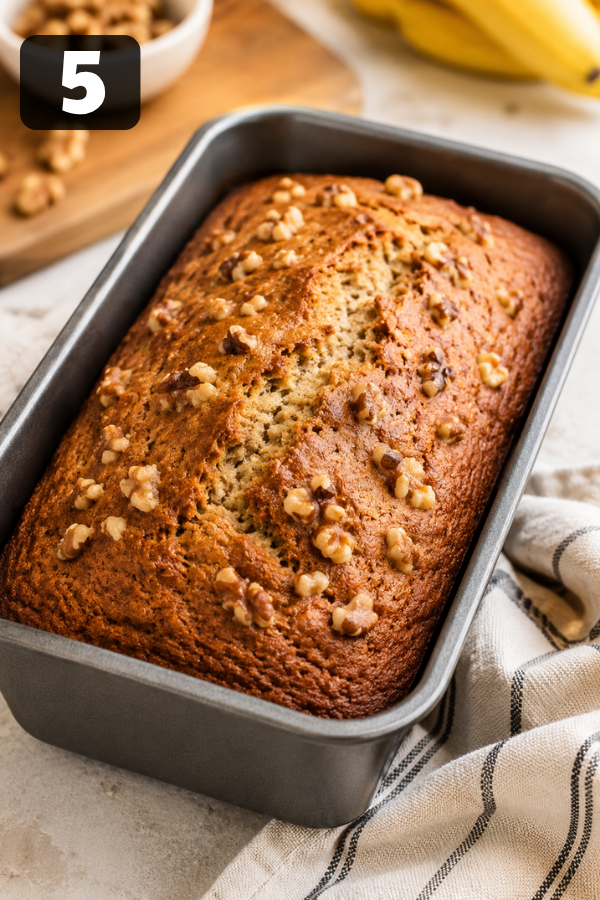
Pour batter into the loaf pan and top with extra walnuts.
Bake for 60–75 minutes.
Around the 55-minute mark, check the center with a toothpick. A few moist crumbs are okay, but wet batter means it needs more time.
If the top browns too quickly, loosely tent foil over it.
Your kitchen will smell incredible at this point. Warm banana, toasted nuts, cinnamon—it’s basically a coffee shop in loaf form.
Step 6: Cool Before Slicing
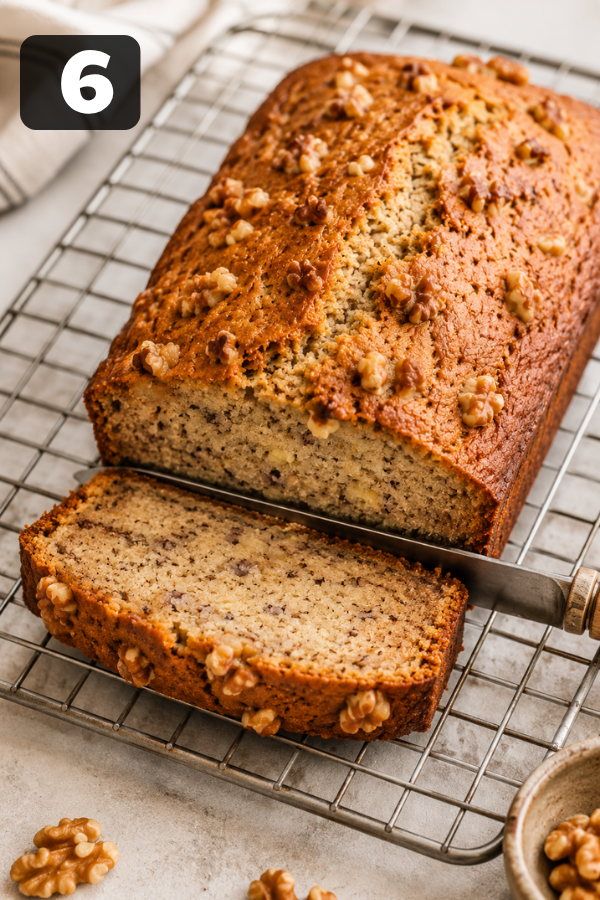
This part tests patience.
Let the loaf cool in the pan for about 15 minutes, then move it to a wire rack.
Cutting too early can make the center gummy. Banana bread keeps setting as it cools.
Oddly enough, it often tastes even better the next morning.
A Few Tips That Make a Big Difference
Measure Flour Carefully
Too much flour creates dry banana bread.
Instead of scooping directly with the measuring cup:
- spoon flour into the cup
- level with a knife
Simple change. Huge difference.
Toast the Walnuts First
Want bakery-level flavor?
Toast walnuts in a dry skillet for 3–4 minutes before adding them to the batter. It deepens the nutty flavor and makes the loaf taste richer without adding extra ingredients.
Tiny step. Big payoff.
Don’t Skip the Buttermilk
It adds tenderness and subtle tanginess.
No buttermilk?
Mix:
- 1/4 cup milk
- 1 teaspoon lemon juice or vinegar
Let sit for 5 minutes.
Done.
Common Banana Bread Problems (And How to Fix Them)
Why Is My Banana Bread Dry?
Usually:
- too much flour
- overbaking
- not enough banana
Try checking the loaf earlier next time. Every oven runs differently, and some bake hotter than they claim.
Why Did the Middle Sink?
That usually means the center wasn’t fully baked.
A dense loaf needs enough time in the oven. Opening the oven door too often can also cause sinking because the temperature drops suddenly.
Why Is the Bread Dense?
Ironically, Starbucks-style banana bread is somewhat dense—but not heavy.
If it feels heavy or gummy:
- batter was likely overmixed
- bananas may have been too wet
- loaf may have cooled improperly
Fun Variations to Try
Chocolate Chip Banana Bread
Add:
- 1/2 cup mini chocolate chips
This version disappears fast in family kitchens.
Healthier Banana Bread
Swap:
- half whole wheat flour
- Greek yogurt instead of some oil
- lower sugar slightly
It won’t taste exactly like Starbucks, but it still turns out moist and satisfying.
Nut-Free Version
Skip walnuts completely or replace them with:
- pumpkin seeds
- sunflower seeds
- oats on top
Still delicious.
Storage and Meal Prep Tips
Room Temperature
Store tightly wrapped for:
- 2–3 days
Refrigerator
Keeps well for:
- about 1 week
Freezer
Wrap slices individually and freeze up to:
- 3 months
Microwave frozen slices for about:
- 20–30 seconds
Perfect for rushed mornings.
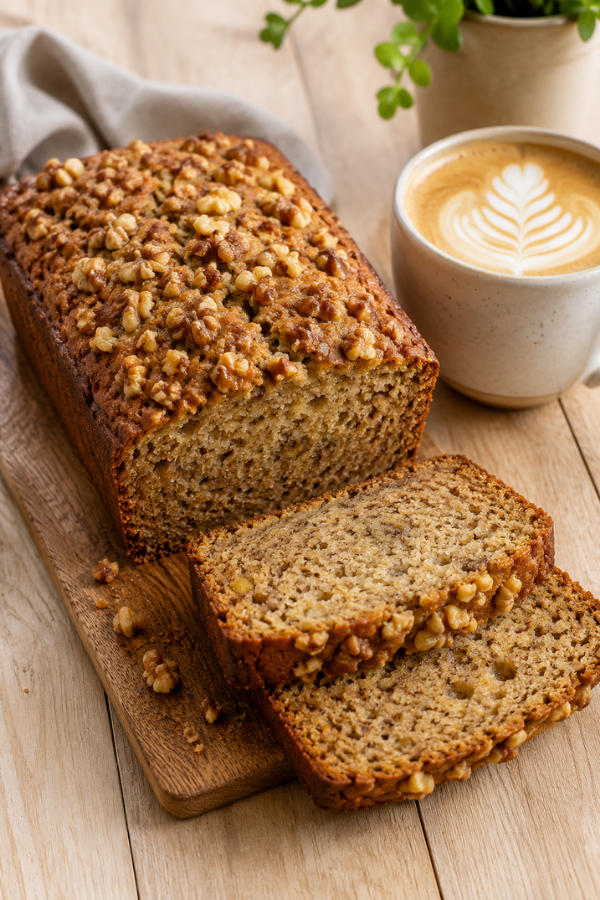
What to Serve With Banana Bread
This loaf works surprisingly well with:
- hot coffee
- cold brew
- chai latte
- vanilla Greek yogurt
- scrambled eggs
- fresh berries
Some people even spread salted butter on warm slices. Sounds simple, but wow—it’s good.
Nutrition Info
- Calories: 320–360
- Protein: 5g
- Carbs: 40g
- Fat: 16g
Values vary depending on walnuts, sugar, and slice size.
FAQs
1. Can I Make This Ahead of Time?
Absolutely. In fact, the flavor improves overnight.
2. Can I Freeze Banana Bread?
Yes. Freeze whole or sliced.
Slices are more convenient for meal prep.
3. Can I Use Frozen Bananas?
Yes. Thaw them first and drain excess liquid if needed.
4. Can I Make Muffins Instead?
You can.
Bake at:
- 425°F for 5 minutes
- then reduce to 350°F until done
Usually about 15–18 minutes total.
5. Why Does Banana Bread Crack on Top?
That crack is normal.
The batter expands while baking, and the top sets first. It’s actually a sign the loaf is baking correctly.
Final Thoughts
There’s a reason this Starbucks Copycat Banana Bread keeps finding its way back into kitchens everywhere. It’s simple, comforting, and reliably good every single time. Whether you’re slicing it for a quick breakfast, pairing it with afternoon coffee, or freezing extra pieces for busy mornings, this homemade loaf brings that cozy coffee shop feeling right to your table—without the extra cost or long line.
Don’t Miss: Cinnamon Roll Banana Bread
Don’t Miss: Maple Glazed Apple Blondies Recipe
Also Try: Low Calorie Frozen Banana Snickers
Ingredients
Method
- Step 1: Prep the Pan and OvenPreheat your oven to 325°F.Grease a 9x5 loaf pan or line it with parchment paper. Parchment makes cleanup easier and helps lift the loaf cleanly later.And honestly, fewer dishes always feels like a win.

- Step 2: Mix the Dry IngredientsIn a medium bowl, whisk together:flourbaking sodasaltcinnamonThis helps distribute the baking soda evenly so you don’t get weird bitter pockets later.
- Step 3: Combine the Wet IngredientsIn a larger bowl:mash bananaswhisk in eggsadd sugarpour in oilstir in vanilla and buttermilkThe mixture should look slightly thick and creamy with a few banana lumps left behind. Perfectly smooth batter actually isn’t the goal here.
- Step 4: Bring Everything TogetherAdd the dry ingredients into the wet mixture.Fold gently with a spatula until just combined.Then add the walnuts.Don’t overmix. Really. Banana bread goes from soft to rubbery faster than people think. Once the flour disappears, stop stirring.A few streaks are fine.
- Step 5: Bake Until GoldenPour batter into the loaf pan and top with extra walnuts.Bake for 60–75 minutes.Around the 55-minute mark, check the center with a toothpick. A few moist crumbs are okay, but wet batter means it needs more time.If the top browns too quickly, loosely tent foil over it.Your kitchen will smell incredible at this point. Warm banana, toasted nuts, cinnamon—it’s basically a coffee shop in loaf form.
- Step 6: Cool Before SlicingThis part tests patience.Let the loaf cool in the pan for about 15 minutes, then move it to a wire rack.Cutting too early can make the center gummy. Banana bread keeps setting as it cools.Oddly enough, it often tastes even better the next morning.


