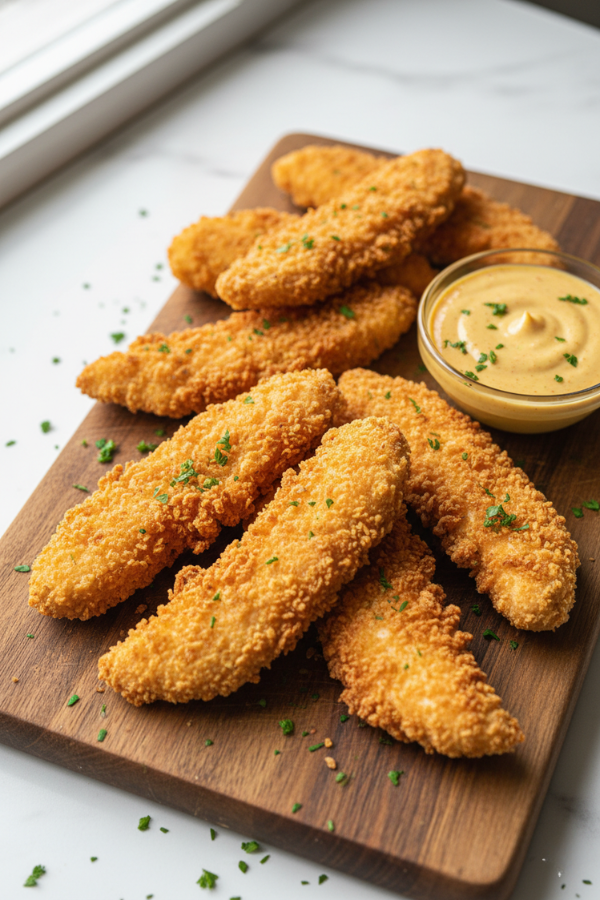
It’s 6 p.m., and you want something that tastes like it came from a restaurant — but without the grease splatter, the messy pot of oil, or the 45-minute wait. That’s exactly why I make these breaded air fryer chicken tenders at least twice a month. They come out with a golden panko crust, juicy chicken inside, and a 20-minute cook time. Best of all, the breading actually stays on this time.
Why These Breaded Air Fryer Chicken Tenders Work So Well
Here’s the thing: most air fryer chicken tender recipes give you a list of ingredients and a timer. They skip the part that actually matters — why the breading sticks, why the oil spray isn’t optional, and why your air fryer model changes the equation.
This recipe fixes all of that. Here’s why it works so well:
- The “press and rest” method locks the coating on. Pressing panko firmly into the chicken — then letting it sit for 10 minutes before cooking — is the difference between a crust that holds and one that slides off in the basket. That rest time lets the coating bond to the surface.
- Panko gives you real, restaurant-level crunch. Regular breadcrumbs pack too tightly and steam instead of crisp. Panko’s airier flakes let hot air move around every piece, which is exactly what an air fryer needs to do its job.
- Oil spray is genuinely non-negotiable. An air fryer isn’t a deep fryer — it needs a little fat to brown the breading. A good, even coat of avocado oil spray is what turns pale panko into that gorgeous golden crust.
- Single-layer cooking means crispy, not soggy. Overcrowding the basket is the number one mistake. Give every tender its own space and the hot air works evenly around all sides.
The Ingredients You’ll Need

The Chicken
- Chicken tenderloins, 1.5 lbs (680g) — The natural shape is perfect. You can also cut chicken breasts into 1-inch strips. In fact, either works great and the cook time is the same.
- Kosher salt and black pepper — Season the chicken itself before breading starts. This is where a lot of flavor gets skipped.
The Breading Station
- All-purpose flour, ½ cup — This is the first layer and also the most important one. Flour creates a dry surface for the egg to cling to. Simply skip it and the whole crust slides off.
- 2 large eggs, beaten with 1 tbsp water — The egg wash is the glue between the flour and the breadcrumbs. Beat until fully combined.
- Panko breadcrumbs, 1½ cups — The star of this recipe. Panko gives you that extra-crunchy, lighter texture that regular breadcrumbs can’t match. Plus, they brown beautifully in an air fryer. I use the Kikkoman panko — consistent flake size, great color every time.
- Garlic powder (1 tsp), onion powder (1 tsp), smoked paprika (1 tsp) — These three form the flavor base of a good seasoned crust. The smoked paprika also adds gorgeous color to the finished tender.
- Dried Italian seasoning, ½ tsp — Adds a subtle herbiness without overpowering the chicken.
- Cayenne pepper, ¼ tsp (optional) — For a little warmth. However, leave it out for kids or anyone who doesn’t love heat.
For Cooking
- Avocado oil spray — Best option for high-heat air frying. Olive oil spray works too. The key is even, light coverage — not drenching.
Step-by-Step Instructions: How to Make Breaded Air Fryer Chicken Tenders
Step 1: Pat the Chicken Completely Dry
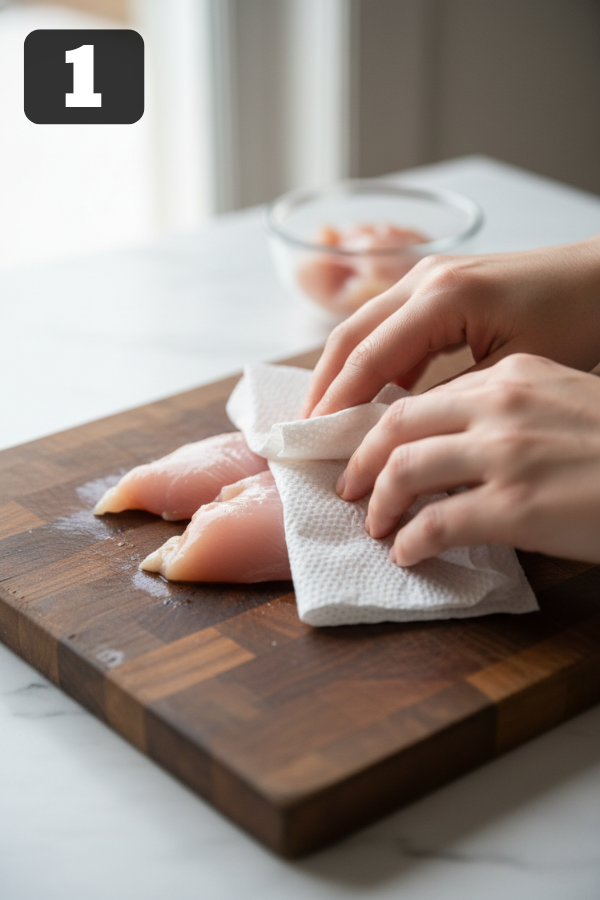
First, pat every piece of chicken dry with paper towels. Then season all over with salt and pepper.
This step matters more than it looks because moisture on the surface prevents the flour from sticking properly. So, take 30 extra seconds here. As a result, you’ll get a crust that holds together through the whole cook.
Step 2: Set Up Your Breading Station
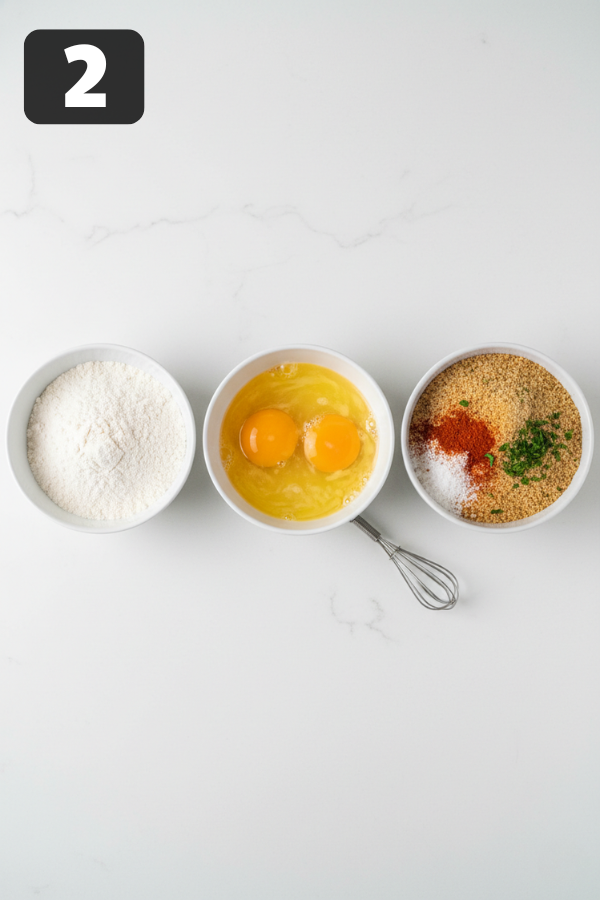
Next, line up three shallow bowls side by side. Bowl one gets the flour, bowl two gets the beaten eggs, and bowl three gets the panko mixed with garlic powder, onion powder, paprika, Italian seasoning, and cayenne.
Mix the spices into the panko before you start breading so every tender gets even seasoning. Also, having everything in order makes the process faster and keeps your hands from getting completely covered in egg.
Step 3: Bread Each Tender
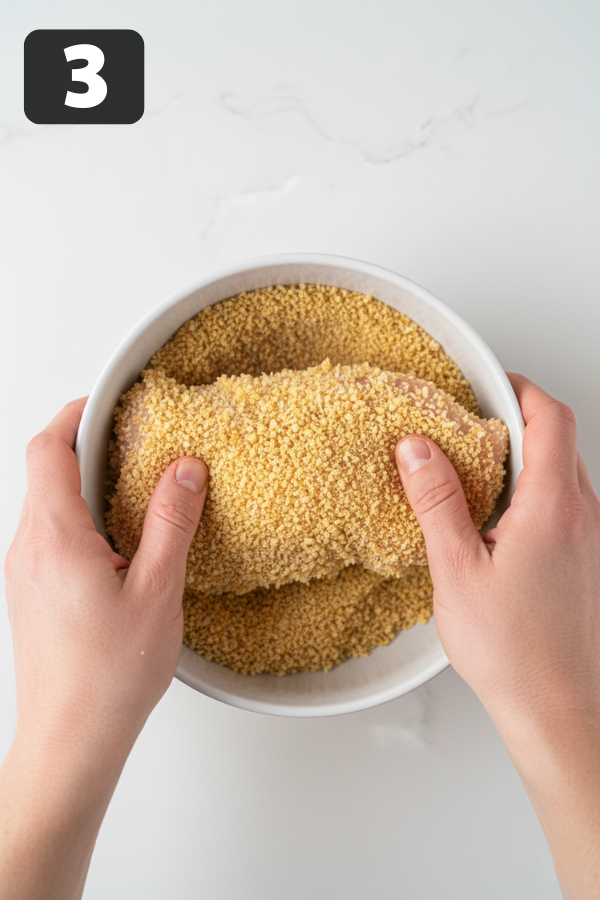
Take one piece of chicken and dredge it in flour first. Coat all sides, then shake off the excess. Next, dip it into the egg wash and let the extra drip off. Finally, press it firmly into the seasoned panko.
Use your fingers to press the crumbs into the surface on all sides. Don’t just roll the chicken around — press it firmly. That pressure helps lock the coating on, and it only takes a few extra seconds per tender.
Step 4: Rest the Breaded Tenders
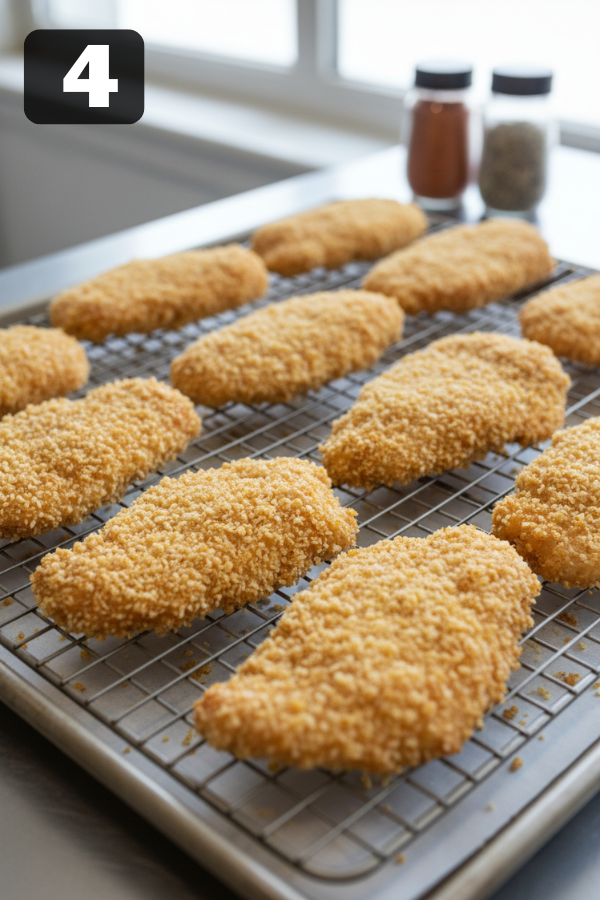
After breading, lay the tenders on a wire rack or plate in a single layer. Then let them rest for 10 minutes at room temperature before cooking.
This is the step almost every recipe skips. However, it is also one of the main reasons the breading stays on. During those 10 minutes, the moisture from the egg helps bind the panko to the flour layer. After that, the coating is set and much less likely to slide off in the basket.
Step 5: Preheat the Air Fryer
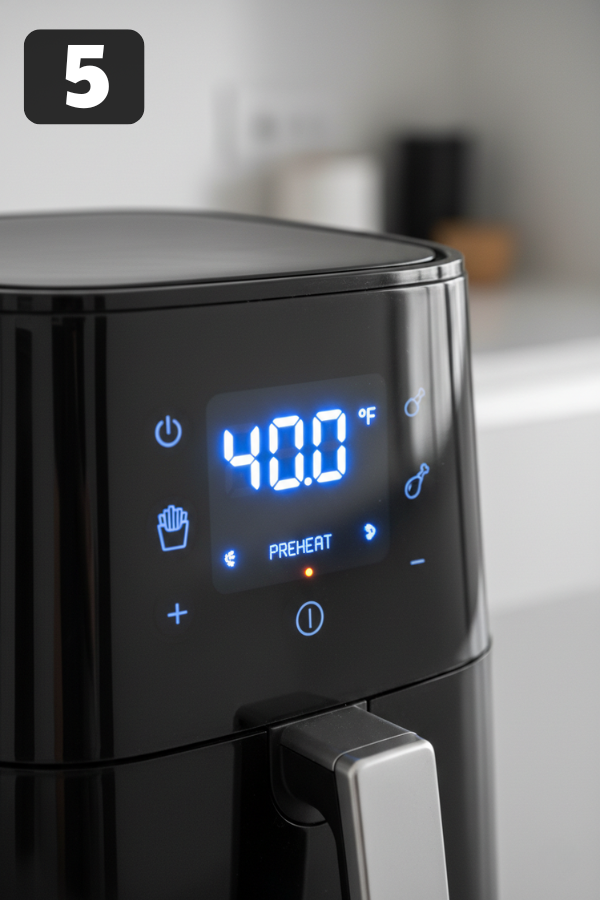
Preheat your air fryer to 400°F (200°C) for 3 to 5 minutes. A cold air fryer gives you pale, uneven results. Because the preheat takes less than 5 minutes, there’s no reason to skip it.
Step 6: Spray and Load the Basket
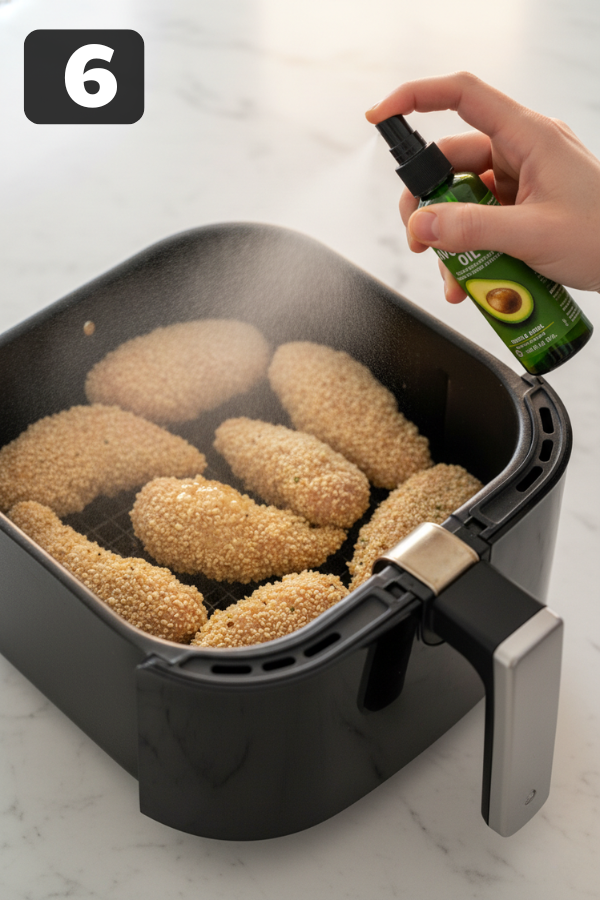
Next, spray the air fryer basket with oil and arrange the tenders in a single layer. Leave space between each piece so hot air can circulate freely. If needed, work in batches instead of stacking or overlapping the chicken.
After that, spray the tops generously with oil. Look at the surface from the side. If you still see dry white spots in the panko, spray again because those spots will not brown well.
Step 7: Air Fry, Flip, and Finish
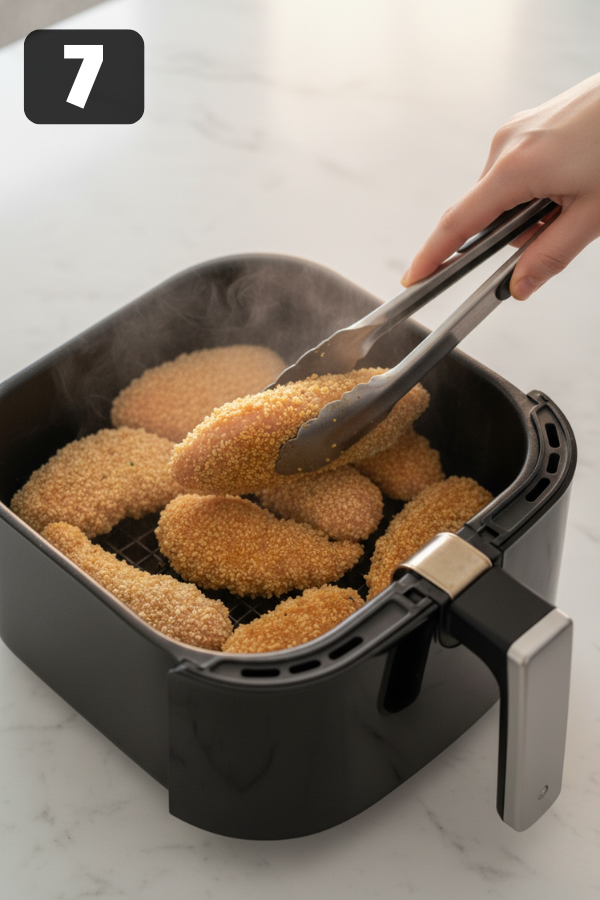
Air fry at 400°F for 10 to 12 minutes total. At the halfway mark — around 5 to 6 minutes — flip each tender and spray the second side with oil. Then continue cooking until the coating is deep golden brown.
For the safest result, use an instant-read thermometer to check the thickest tender. When it reaches 165°F (74°C), the chicken is done. As a result, you will not have to guess or cut one open to check.
Step 8: Rest and Serve
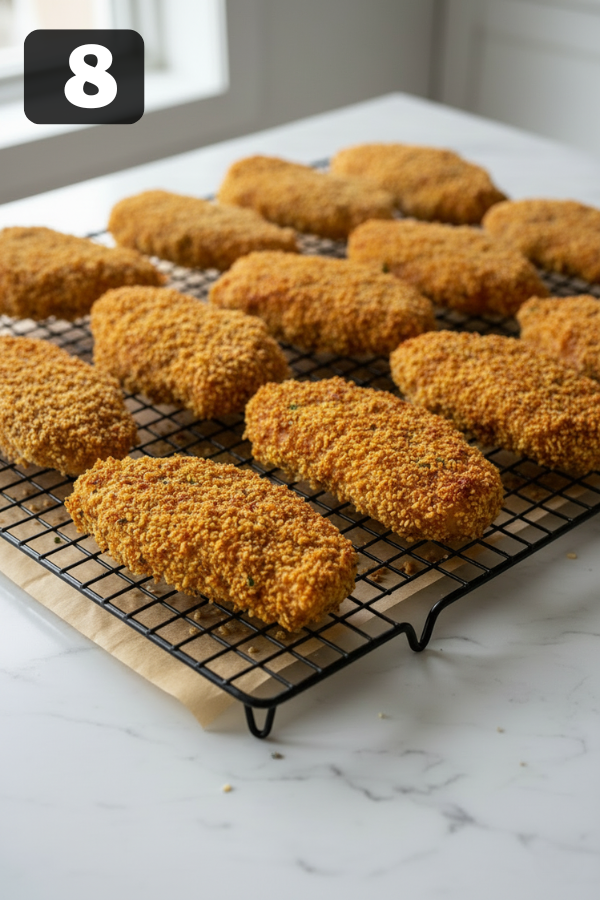
Let the tenders rest on the rack for 2 to 3 minutes before serving. They firm up slightly as they rest, which makes that crust even crunchier. Then pile them onto a plate with your favorite dipping sauce.
Customizing Your Chicken Tenders
Gluten-Free
Replace the all-purpose flour with rice flour or a GF all-purpose blend. Also, use gluten-free panko — several brands work well. Everything else stays the same.
Keto or Low-Carb
Swap the flour for almond flour and replace the panko with a mix of ½ cup almond flour and ½ cup crushed pork rinds. The pork rinds get incredibly crispy in the air fryer — honestly, sometimes better than panko.
High-Protein
Mix 2 tablespoons of unflavored protein powder into the panko mixture. It blends in completely and adds roughly 5g protein per serving.
Extra Flavor (The Parmesan-Panko Upgrade)
Add ¼ cup finely grated Parmesan cheese directly into the panko bowl. It melts slightly during cooking and creates a savory, extra-crunchy crust. Trust me on this one — it’s hard to go back after the first time.
Spicy Buffalo-Style
Double the cayenne to ½ tsp and add ½ tsp of chili powder to the breading. For a full buffalo experience, toss the cooked tenders in buffalo sauce right before serving. These pair perfectly with the sauce from our High-Protein Buffalo Chicken Rice Bowls.
A Few Tiny Secrets for Perfection
- First, cut everything to the same thickness. Otherwise, the thinner pieces may overcook before the thicker ones finish. If needed, pound any thicker pieces lightly with a flat-bottomed glass.
- Also, don’t skip the oil on the second side. Most people flip the tenders and forget this step. However, the second side needs the same oil treatment for even color.
- For better results, let the basket preheat, not just the machine. Some air fryer models take longer to heat the basket itself. So, run the preheat cycle with the empty basket inside instead of leaving it on the counter.
- Next, use a wire rack for resting instead of a plate. Hot tenders on a flat plate can trap steam underneath and soften the bottom crust. By using a wire rack, you keep air moving around them so they stay crispy longer.
- Finally, adjust the temperature for very thick tenders. Reduce the heat to 390°F and add 2 to 3 minutes. Then check the internal temperature before pulling them from the air fryer.
What to Serve With Chicken Tenders
These tenders are perfect for casual weeknight dinners, game-day platters, or picky-eater family nights.
Dipping Sauces
- Our Buttermilk Ranch Dressing — tangy, creamy, and done in 2 minutes
- Honey mustard — 2 tbsp mayo, 1 tbsp Dijon, 1 tbsp honey, squeeze of lemon
- BBQ sauce — the classic, always welcome
- Buffalo sauce — for the heat seekers at the table
Sides That Work
- Easy Crispy Baked Parmesan Zucchini — same crispy energy, lighter side dish
- Simple coleslaw or a green salad for balance
- Broccoli pasta salad on meal-prep nights
For a Bigger Dinner
- One-Pan Chicken with Buttered Noodles alongside for a heartier spread
- Or keep it simple — tenders, sauce, and oven fries. That’s plenty.
Honestly, these are great on their own. Grab a dipping sauce and call it a win.
Storage and Reheating
- Fridge: Store cooled tenders in an airtight container for up to 3 days.
- Reheat: For the best texture, reheat the tenders in the air fryer at 375°F for 5 to 6 minutes. They come back surprisingly close to their original crunch. However, avoid the microwave because it turns the breading soft and sad.
- Freeze after cooking: First, let the tenders cool completely. Then freeze them in a single layer on a baking sheet for 1 hour. After that, transfer them to a zip bag and freeze for up to 2 months. When you’re ready to eat, reheat from frozen in the air fryer at 375°F for 8 to 10 minutes.
- Freeze before cooking: Bread the tenders, then freeze them flat on a tray until solid. Next, transfer them to a zip bag and freeze for up to 3 months. When needed, cook straight from frozen at 400°F for 14 to 16 minutes, flipping halfway. No thawing is needed.
Nutrition Info
These are estimates based on 1 serving (approximately 4 tenders, no dipping sauce included). Actual values vary by brand and chicken size.
| Calories | ~310 kcal |
|---|---|
| Carbohydrates | ~18g |
| Fat | ~9g |
| Protein | ~34g |
| Sugar | ~1g |
| Fiber | ~1g |
| Sodium | ~540mg |
Common Questions and Easy Fixes
1. How long do you cook breaded chicken tenders in an air fryer?
At 400°F in a basket-style air fryer: 10 to 12 minutes total, flipping at 5 to 6 minutes. Oven-style air fryers run slightly cooler, so add 3 to 4 minutes.
2. How do I keep the breading from falling off in the air fryer?
Three things: pat the chicken completely dry first, press the panko firmly into the surface, and let the breaded tenders rest 10 minutes before cooking. All three matter.
3. Can I cook frozen breaded chicken tenders in the air fryer?
Yes — cook straight from frozen at 400°F for 14 to 16 minutes, flipping at the 8-minute mark. No thawing needed.
4. Do I need to flip chicken tenders in the air fryer?
Yes. The bottom of the basket gets less airflow. Flip at the halfway point for even golden color on both sides.
5. Why are my chicken tenders coming out pale?
Two likely culprits: no oil spray before cooking, or a cold air fryer. Preheat first and spray generously — those two steps alone fix it.
6. Can I make these chicken tenders ahead of time?
Yes. Bread them and freeze flat before cooking, or cook a full batch and reheat throughout the week in the air fryer. Both methods work well.
These breaded air fryer chicken tenders earn a permanent spot in your weeknight rotation. Crispy coating, juicy inside, done in 20 minutes — and with the tips above, they’ll come out right every single time.
More Recipes You’ll Love
🔥 Don’t Miss: Buttermilk Ranch Dressing — the perfect dipping sauce for crispy chicken tenders
🔥 Don’t Miss: Crispy and Juicy Air Fryer Pork Tenderloin — same air fryer technique, incredible results
🔥 Don’t Miss: High-Protein Buffalo Chicken Rice Bowls — great pairing or sauce inspiration for spicy fans
🔥 Don’t Miss: One-Pan Chicken with Buttered Noodles — another crowd-pleasing chicken weeknight dinner
🔥 Don’t Miss: Easy Crispy Baked Parmesan Zucchini — crispy side dish that pairs perfectly with tenders
Ingredients
Method
- Pat chicken dry with paper towels. Season all over with salt and pepper. This step is critical - moisture stops the flour from sticking.

- Set up 3 shallow bowls: Bowl 1 with flour, Bowl 2 with beaten eggs, Bowl 3 with panko mixed with garlic powder, onion powder, paprika, Italian seasoning, and cayenne.
- Dredge each tender in flour (shake off excess), dip in egg wash (let excess drip), then press firmly into seasoned panko on all sides. Use your fingers to press the crumbs in.
- Place breaded tenders on a wire rack or plate in a single layer. Rest 10 minutes at room temperature before cooking. This bonds the coating to the chicken.
- Preheat air fryer to 400F (200C) for 3 to 5 minutes with the empty basket inside.
- Spray the air fryer basket with oil. Arrange tenders in a single layer with space between each piece. Spray the tops generously until no dry white spots remain on the panko.
- Air fry at 400F for 10 to 12 minutes. Flip at 5 to 6 minutes and spray the second side with oil. Cook until internal temperature reaches 165F.
- Rest on a wire rack for 2 to 3 minutes. Serve immediately with dipping sauces.